java 集合框架概述
面向对象语言是以对象的形式来对事物进行体现,为了方便对多个对象的操作,就需要对对象进行存储。
在 java 语言中,数组 (Array) 和集合都是对多个数据进行存储操作的结构,简称 java 容器。此时的存储,主要指的是内存层面的存储,不涉及到持久化的存储。
数组在内存存储方面的特点:
- 数组一旦初始化以后,其长度就确定了。
- 数组一旦定义好,其元素的类型也就确定了。
数组在存储数据方面的弊端:
- 数组一旦初始化以后,其长度就不可修改,不便于扩展。
- 数组中提供的属性和方法少,不便于进行添加、删除、插入等操作,且效率不高。
- 数组中没有现成的属性和方法,去直接获取数组中已存储的元素的个数 (只能直接知道数组的长度)。
- 数组存储的数据是有序的、可重复的。对于无序、不可重复的需求,不能满足,即数组存储数据的特点比较单一。
java 集合类可以用于存储数量不等的多个对象,还可用于保存具有映射关系的关联数组。
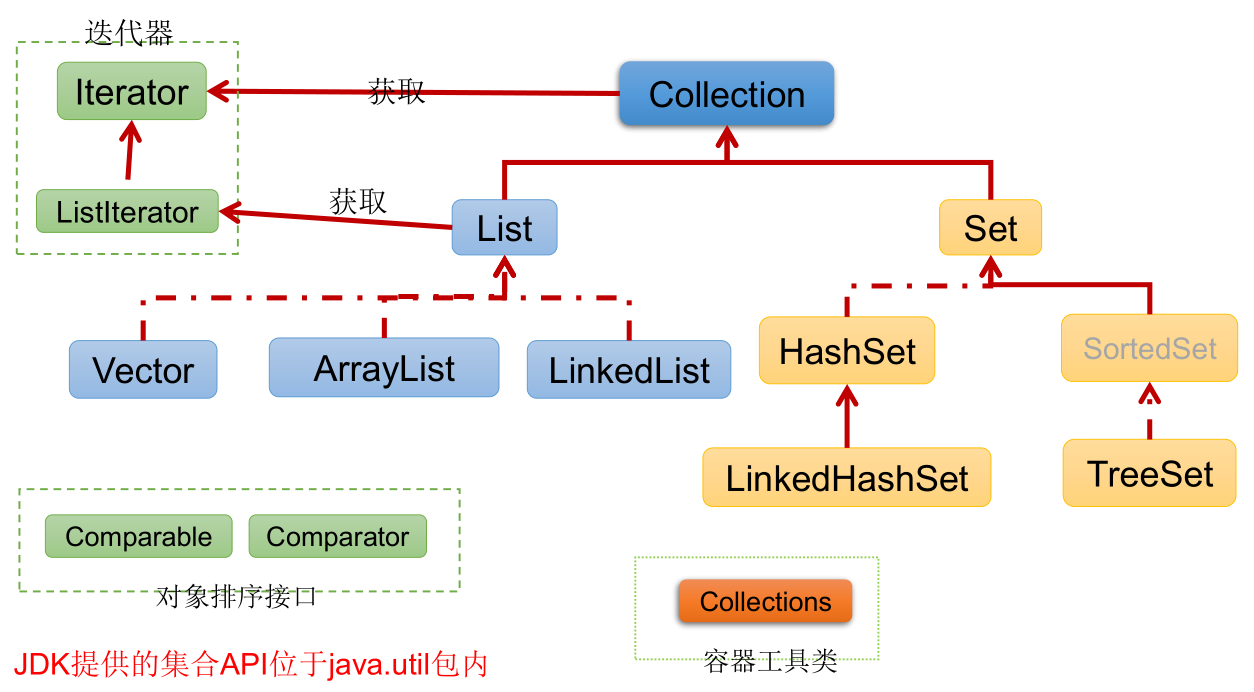
java 集合框架可分为 Collection 和 Map 两种体系:
- Collection 接口 :单列集合,用来存储一个一个的对象CD 。
- List 接口:存储有序的、可重复的数据。—> “动态” 数组
- ArrayList、LinkedList、Vector
- Set 接口:存储无序的、不可重复的数据。—> 高中 “集合”
- HashSet、LinkedHashSet、TreeSet
- List 接口:存储有序的、可重复的数据。—> “动态” 数组
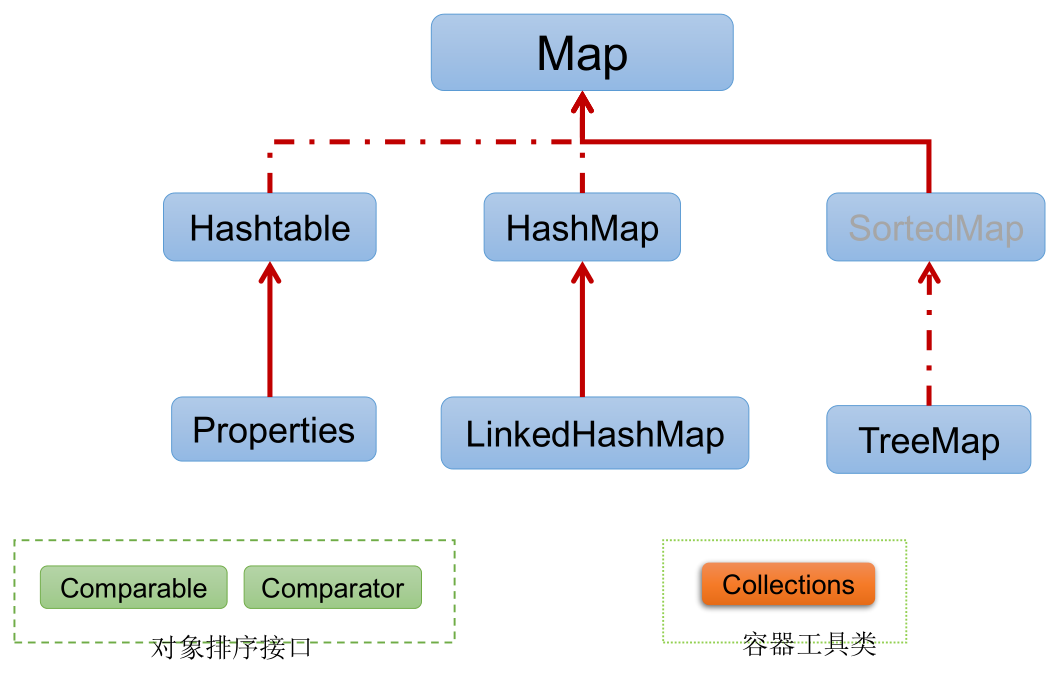
- Map 接口:双列集合,用来存储具有映射关系 “key - value 对” 的数据。—> 高中 “函数”
- HashMap、LinkedHashMap、TreeMap、Hashtable、Properties
- Collection 接口 :单列集合,用来存储一个一个的对象CD 。
Collection 接口继承树:
Map 接口继承树:
Collection 接口
Collection 接口是 List、Set 和 Queue 接口的父接口,该接口里定义的方法既可用于操作 Set 集合,也可用于操作 List 和 Queue 集合。
jdk 不提供此接口的任何直接实现,而是提供更具体的子接口实现,如:Set 和 List。
在 jdk 5.0 之前,java 集合会丢失容器中所有对象的数据类型,把所有对象都当成 Object 类型处理;从 jdk 5.0 增加了泛型以后,java 集合可以记住容器中对象的数据类型。
Collection 接口的方法:
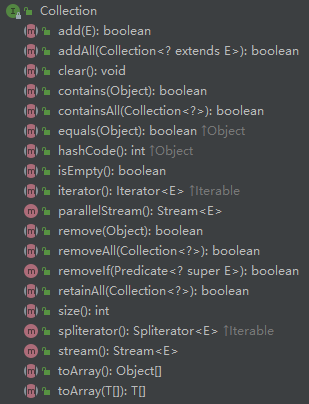
添加元素:
add(Object obj)addAll(Collection coll)
获取有效元素的个数:
int size()
清空集合中的元素:
void clear()
是否是空集合:
boolean isEmpty()
是否包含某个元素:
boolean contains(Object obj):判断当前集合中是否包含 obj,通过 obj 的equals()来判断是否是同一个对象。- 向 Collection 的实现类的对象中添加数据 obj 时,要求 obj 所在的类要重写
equals(),否则调用的是 Object 中的equals(),即 ==。
- 向 Collection 的实现类的对象中添加数据 obj 时,要求 obj 所在的类要重写
boolean containsAll(Collection coll):对两个集合的元素逐个比较,判断 coll 中的所有元素是否都存在于当前集合中,也是通过元素的equals()来比较的。
删除:
boolean remove(Object obj):从当前集合中移除 obj,通过 obj 的equals()判断是否是要删除的那个元素,只会删除找到的第一个元素。boolean removeAll(Collection coll):从当前集合中移除 coll 中的所有元素,即取当前集合的差集。
取两个集合的交集:
boolean retainAll(Collection coll):把交集的结果存在当前集合中,不影响 coll。
集合是否相等:
boolean equals(Object obj):如果返回 true,则 obj 首先得与当前集合类型相同。如果是 List,要求元素个数和顺序一致,如果是 Set,则不考虑顺序。
转成对象数组:
Object[] toArray():将当前集合转换为数组。拓展:将数组转换为集合,
Arrays.asList(),例如:List<String> strings = Arrays.asList(new String[]{"aa", "bb", "cc"});。使用此方法时的注意事项:1
2
3
4
5
6
7
8
9
10
11
12
13
14public class Test {
public static void main(String[] args) {
// toArray():集合转换为数组
Object[] objects = collection.toArray();
System.out.println(Arrays.toString(objects));
// 拓展:数组转换为集合
List<String> strings = Arrays.asList(new String[]{"aa", "bb", "cc"});
List<Person> people = Arrays.asList(new Person(), new Person());
List<int[]> ints = Arrays.asList(new int[]{1, 2, 3});
System.out.println(ints.size());// 1,含有一个int[]数组的集合
List<Integer> integers = Arrays.asList(1, 2, 3);
System.out.println(integers.size());// 3,含有三个Integer元素的集合
}
}
获取集合对象的哈希值:
hashCode()
遍历:
iterator():返回 Iterator 接口的实例,即迭代器对象,用于遍历集合的元素。
实例:
1
2
3
4
5
6
7
8
9
10
11
12
13
14
15
16
17
18
19
20
21
22
23
24
25
26
27
28
29
30
31
32
33
34
35
36
37
38
39
40
41
42
43
44
45
46
47
48
49
50
51
52
53
54
55
56
57
58
59
60
61
62
63
64
65
66
67
68
69
70
71
72
73
74
75
76
77
78
79
80
81
82
83
84
85
86
87
88
89
90
91
92
93
94
95
96
97
98
99
100
101
102
103
104
105
106
107
108
109
110
111
112
113
114
115
116
117
118
119
120
121
122
123
124
125
126
127
128public class Test {
public static void main(String[] args) {
Collection<Object> collection = new ArrayList<>();
// add(Object obj):将元素obj添加到集合collection中
collection.add("AA");
collection.add("bb");
collection.add(123);// 自动装箱
collection.add(new Date());
// size():获取添加的元素的个数
System.out.println(collection.size());// 4
// addAll(Collection c):将c集合中的元素添加到当前的集合中
Collection<Object> collection2 = new ArrayList<>();
collection2.add(456);
collection2.add("CC");
collection.addAll(collection2);
System.out.println(collection2.size());
// clear():清空集合中的元素
collection.clear();
// isEmpty():判断当前集合是否为空
System.out.println(collection.isEmpty());// true
// contains(Object obj):判断当前集合是否包含obj
collection.add(new String("Tom"));
System.out.println(collection.contains(new String("Tom")));// true,比较的是内容
collection.add(new Person("Jerry", 20));
// true,如果Person未重写equals(),调用的是Object的方法,即==,返回false
System.out.println(collection.contains(new Person("Jerry", 20)));
// containsAll(Collection coll):判断coll中的所有元素是否都存在于当前集合中
collection.add(123);
collection.add("bb");
System.out.println(collection.containsAll(Arrays.asList(123, "bb", new Person("Jerry", 20))));// true
// remove(Object obj):从当前集合中移除obj
System.out.println(collection.remove(new Person("Jerry", 20)));// true
System.out.println(collection);// [Tom, 123, bb]
// removeAll(Collection coll):从当前集合中移除coll中的所有元素
System.out.println(collection.removeAll(Arrays.asList("bb", "BB")));// true,移除了一个bb
System.out.println(collection);// [Tom, 123, bb]
// retainAll(Collection coll):获取当前集合与coll的交集,并返回给当前集合
System.out.println(collection.retainAll(Arrays.asList(123, new Person("Jerry", 20), "BB")));// true
System.out.println(collection);// [123]
// equals(Object obj):
collection.add("BB");
System.out.println(collection);// [123, BB]
System.out.println(collection.equals(Arrays.asList(123, "BB")));// true
// false,因为collection是List,元素是有序的
System.out.println(collection.equals(Arrays.asList("BB", 123)));
// hashCode():返回当前集合的哈希值
System.out.println(collection.hashCode());
// toArray():集合转换为数组
Object[] objects = collection.toArray();
System.out.println(Arrays.toString(objects));
// 拓展:数组转换为集合
List<String> strings = Arrays.asList(new String[]{"aa", "bb", "cc"});
List<Person> people = Arrays.asList(new Person(), new Person());
List<int[]> ints = Arrays.asList(new int[]{1, 2, 3});
System.out.println(ints.size());// 1,含有一个int[]数组的集合
List<Integer> integers = Arrays.asList(1, 2, 3);
System.out.println(integers.size());// 3,含有三个Integer元素的集合
}
}
class Person {
private String name;
private int age;
public Person() {
}
public Person(String name, int age) {
this.name = name;
this.age = age;
}
public String getName() {
return name;
}
public void setName(String name) {
this.name = name;
}
public int getAge() {
return age;
}
public void setAge(int age) {
this.age = age;
}
public boolean equals(Object o) {
if (this == o) {
return true;
}
if (o == null || getClass() != o.getClass()) {
return false;
}
Person person = (Person) o;
return age == person.age &&
Objects.equals(name, person.name);
}
public int hashCode() {
return Objects.hash(name, age);
}
public String toString() {
return "Person{" +
"name='" + name + '\'' +
", age=" + age +
'}';
}
}
Iterator 迭代器接口
Iterator对象称为迭代器 (设计模式的一种),主要用于遍历 Collection 集合中的元素。
GOF 给迭代器模式的定义为:提供一种方法访问一个容器 (container) 对象中各个元素,而又不需暴露该对象的内部细节。迭代器模式,就是为容器而生。
Collection 接口继承了
java.lang.Iterable接口,该接口有一个iterator(),所有实现了 Collection 接口的集合类都有一个iterator(),用以返回一个实现了 Iterator 接口的类的对象。Iterator 仅用于遍历集合,Iterator 本身并不提供承装对象的能力。如果需要创建 Iterator 对象,则必须有一个被迭代的集合。(不适用于 Map)
集合对象每次调用
iterator()都得到一个全新的迭代器对象,默认游标都在集合的第一个元素之前。Iterator 接口的方法:
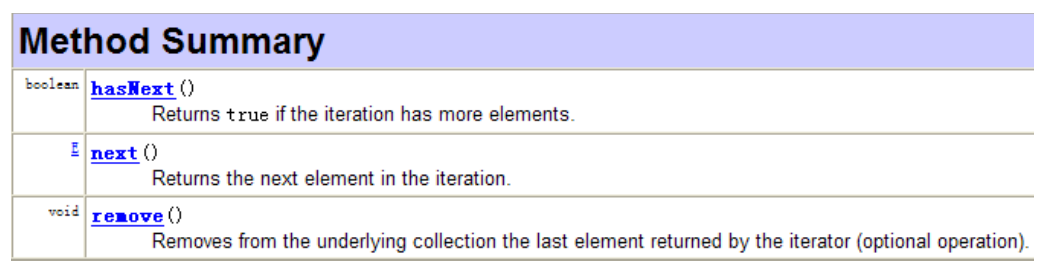
迭代器的执行原理:

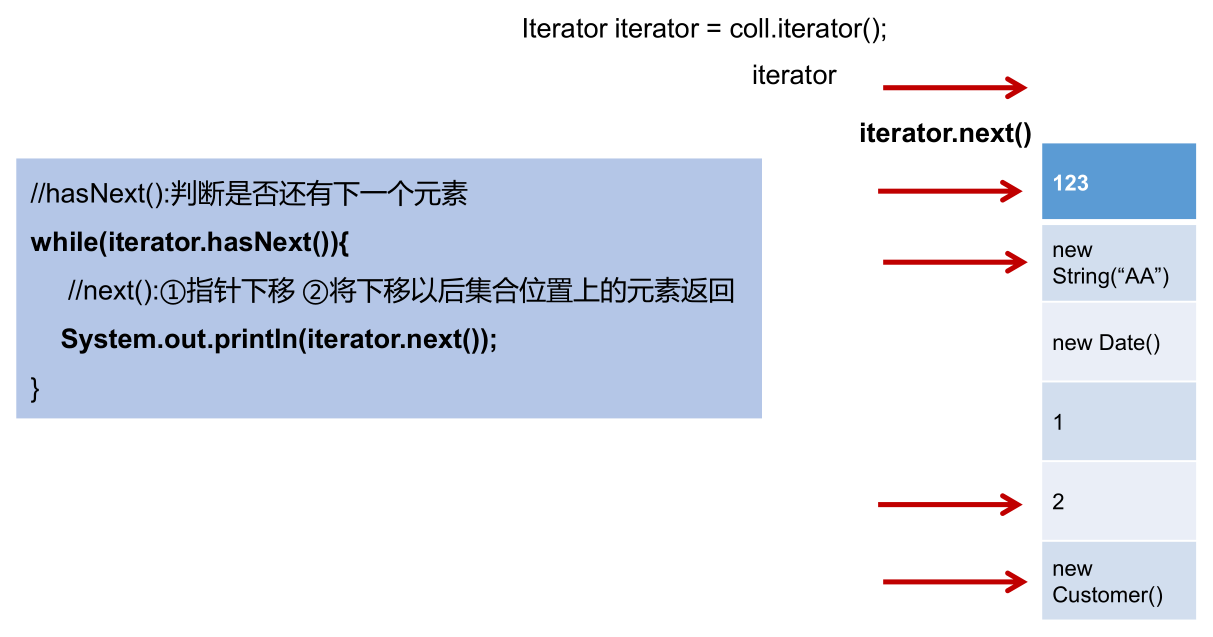
在调用
it.next()之前必须要调用it.hasNext()进行检测。若不调用,且下一条记录无效,直接调用it.next()会抛出 NoSuchElementException 异常。Iterator 接口的
remove():Iterator 可以删除集合的元素,但是是在遍历过程中通过迭代器对象的
remove()删除的,不是集合对象的remove()。如果还未调用
next(),或在上一次调用next()之后已经调用了remove(),则再次调用remove()都会抛出 IllegalStateException 异常。实例:
1
2
3
4
5
6
7
8
9
10
11
12
13
14
15
16
17
18
19
20
21
22
23
24
25
26
public class Test {
public static void main(String[] args) {
Collection<Object> collection = new ArrayList<>();
collection.add(123);
collection.add(456);
collection.add(new String("Tom"));
collection.add(false);
Iterator<Object> iterator = collection.iterator();
while (iterator.hasNext()) {
// iterator.remove();// 游标处于集合的第一个元素之前,java.lang.IllegalStateException
Object obj = iterator.next();
if ("Tom".equals(obj)) {// Tom放在前面,可以防止obj为null时触发空指针异常
iterator.remove();
// iterator.remove();// 游标所处位置的元素已经被remove,在该位置再次调用remove发生异常,java.lang.IllegalStateException
}
}
// 遍历集合
iterator = collection.iterator();// 重新获取collection的迭代器对象,不能使用原来的,因为其游标已经移到集合末尾了
while (iterator.hasNext()) {
System.out.println(iterator.next());
}
}
}
实例:
1
2
3
4
5
6
7
8
9
10
11
12
13
14
15
16
17
public class Test {
public static void main(String[] args) {
Collection<Object> collection = new ArrayList<>();
collection.add(123);
collection.add(456);
collection.add(new String("Tom"));
collection.add(false);
Iterator<Object> iterator = collection.iterator();
// 遍历
// hasNext():判断是否还有下一个元素
while (iterator.hasNext()) {
// next():1.指针下移;2.将下移以后集合位置上的元素返回
System.out.println(iterator.next());
}
}
}错误写法:
1
2
3
4
5
6
7
8
9
10
11
12
13
14
15
16
17
18
19
20
21
public class Test {
public static void main(String[] args) {
Collection<Object> collection = new ArrayList<>();
collection.add(123);
collection.add(456);
collection.add(new String("Tom"));
collection.add(false);
Iterator<Object> iterator = collection.iterator();
// 错误写法一:间隔的输出集合中的元素,也会出现java.util.NoSuchElementException异常
while (iterator.next()!=null){// 游标下移一次
System.out.println(iterator.next());// 游标下移两次
}
// 错误写法二:死循环
while (collection.iterator().hasNext()) {
System.out.println(collection.iterator().hasNext());
}
}
}补充:
Enumeration 接口是 Iterator 迭代器的古老版本。

1
2
3
4
5
6
7
8
9
public class Test {
public static void main(String[] args) {
Enumeration stringEnum = new StringTokenizer("a-b*c-d-e-g", "-");
while (stringEnum.hasMoreElements()) {
Object obj = stringEnum.nextElement();
System.out.println(obj);
}
}
}
foreach 循环
jdk 5.0 提供了 foreach 循环迭代访问 Collection 和数组。格式如下:
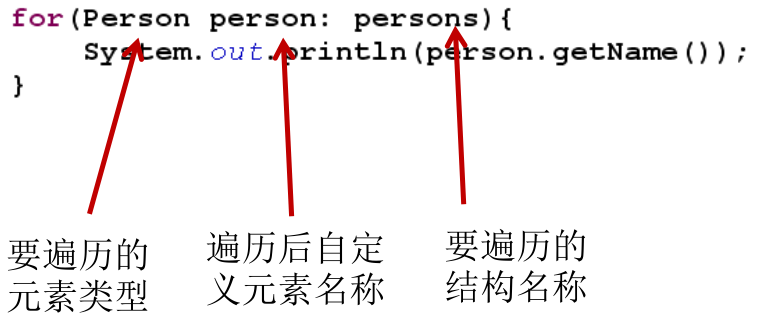
foreach 对 Collection 或数组的遍历操作,不需获取 Collection 和数组的长度,无需使用索引访问元素。
foreach 遍历 Collection 时,其底层仍然是调用 Iterator 来完成操作。
实例:
1
2
3
4
5
6
7
8
9
10
11
12
13
14
15
16
17
18
19
20
public class Test {
public static void main(String[] args) {
Collection<Object> collection = new ArrayList<>();
collection.add(123);
collection.add(456);
collection.add(new String("Tom"));
collection.add(false);
// 遍历集合:for (集合元素的类型 局部变量 : 集合对象),底层仍然调用了迭代器
for (Object obj : collection) {
System.out.println(obj);
}
int[] arr = new int[]{1, 2, 3, 4, 5, 6};
// 遍历数组:for(数组元素的类型 局部变量 : 数组对象)
for (int i : arr) {
System.out.println(i);
}
}
}foreach 的使用注意事项:
1
2
3
4
5
6
7
8
9
10
11
12
13
14
15
16
17
18
19
20
21
22
23
24
public class Test {
public static void main(String[] args) {
String[] arr = new String[]{"MM", "MM", "MM"};
// 方式一:普通for赋值
for (int i = 0; i < arr.length; i++) {
arr[i] = "GG";// 能够赋值
}
for (int i = 0; i < arr.length; i++) {
System.out.print(arr[i] + " ");// GG GG GG
}
System.out.println();
arr = new String[]{"MM", "MM", "MM"};
// 方式二:增强for循环
for (String s : arr) {
s = "GG";// 不能赋值,因为s是一个局部变量,foreach循环将arr数组的当前值赋给了s,然后循环中s被重新赋值为GG,不会影响到arr数组中的值
}
for (int i = 0; i < arr.length; i++) {
System.out.print(arr[i] + " ");// MM MM MM
}
}
}
List 接口
鉴于 java 中数组用来存储数据的局限性,我们通常使用 List 替代数组。
List 集合类中元素有序、且可重复,集合中的每个元素都有其对应的顺序索引。
List 容器中的元素都对应一个整数型的序号记载其在容器中的位置,可以根据序号存取容器中的元素。
JDK API 中 List 接口的实现类常用的有:ArrayList、LinkedList 和 Vector。
List 常用方法:
List 除了从 Collection 集合继承的方法外,还添加了一些根据索引来操作集合元素的方法。
void add(int index, Object ele):在 index 位置插入ele 元素。boolean addAll(int index, Collection eles):从 index 位置开始将 eles 中的所有元素添加进来。Object get(int index):获取指定 index 位置的元素。int indexOf(Object obj):返回 obj 在集合中首次出现的位置。int lastIndexOf(Object obj):返回 obj 在当前集合中末次出现的位置。Object remove(int index):移除指定 index 位置的元素,并返回此元素,区别于 Collection 接口中的remove(Object obj)。1
2
3
4
5
6
7
8
9
10
11
12
13
14
15public class Test {
private static void updateList(List list) {
list.remove(2);// 删除索引2
// list.remove(new Integer(2));// 删除对象2
}
public static void main(String[] args) {
List list = new ArrayList();
list.add(1);
list.add(2);
list.add(3);
updateList(list);
System.out.println(list);// [1, 2]
}
}Object set(int index, Object ele):设置指定 index 位置的元素为 ele。List subList(int fromIndex, int toIndex):返回当前集合从 fromIndex 到 toIndex 位置的子集合,前包后不包,当前集合不发生改变。总结:
增:
add(Object obj)删:
remove(int index)/remove(Object obj)改:
set(int index, Object ele)查:
get(int index)插:
add(int index, Object ele)长度:
size()遍历:① Iterator 迭代器方式;② 增强 for 循环;③ 普通的循环。
1
2
3
4
5
6
7
8
9
10
11
12
13
14
15
16
17
18
19
20
21
22
23
24
25
26
27
28public class Test {
public static void main(String[] args) {
ArrayList<Object> list = new ArrayList();
list.add(123);
list.add(456);
list.add("AA");
// 方式一:Iterator迭代器方式
Iterator<Object> iterator = list.iterator();
while (iterator.hasNext()) {
System.out.println(iterator.next());
}
System.out.println("***************");
// 方式二:增强for循环
for (Object obj : list) {
System.out.println(obj);
}
System.out.println("***************");
// 方式三:普通for循环
for (int i = 0; i < list.size(); i++) {
System.out.println(list.get(i));
}
}
}
实例:
1
2
3
4
5
6
7
8
9
10
11
12
13
14
15
16
17
18
19
20
21
22
23
24
25
26
27
28
29
30
31
32
33
34
35
36
37
38
39
40
41
42
43
44
45public class Test {
public static void main(String[] args) {
ArrayList<Object> list = new ArrayList();
list.add(123);
list.add(456);
list.add("AA");
list.add(456);
System.out.println(list);// [123, 456, AA, 456]
// void add(int index, Object ele): 在index位置插入ele元素
list.add(1, "BB");
System.out.println(list);// [123, BB, 456, AA, 456]
// boolean addAll(int index, Collection eles): 从index位置开始将eles中的所有元素添加进来
List<Integer> list1 = Arrays.asList(1, 2, 3);
list.addAll(list1);
// list.add(list1);// 这是把list1当作一个元素添加到list中
System.out.println(list);// [123, BB, 456, AA, 456, 1, 2, 3]
// Object get(int index): 获取指定index位置的元素
System.out.println(list.get(0));// 123
// int indexOf(Object obj): 返回obj在集合中首次出现的位置。如果不存在,返回-1。
int index = list.indexOf(4567);
System.out.println(index);// -1
// int lastIndexOf(Object obj): 返回obj在当前集合中末次出现的位置。如果不存在,返回-1。
System.out.println(list.lastIndexOf(456));// 4
// Object remove(int index): 移除指定index位置的元素,并返回此元素
Object obj = list.remove(0);
System.out.println(obj);// 123
System.out.println(list);// [BB, 456, AA, 456, 1, 2, 3]
// Object set(int index, Object ele): 设置指定index位置的元素为ele
list.set(1, "CC");
System.out.println(list);// [BB, CC, AA, 456, 1, 2, 3]
// List subList(int fromIndex, int toIndex): 返回从fromIndex到toIndex位置的左闭右开区间的子集合
List<Object> subList = list.subList(2, 4);
System.out.println(subList);// [AA, 456]
System.out.println(list);// [BB, CC, AA, 456, 1, 2, 3]
}
}
ArrayList
ArrayList 是 List 接口的典型实现类、主要实现类。
本质上,ArrayList 是对象引用的一个 “变长” 数组。
ArrayList 的 JDK 1.8 之前与之后的实现区别?
- JDK 1.7:ArrayList 类似于饿汉式,初始化时直接创建一个初始容量为 10 的数组。
- JDK 1.8:ArrayList 类似于懒汉式,初始化时创建一个长度为 0 的数组,当添加第一个元素时再创建一个初始容量为 10 的数组。
Arrays.asList(…)返回的 List 集合,既不是 ArrayList 实例,也不是 Vector 实例。Arrays.asList(…)返回值是一个固定长度的 List 集合。源码分析:
JDK 7.0:
ArrayList list = new ArrayList();,初始化时,底层创建了长度是 10 的 Object[] 数组 elementData。1
2
3
4
5/**
* The array buffer into which the elements of the ArrayList are stored.
* The capacity of the ArrayList is the length of this array buffer.
*/
private transient Object[] elementData;1
2
3
4
5
6/**
* Constructs an empty list with an initial capacity of ten.
*/
public ArrayList() {
this(10);// 初始化时,数组长度为10
}1
2
3
4
5
6
7
8
9
10
11
12
13
14/**
* Constructs an empty list with the specified initial capacity.
*
* @param initialCapacity the initial capacity of the list
* @throws IllegalArgumentException if the specified initial capacity
* is negative
*/
public ArrayList(int initialCapacity) {// 也可以直接指定ArrayList的容量
super();
if (initialCapacity < 0)
throw new IllegalArgumentException("Illegal Capacity: "+
initialCapacity);
this.elementData = new Object[initialCapacity];
}list.add(123);,等同于elementData[0] = new Integer(123);。list.add(11);,每次添加数据前,会验证数组容量,如果此次的添加导致底层 elementData 数组容量不够,则扩容。1
2
3
4
5
6
7
8
9
10
11
12/**
* Appends the specified element to the end of this list.
*
* @param e element to be appended to this list
* @return <tt>true</tt> (as specified by {@link Collection#add})
*/
public boolean add(E e) {
// add()添加元素之前,先验证数组容量,size即为已添加的元素的数量
ensureCapacityInternal(size + 1); // Increments modCount!!
elementData[size++] = e;// 添加元素到数组的size+1的位置
return true;
}1
2
3
4
5
6private void ensureCapacityInternal(int minCapacity) {
modCount++;
// overflow-conscious code
if (minCapacity - elementData.length > 0)// 如果添加的元素的总数,已经超过了数组的长度,则进行扩容操作
grow(minCapacity);
}默认情况下,扩容为原来的容量的 1.5 倍,同时需要将原有数组中的数据复制到新的数组中。
1
2
3
4
5
6
7
8
9
10
11
12
13
14
15
16
17/**
* Increases the capacity to ensure that it can hold at least the
* number of elements specified by the minimum capacity argument.
*
* @param minCapacity the desired minimum capacity
*/
private void grow(int minCapacity) {
// overflow-conscious code
int oldCapacity = elementData.length;
int newCapacity = oldCapacity + (oldCapacity >> 1);// 扩容后的新数组,其长度为原数组长度的1.5倍
if (newCapacity - minCapacity < 0)
newCapacity = minCapacity;
if (newCapacity - MAX_ARRAY_SIZE > 0)
newCapacity = hugeCapacity(minCapacity);
// minCapacity is usually close to size, so this is a win:
elementData = Arrays.copyOf(elementData, newCapacity);// 将原数组中的元素,复制到新数组中
}结论:建议开发中使用带参的构造器:
ArrayList list = new ArrayList(int capacity);,按需求在初始化时就指定 ArrayList 的容量,以尽可能的避免扩容。
JDK 8.0:
ArrayList list = new ArrayList();,底层 Object[] 数组 elementData 初始化为 {} (长度为 0 的空数组),并没有创建长度为 10 的数组。1
2
3
4
5
6
7/**
* The array buffer into which the elements of the ArrayList are stored.
* The capacity of the ArrayList is the length of this array buffer. Any
* empty ArrayList with elementData == DEFAULTCAPACITY_EMPTY_ELEMENTDATA
* will be expanded to DEFAULT_CAPACITY when the first element is added.
*/
transient Object[] elementData; // non-private to simplify nested class access1
2
3
4
5
6/**
* Shared empty array instance used for default sized empty instances. We
* distinguish this from EMPTY_ELEMENTDATA to know how much to inflate when
* first element is added.
*/
private static final Object[] DEFAULTCAPACITY_EMPTY_ELEMENTDATA = {};1
2
3
4
5
6/**
* Constructs an empty list with an initial capacity of ten.
*/
public ArrayList() {
this.elementData = DEFAULTCAPACITY_EMPTY_ELEMENTDATA;// 初始化时,没有创建长度为10的数组
}list.add(123);,第一次调用add()时,底层才创建了长度为 10 的数组,并将数据 123 添加到 elementData[0]。1
2
3
4
5
6
7
8
9
10
11
12/**
* Appends the specified element to the end of this list.
*
* @param e element to be appended to this list
* @return <tt>true</tt> (as specified by {@link Collection#add})
*/
public boolean add(E e) {
// 第一次添加元素,size=0,先初始化数组
ensureCapacityInternal(size + 1); // Increments modCount!!
elementData[size++] = e;// 添加元素到数组的size+1的位置
return true;
}1
2
3private void ensureCapacityInternal(int minCapacity) {
ensureExplicitCapacity(calculateCapacity(elementData, minCapacity));// 得到数组的长度
}1
2
3
4
5
6
7private static int calculateCapacity(Object[] elementData, int minCapacity) {
if (elementData == DEFAULTCAPACITY_EMPTY_ELEMENTDATA) {
// 第一次添加元素,elementData为{},返回数组长度为DEFAULT_CAPACITY,即10
return Math.max(DEFAULT_CAPACITY, minCapacity);
}
return minCapacity;// 不是第一次添加元素,elementData不为{},直接返回下一个添加元素的数目
}1
2
3
4
5
6
7private void ensureExplicitCapacity(int minCapacity) {
modCount++;
// overflow-conscious code
if (minCapacity - elementData.length > 0)// 如果添加的元素的总数,已经超过了数组的长度,则进行扩容操作
grow(minCapacity);
}后续的添加和扩容操作与 JDK 7.0 无异。
小结:
- JDK 7.0 中的 ArrayList 的对象的创建,类似于单例的饿汉式,初始化时直接创建一个初始容量为 10 的数组。
- JDK 8.0 中的 ArrayList 的对象的创建,类似于单例的懒汉式,延迟了数组的创建,节省内存。
- 添加数据时,如果底层的数组需要扩容,均扩容为原来的容量的 1.5 倍,同时将原有数组中的数据复制到新的数组中。
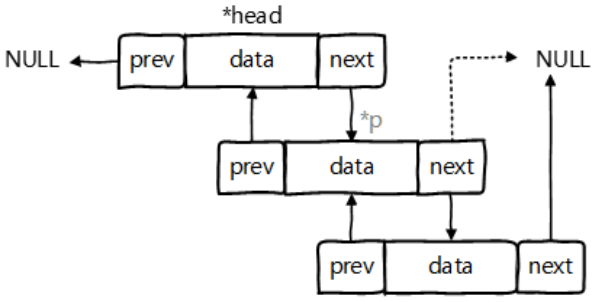
LinkedList
双向链表,内部定义了内部类 Node,作为 LinkedList 中保存数据的基本结构。LinkedList 内部没有声明数组,而是定义了 Node 类型的 first 和 last,用于记录首末元素。
对于频繁的插入或删除元素的操作,建议使用 LinkedList 类,效率较高。
新增方法:
void addFirst(Object obj)void addLast(Object obj)Object getFirst()Object getLast()Object removeFirst()Object removeLast()
源码分析:
LinkedList list = new LinkedList();,内部声明了 Node 类型的 first 和 last 属性,默认值为 null。1
2/**
* Pointer to first node.- Invariant: (first == null && last == null) ||
(first.prev == null && first.item != null)- /
transient Nodefirst;
/**
Pointer to last node.
Invariant: (first == null && last == null) ||
(last.next == null && last.item != null)*/
transient Node
last; 1
2
3
4
5
6
7
8
9
10
11
12
13
```java
private static class Node<E> {
E item;// 这个就是往LinkedList中添加的数据
Node<E> next;
Node<E> prev;
Node(Node<E> prev, E element, Node<E> next) {
this.item = element;
this.next = next;
this.prev = prev;
}
}
1
2
3
4
5/**
* Constructs an empty list.
*/
public LinkedList() {
}- Invariant: (first == null && last == null) ||
list.add(123);,将 123 封装到 Node 中,创建了 Node 对象。1
2
3
4
5
6
7
8
9
10
11
12/**
* Appends the specified element to the end of this list.
*
* <p>This method is equivalent to {@link #addLast}.
*
* @param e element to be appended to this list
* @return {@code true} (as specified by {@link Collection#add})
*/
public boolean add(E e) {
linkLast(e);
return true;
}1
2
3
4
5
6
7
8
9
10
11
12
13
14/**
* Links e as last element.
*/
void linkLast(E e) {
final Node<E> l = last;
final Node<E> newNode = new Node<>(l, e, null);
last = newNode;
if (l == null)
first = newNode;
else
l.next = newNode;
size++;
modCount++;
}Node 的定义体现了 LinkedList 的双向链表的说法,其除了保存数据,还定义了两个变量:
- prev:变量记录前一个元素的位置。
- next:变量记录下一个元素的位置。
Vector
Vector 是一个古老的集合,JDK 1.0 就有了。大多数操作与 ArrayList 相同,区别之处在于 Vector 是线程安全的。
在各种 List 中,最好把 ArrayList 作为缺省选择。当插入、删除频繁时,使用 LinkedList。Vector 总是比 ArrayList 慢,所以尽量避免使用。
新增方法:
void addElement(Object obj)void insertElementAt(Object obj,int index)void setElementAt(Object obj,int index)void removeElement(Object obj)void removeAllElements()
源码分析:
JDK 7.0 和 JDK 8.0 中,通过
new Vector()构造器创建对象时,底层都创建了长度为 10 的数组。在扩容方面,默认扩容为原来的数组长度的 2 倍。1
2
3
4
5
6
7
8/**
* Constructs an empty vector so that its internal data array
* has size {@code 10} and its standard capacity increment is
* zero.
*/
public Vector() {
this(10);// 初始化长度为10
}1
2
3
4
5
6
7
8
9
10
11/**
* Constructs an empty vector with the specified initial capacity and
* with its capacity increment equal to zero.
*
* @param initialCapacity the initial capacity of the vector
* @throws IllegalArgumentException if the specified initial capacity
* is negative
*/
public Vector(int initialCapacity) {
this(initialCapacity, 0);
}1
2
3
4
5
6
7
8
9
10
11
12
13
14
15
16
17
18/**
* Constructs an empty vector with the specified initial capacity and
* capacity increment.
*
* @param initialCapacity the initial capacity of the vector
* @param capacityIncrement the amount by which the capacity is
* increased when the vector overflows
* @throws IllegalArgumentException if the specified initial capacity
* is negative
*/
public Vector(int initialCapacity, int capacityIncrement) {
super();
if (initialCapacity < 0)
throw new IllegalArgumentException("Illegal Capacity: "+
initialCapacity);
this.elementData = new Object[initialCapacity];// 创建长度为10的数组
this.capacityIncrement = capacityIncrement;
}add()添加数据之前,先验证数组容量:1
2
3
4
5
6
7
8
9
10
11
12
13/**
* Appends the specified element to the end of this Vector.
*
* @param e element to be appended to this Vector
* @return {@code true} (as specified by {@link Collection#add})
* @since 1.2
*/
public synchronized boolean add(E e) {
modCount++;
ensureCapacityHelper(elementCount + 1);
elementData[elementCount++] = e;
return true;
}1
2
3
4
5
6
7
8
9
10
11
12
13/**
* This implements the unsynchronized semantics of ensureCapacity.
* Synchronized methods in this class can internally call this
* method for ensuring capacity without incurring the cost of an
* extra synchronization.
*
* @see #ensureCapacity(int)
*/
private void ensureCapacityHelper(int minCapacity) {
// overflow-conscious code
if (minCapacity - elementData.length > 0)// 数组容量不够,扩容
grow(minCapacity);
}1
2
3
4
5
6
7
8
9
10
11private void grow(int minCapacity) {
// overflow-conscious code
int oldCapacity = elementData.length;
int newCapacity = oldCapacity + ((capacityIncrement > 0) ?
capacityIncrement : oldCapacity);// 扩容到原来数组长度的二倍
if (newCapacity - minCapacity < 0)
newCapacity = minCapacity;
if (newCapacity - MAX_ARRAY_SIZE > 0)
newCapacity = hugeCapacity(minCapacity);
elementData = Arrays.copyOf(elementData, newCapacity);
}
ArrayList、LinkedL`ist、Vector三者的异同
相同点:三个类都实现了 List 接口,存储数据的特点相同,都是存储有序的、可重复的数据。
不同点:
- ArrayList:作为 List 接口的主要实现类;线程不安全的,效率高;底层使用
Object[] elementData存储。 - LinkedList:线程不安全的,对于频繁的插入、删除操作,使用此类效率比 ArrayList 高;底层使用双向链表存储。
- Vector:作为 List 接口的古老实现类;线程安全的,效率低;底层使用
Object[] elementData存储。
- ArrayList:作为 List 接口的主要实现类;线程不安全的,效率高;底层使用
ArrayList 和 LinkedList 的异同:
- ArrayList 和 LinkedList 都线程不安全,相对线程安全的 Vector,二者执行效率更高。
- ArrayList 底层是实现了基于动态数组的数据结构,LinkedList 底层是实现了基于链表的数据结构。
- 对于随机访问
get()和set(),ArrayList 优于LinkedList,因为 LinkedList 要移动指针。 - 对于新增和删除操作
add()(特指插入) 和remove(),LinkedList 比较占优势,因为 ArrayList 要移动数据。
ArrayList 和 Vector 的区别:
- Vector 和 ArrayList 几乎是完全相同的,唯一的区别在于 Vector 是同步类,属于强同步类。因此开销就比 ArrayList 要大,访问要慢。
- 正常情况下,大多数的 java 程序员使用 ArrayList 而不是 Vector,因为同步完全可以由程序员自己来控制。
- Vector 每次扩容请求其大小的 2 倍空间,而 ArrayList 是 1.5 倍。Vector 还有一个子类 Stack。
Set 接口
Set 集合存储无序的、不可重复的数据,如果试把两个相同的元素加入同一个 Set 集合中,则添加操作失败。
- 无序性:不等于随机性。以 HashSet 为例,存储的数据在底层数组中并非按照数组索引的顺序添加,而是根据数据的哈希值决定的。
- 不可重复性:保证添加的元素按照
equals()判断时,不能返回 true。即:相同的元素只能添加一个。
Set 接口是 Collection 的子接口,Set 接口没有提供额外的方法,使用的都是Collection中声明过的方法。
Set 判断两个对象是否相同不是使用 == 运算符,而是根据
equals()。对于存放在 Set (主要指:HashSet、LinkedHashSet) 容器中的对象,其对应的类一定要重写
equals()和hashCode(),以实现对象相等规则。- 要求:重写的
hashCode()和equals()尽可能保持一致性,即:相等的对象必须具有相等的散列码。- 如果不重写所添加元素所在类的
hashCode(),则会调用 Object 类的hashCode(),该方法是产生一个随机数,因此,即使添加两个一样的元素,其 hashCode 值也可能不同,也就都能添加成功。
- 如果不重写所添加元素所在类的
- 重写两个方法的小技巧:对象中用作
equals()方法比较的 Field,都应该用来计算 hashCode 值。 - TreeSet 比较两个元素是否相同的方法,不是
equals()和hashCode(),而是元素对应类的排序方法。
- 要求:重写的
重写
hashCode()方法的基本原则:- 在程序运行时,同一个对象多次调用
hashCode()方法应该返回相同的值。 - 当两个对象的
equals()方法比较返回 true 时,这两个对象的hashCode()方法的返回值也应相等。 - 对象中用作
equals()方法比较的 Field,都应该用来计算 hashCode 值。
- 在程序运行时,同一个对象多次调用
重写
equals()方法的基本原则,以自定义的 Customer 类为例,何时需要重写equals():- 如果一个类有自己特有的 “逻辑相等” 概念,当重写
equals()的时候,总是需要重写hashCode()。因为根据一个类改写后的equals(),两个截然不同的实例有可能在逻辑上是相等的,但是,根据 Object 类的hashCode(),它们仅仅是两个对象。这种情况,违反了 “相等的对象必须具有相等的散列码” 的原则。 - 结论:重写
equals()的时候,一般都需要同时重写hashCode()方法。通常参与计算 hashCode 的对象的属性也应该参与到equals()中进行计算。
- 如果一个类有自己特有的 “逻辑相等” 概念,当重写
Eclipse/IDEA 工具里
hashCode()的重写,为什么会有 31 这个数字:1
2
3
4
5
6
public int hashCode() {
int result = name.hashCode();
result = 31 * result + age;
return result;
}- 选择系数的时候要选择尽量大的系数,因为如果计算出来的 hashCode 值越大,所谓的冲突就越少,查找起来效率也会提高。—> 减少冲突
- 31 只占用 5 bits,相乘造成数据溢出的概率较小。
- 31 可以由
i * 31 == (i << 5) - 1来表示,现在很多虚拟机里面都有做相关优化。—> 提高算法效率 - 31 是一个素数,素数作用就是如果用一个数字来乘以这个素数,那么最终出来的结果只能被素数本身和被乘数还有 1 来整除!—> 减少冲突
HashSet
HashSet 是 Set 接口的典型实现,大多数时候使用 Set 集合时都使用这个实现类。
HashSet 按 Hash 算法来存储集合中的元素,因此具有很好的存取、查找、删除性能。
HashSet 具有以下特点:
- 不保证元素的排列顺序。
- 不是线程安全的。
- 集合元素可以是 null。
向 HashSet 中添加元素的过程:
- 当向 HashSet 集合中存入一个元素 a 时,首先会调用元素 a 所在类的
hashCode(),计算元素 a 的 hashCode 值,然后根据 hashCode 值,通过某种散列函数,计算出元素 a 在 HashSet 底层数组中的存储位置 (即为:索引位置,这个索引位置不是像 List 那样有顺序的,而是无序的)。- 说明:这个散列函数会根据元素的 hashCode 值和底层数组的长度相计算,得到该元素在数组中的下标 (存储位置),并且这种散列函数计算还尽可能保证能均匀存储元素,越是散列分布,该散列函数设计的越好。
- 向 List 中添加元素时,会按照索引位置的顺序在数组中逐个添加,这是一种有序性。而向 HashSet 中添加元素时,可能第一个元素的索引位置在数组的中间,第二个元素的索引位置在数组的头,第三个元素的索引位置在数组的尾,是按照一种无序的状态添加的,是为无序性。
- 计算出元素 a 的存储位置后,首先判断数组此位置上是否已经有元素:
- 如果此位置上没有其他元素,则元素 a 添加成功。—> 情况1
- 如果此位置上有其他元素 b (或以链表形式存在的多个元素),则比较元素 a 与元素 b (或以链表形式存在的多个元素) 的 hashCode 值:
- 如果 hashCode 值不相同,则元素 a 添加成功。—> 情况2
- 如果 hashCode 值相同,进而需要调用元素 a 所在类的
equals():equals()返回 true,则元素 a 添加失败。equals()返回 false,则元素 a 添加成功。—> 情况3
- 对于添加成功的情况 2 和情况 3 而言:元素 a 与已经存在指定索引位置上的元素以链表的方式存储。
- JDK 7.0:元素 a 存放到底层数组中,指向原来的元素。
- JDK 8.0:原来的元素存放到数组中,指向元素 a。
- 总结:七上八下。
- 当向 HashSet 集合中存入一个元素 a 时,首先会调用元素 a 所在类的
由以上向 HashSet 添加元素的过程,可以看出 HashSet 的底层:数组 + 链表的结构。(前提:JDK 7.0,JDK 8.0 见 HashMap。)
HashSet 底层结构:
HashSet 集合判断两个元素相等的标准:两个对象通过
hashCode()比较相等,并且两个对象的equals()返回值也相等。利用 HashSet 去除 List 中的重复元素:
1
2
3
4
5
6
7
8
9
10
11
12
13
14
15
16
17
18
19
20public class Test {
public static List duplicateList(List list) {
HashSet set = new HashSet();
set.addAll(list);
return new ArrayList(set);
}
public static void main(String[] args) {
List list = new ArrayList();
list.add(new Integer(1));
list.add(new Integer(2));
list.add(new Integer(2));
list.add(new Integer(4));
list.add(new Integer(4));
List list2 = duplicateList(list);
for (Object integer : list2) {
System.out.println(integer);
}
}
}实例:
1
2
3
4
5
6
7
8
9
10
11
12
13
14
15
16public class Test {
public static void main(String[] args) {
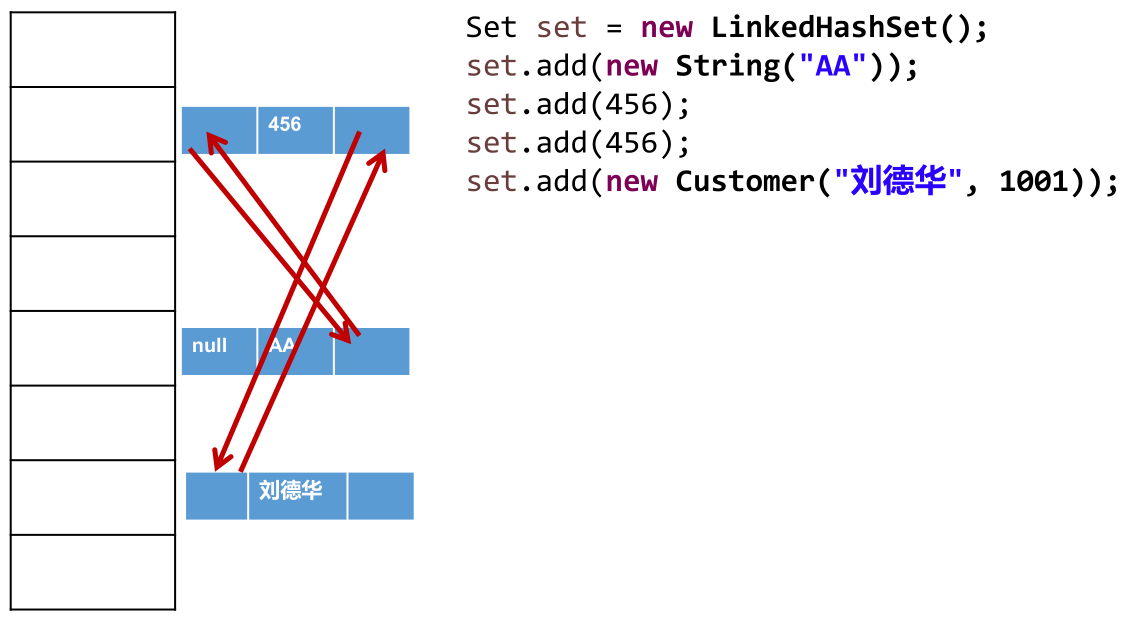
Set set = new HashSet();
set.add(456);
set.add(123);
set.add(123);
set.add("AA");
set.add("CC");
set.add(129);
Iterator iterator = set.iterator();
while(iterator.hasNext()){
System.out.print(iterator.next() + " ");// AA CC 129 456 123,不是按照元素添加的顺序进行输出的
}
}
}
LinkedHashSet
LinkedHashSet 是 HashSet 的子类,不允许集合元素重复
LinkedHashSet 根据元素的 hashCode 值来决定元素的存储位置,但它同时使用双向链表维护元素的次序,这使得元素看起来是以插入顺序保存的。
- 遍历 LinkedHashSet 内部数据时,可以按照添加的顺序遍历。
LinkedHashSet 插入性能略低于 HashSet,但在迭代访问 Set 里的全部元素时有很好的性能。
- 对于频繁的遍历操作,LinkedHashSet 效率高于 HashSet。
LinkedHashSet 底层结:
实例:
1
2
3
4
5
6
7
8
9
10
11
12
13
14
15
16
17public class Test {
public static void main(String[] args) {
// LinkedHashSet在添加数据的同时,每个数据还维护了两个引用,记录此数据前一个数据和后一个数据
Set set = new LinkedHashSet();
set.add(456);
set.add(123);
set.add(123);
set.add("AA");
set.add("CC");
set.add(129);
Iterator iterator = set.iterator();
while (iterator.hasNext()) {
System.out.print(iterator.next() + " ");// 456 123 AA CC 129,按照元素添加的顺序进行输出的
}
}
}面试题:
1
2
3
4
5
6
7
8
9
10
11
12
13
14
15
16
17
18
19
20
21
22
23
24
25
26
27
28
29
30
31
32
33
34
35
36
37
38
39
40
41
42
43
44
45
46
47
48
49
50
51
52
53
54
55
56
57
58
59
60
61
62
63
64public class Test {
public static void main(String[] args) {
HashSet set = new HashSet();
User p1 = new User(1001, "AA");
User p2 = new User(1002, "BB");
set.add(p1);// 假设p1添加到HashSet底层数组的位置7(hashCode值以1001和AA计算出来)
set.add(p2);// 假设p2添加到HashSet底层数组的位置3(hashCode值以1002和BB计算出来)
System.out.println(set);// 位置3和7处对应的2个User
p1.name = "CC";// 更改p1指向的User对象的name为CC
set.remove(p1);// 以新的p1在HashSet底层数组查找,没有相同的对象(hashCode值以1001和CC计算出来)
System.out.println(set);// 位置3和7处对应的2个User,但位置7指向的User对象的name为C,不是AA,位置3指向的User对象的name为BB
set.add(new User(1001, "CC"));// 新new出来的User,hashCode值以1001和CC计算出来,不同于最初的p1,其位置不会在7处,也不会在3处,假设在11处
System.out.println(set);// 位置3、7和11处对应的3个User,其中,位置7和11对应的User的id和name都是1001和CC,但不是堆中的同一个对象
set.add(new User(1001, "AA"));// 新new出来的User,hashCode值以1001和AA计算出来,等于最初的p1,位置在7处,但因为现在7处User对象的name为CC,所以equals()不相同,这个User对象链接到7位置
System.out.println(set);// 位置3、7和11处对应的4个User
}
}
class User {
int id;
String name;
public User(int id, String name) {
this.id = id;
this.name = name;
}
public boolean equals(Object o) {
if (this == o) {
return true;
}
if (o == null || getClass() != o.getClass()) {
return false;
}
User user = (User) o;
if (id != user.id) {
return false;
}
return name != null ? name.equals(user.name) : user.name == null;
}
public int hashCode() {
int result = id;
result = 31 * result + (name != null ? name.hashCode() : 0);
return result;
}
public String toString() {
return "User{" +
"id=" + id +
", name='" + name + '\'' +
'}';
}
}
输出结果:
[User{id=1002, name='BB'}, User{id=1001, name='AA'}]
[User{id=1002, name='BB'}, User{id=1001, name='CC'}]
[User{id=1002, name='BB'}, User{id=1001, name='CC'}, User{id=1001, name='CC'}]
[User{id=1002, name='BB'}, User{id=1001, name='CC'}, User{id=1001, name='CC'}, User{id=1001, name='AA'}]解析:
TreeSet
TreeSet 是 SortedSet 接口的实现类,TreeSet 可以按照添加对象的指定属性,进行排序,确保集合元素处于排序状态。
TreeSet 特点:有序,查询速度比 List 快。
TreeSet 与 TreeMap 一样,底层使用红黑树结构存储数据。
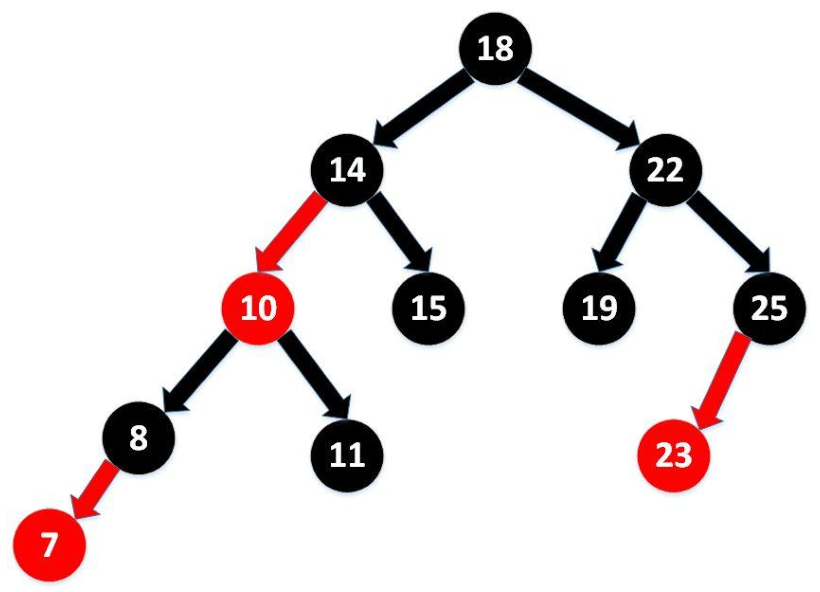
红黑树参考:http://www.cnblogs.com/yangecnu/p/Introduce-Red-Black-Tree.html
新增方法:
Comparator comparator()Object first()Object last()Object lower(Object e)Object higher(Object e)SortedSet subSet(fromElement, toElement)SortedSet headSet(toElement)SortedSet tailSet(fromElement)
向 TreeSet 中添加的数据,要求是相同类的对象。
TreeSet 两种排序方法:自然排序 (实现 Comparable 接口) 和定制排序 (Comparator)。默认情况下,TreeSet 采用自然排序。
在 TreeSet 中比较两个元素是否相同时,取决于使用的是自然排序还是定制排序,不再考虑
equals(),比如add()和remove()等方法,这点与 HashSet 不同。自然排序:
TreeSet 会调用集合元素的
compareTo(Object obj)来比较元素之间的大小关系,然后将集合元素按升序 (默认情况) 排列。如果试图把一个对象添加到 TreeSet 时,则该对象的类必须实现 Comparable 接口。
实现 Comparable 的类必须实现
compareTo(Object obj),两个对象即通过compareTo(Object obj)的返回值来比较大小。Comparable 的典型实现:
- BigDecimal、BigInteger 以及所有的数值型对应的包装类:按它们对应的数值大小进行比较。
- Character:按字符的 unicode值来进行比较。
- Boolean:true 对应的包装类实例大于 false 对应的包装类实例。
- String:按字符串中字符的 unicode 值进行比较。
- Date、Time:后边的时间、日期比前面的时间、日期大。
向 TreeSet 中添加元素时,只有第一个元素无须比较
compareTo(),后面添加的所有元素都会调用compareTo()进行比较。因为只有相同类的两个实例才会比较大小,所以向 TreeSet 中添加的应该是同一个类的对象。
对于 TreeSet 集合而言,使用自然排序判断两个元素相等的标准是:两个元素通过
compareTo()比较返回 0,不再是equals()。当需要把一个对象放入 TreeSet 中,在重写该对象对应的
equals()时,应保证该方法与compareTo()有一致的结果:如果两个对象通过equals()比较返回 true,则通过compareTo(Object obj)比较应返回 0。否则,会让人难以理解。实例:
1
2
3
4
5
6
7
8
9
10
11
12
13
14
15
16
17
18
19
20
21
22
23
24
25
26
27
28
29
30
31
32
33
34
35
36
37
38
39
40
41
42
43
44
45
46
47
48
49
50
51
52
53
54
55
56
57
58
59
60
61
62
63
64
65
66
67
68
69
70
71
72
73
74
75
76
77
78
79
80
81
82
83
84
85
86
87
88
89
90
91
92
93
94
95
96
97public class Test {
public static void main(String[] args) {
Set set = new TreeSet();
set.add(new User("Tom", 12));
set.add(new User("Jerry", 32));
set.add(new User("Jim", 2));
set.add(new User("Mike", 65));
set.add(new User("Jack", 33));
set.add(new User("Jack", 56));
Iterator iterator = set.iterator();
while (iterator.hasNext()) {
System.out.println(iterator.next());
}
}
}
class User implements Comparable {
private String name;
private int age;
public User() {
}
public User(String name, int age) {
this.name = name;
this.age = age;
}
public String getName() {
return name;
}
public void setName(String name) {
this.name = name;
}
public int getAge() {
return age;
}
public void setAge(int age) {
this.age = age;
}
public String toString() {
return "User{" +
"name='" + name + '\'' +
", age=" + age +
'}';
}
public boolean equals(Object o) {
System.out.println("User equals()....");
if (this == o) {
return true;
}
if (o == null || getClass() != o.getClass()) {
return false;
}
User user = (User) o;
if (age != user.age) {
return false;
}
return name != null ? name.equals(user.name) : user.name == null;
}
public int hashCode() { //return name.hashCode() + age;
int result = name != null ? name.hashCode() : 0;
result = 31 * result + age;
return result;
}
// 按照姓名从大到小排列,年龄从小到大排列
public int compareTo(Object o) {
if (o instanceof User) {
User user = (User) o;
// return -this.name.compareTo(user.name);
int compare = -this.name.compareTo(user.name);
if (compare != 0) {
return compare;
} else {
return Integer.compare(this.age, user.age);
}
} else {
throw new RuntimeException("输入的类型不匹配");
}
}
}
定制排序:
TreeSet 的自然排序要求元素所属的类实现 Comparable 接口,如果元素所属的类没有实现 Comparable 接口,或不希望按照升序 (默认情况 )的方式排列元素或希望按照其它属性大小进行排序,则考虑使用定制排序。定制排序,通过 Comparator 接口来实现。需要重写
compare()方法。利用
int compare(T o1,T o2)方法,比较 o1 和 o2 的大小:如果方法返回正整数,则表示 o1 大于 o2;如果返回 0,表示相等;返回负整数,表示 o1 小于 o2。要实现定制排序,需要将实现 Comparator 接口的实例作为形参传递给 TreeSet 的构造器。此时,仍然只能向 TreeSet 中添加类型相同的对象。否则会发生 ClassCastException 异常。
对于 TreeSet 集合而言,使用定制排序判断两个元素相等的标准是:两个元素通过
compare()比较返回 0,不再是equals()。实例:
1
2
3
4
5
6
7
8
9
10
11
12
13
14
15
16
17
18
19
20
21
22
23
24
25
26
27
28
29
30
31
32
33
34
35
36
37
38
39
40
41
42
43
44
45
46
47
48
49
50
51
52
53
54
55
56
57
58
59
60
61
62
63
64
65
66
67
68
69
70
71
72
73
74
75
76
77
78
79
80
81
82
83
84
85
86
87
88
89
90
91
92
93
94
95
96
97
98
99
100
101
102
103
104
105
106
107
108
109
110
111public class Test {
public static void main(String[] args) {
// 定制排序
Comparator com = new Comparator() {
// 按照年龄从小到大排列
public int compare(Object o1, Object o2) {
if (o1 instanceof User && o2 instanceof User) {
User u1 = (User) o1;
User u2 = (User) o2;
return Integer.compare(u1.getAge(), u2.getAge());
} else {
throw new RuntimeException("输入的数据类型不匹配");
}
}
};
TreeSet set = new TreeSet(com);
set.add(new User("Tom", 12));
set.add(new User("Jerry", 32));
set.add(new User("Jim", 2));
set.add(new User("Mike", 65));
set.add(new User("Mary", 33));
set.add(new User("Jack", 33));
set.add(new User("Jack", 56));
Iterator iterator = set.iterator();
while (iterator.hasNext()) {
System.out.println(iterator.next());
}
}
}
class User implements Comparable {
private String name;
private int age;
public User() {
}
public User(String name, int age) {
this.name = name;
this.age = age;
}
public String getName() {
return name;
}
public void setName(String name) {
this.name = name;
}
public int getAge() {
return age;
}
public void setAge(int age) {
this.age = age;
}
public String toString() {
return "User{" +
"name='" + name + '\'' +
", age=" + age +
'}';
}
public boolean equals(Object o) {
System.out.println("User equals()....");
if (this == o) {
return true;
}
if (o == null || getClass() != o.getClass()) {
return false;
}
User user = (User) o;
if (age != user.age) {
return false;
}
return name != null ? name.equals(user.name) : user.name == null;
}
public int hashCode() { //return name.hashCode() + age;
int result = name != null ? name.hashCode() : 0;
result = 31 * result + age;
return result;
}
// 按照姓名从大到小排列,年龄从小到大排列
public int compareTo(Object o) {
if (o instanceof User) {
User user = (User) o;
// return -this.name.compareTo(user.name);
int compare = -this.name.compareTo(user.name);
if (compare != 0) {
return compare;
} else {
return Integer.compare(this.age, user.age);
}
} else {
throw new RuntimeException("输入的类型不匹配");
}
}
}
实例:
1
2
3
4
5
6
7
8
9
10
11
12
13
14
15
16
17
18
19
20
21
22
23public class Test {
public static void main(String[] args) {
Set set = new TreeSet();
// 失败:不能添加不同类的对象
/*set.add(123);
set.add(456);
set.add("AA");
set.add(new User("Tom",12));*/
// 举例:全部添加Integer对象
/*set.add(34);
set.add(-34);
set.add(43);
set.add(11);
set.add(8);*/
Iterator iterator = set.iterator();
while (iterator.hasNext()) {
System.out.println(iterator.next());
}
}
}
Map 接口
Map 与 Collection 是并列存在,双列数据,用于保存具有映射关系的数据:key - value 对。
Map结构的理解:
Map 中的 key:无序的、不可重复的,使用 Set 存储所有的 key。—> key 所在的类要重写
hashCode()和equals()(以 HashMap 为例)。Map 中的 value:无序的、可重复的,使用 Collection 存储所有的 value。—> value 所在的类要重写
equals()。一个键值对:key - value 构成了一个 entry 对象。
- Map 中的映射关系的类型是 Map.Entry 类型,它是 Map 接口的内部接口。
Map 中的 entry:无序的、不可重复的,使用 Set 存储所有的 entry。
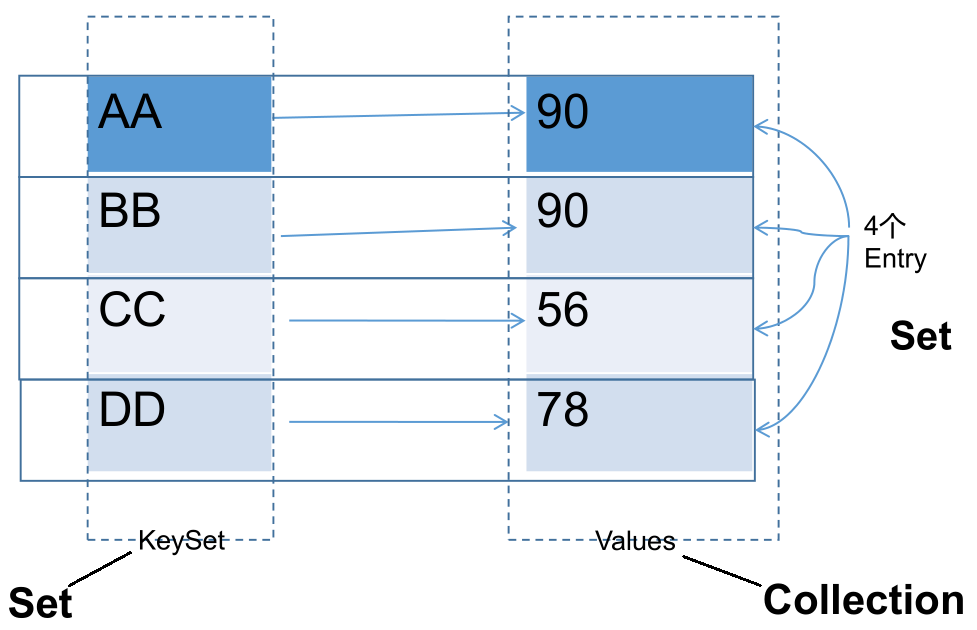
Map 中的 key 和 value 都可以是任何引用类型的数据。
常用 String 类作为 Map 的 key。
key 和 value 之间存在单向一对一关系,即通过指定的 key 总能找到唯一的、确定的 value。
Map 接口的常用实现类:HashMap、TreeMap、LinkedHashMap 和 Properties。其中,HashMap 是 Map 接口使用频率最高的实现类。
Map 常用方法:
添加、删除、修改操作:
Object put(Object key, Object value):将指定 key - value 对添加到 (或修改) 当前 map 对象中。- 如果在 map 中已存在 key,则会用 value 替换 map 中该 key 对应的值。
void putAll(Map m):将 m 中的所有 key - value 对存放到当前 map 中。Object remove(Object key):移除指定 key 的 key - value 对,并返回 value。若 key 不存在,返回 null。void clear():清空当前 map 中的所有数据,与map = null;操作不同。实例:
1
2
3
4
5
6
7
8
9
10
11
12
13
14
15
16
17
18
19
20
21
22
23
24
25
26
27
28
29
30
31public class Test {
public static void main(String[] args) {
Map map = new HashMap();
// put()
map.put("AA", 123);
map.put(45, 123);
map.put("BB", 56);
// 修改,key已存在,会替换其value
map.put("AA", 87);
System.out.println(map);// {AA=87, BB=56, 45=123}
// putAll()
Map map1 = new HashMap();
map1.put("CC", 123);
map1.put("DD", 123);
map.putAll(map1);
System.out.println(map);// {AA=87, BB=56, CC=123, DD=123, 45=123}
// remove(Object key)
Object value = map.remove("CC");
System.out.println(value);// 123
System.out.println(map);// {AA=87, BB=56, DD=123, 45=123}
System.out.println(map.remove("EE"));// key不存在,返回null
// clear()
map.clear();// 与map = null操作不同
System.out.println(map.size());// 0
System.out.println(map);// {}
}
}
元素查询的操作:
Object get(Object key):获取指定 key 对应的 value,如果 key 不存在,返回 null。boolean containsKey(Object key):是否包含指定的 key。boolean containsValue(Object value):是否包含指定的 value。int size():返回 map 中 key - value 对的个数。boolean isEmpty():判断当前 map 是否为空,以 size 是否为 0 判断。boolean equals(Object obj):判断当前 map 和参数对象 obj 是否相等。实例:
1
2
3
4
5
6
7
8
9
10
11
12
13
14
15
16
17
18
19
20
21
22public class Test {
public static void main(String[] args) {
Map map = new HashMap();
map.put("AA", 123);
map.put(45, 123);
map.put("BB", 56);
// Object get(Object key)
System.out.println(map.get(45));// 123
System.out.println(map.get(43));// null
// containsKey(Object key)
boolean isExist = map.containsKey("BB");
System.out.println(isExist);// true
isExist = map.containsValue(123);
System.out.println(isExist);// true
map.clear();
System.out.println(map.isEmpty());// true
}
}
元视图操作的方法:
Set keySet():返回所有 key 构成的 Set 集合。Collection values():返回所有 value 构成的 Collection 集合。Set entrySet():返回所有 key - value 对构成的 Set 集合。实例:
1
2
3
4
5
6
7
8
9
10
11
12
13
14
15
16
17
18
19
20
21
22
23
24
25
26
27
28
29
30
31
32
33
34
35
36
37
38
39
40
41
42
43
44public class Test {
public static void main(String[] args) {
Map map = new HashMap();
map.put("AA", 123);
map.put(45, 1234);
map.put("BB", 56);
// 遍历所有的key集:keySet()
Set keys = map.keySet();
Iterator iterator = keys.iterator();
while (iterator.hasNext()) {
System.out.println(iterator.next());
}
System.out.println();
// 遍历所有的value集:values()
Collection values = map.values();
for (Object obj : values) {
System.out.println(obj);
}
System.out.println();
// 遍历所有的key-value
// 方式一:entrySet()
Set entrySet = map.entrySet();
Iterator iterator1 = entrySet.iterator();
while (iterator1.hasNext()) {
Object obj = iterator1.next();
// entrySet集合中的元素都是entry
Map.Entry entry = (Map.Entry) obj;
System.out.println(entry.getKey() + "---->" + entry.getValue());
}
System.out.println();
// 方式二:
Set keySet = map.keySet();
Iterator iterator2 = keySet.iterator();
while (iterator2.hasNext()) {
Object key = iterator2.next();
Object value = map.get(key);
System.out.println(key + "=====" + value);
}
}
}
总结:
- 添加:
put(Object key, Object value) - 删除:
remove(Object key) - 修改:
put(Object key, Object value) - 查询:
get(Object key) - 长度:
size() - 遍历:
keySet()/values()/entrySet()
- 添加:
HashMap
HashMap 是 Map 接口使用频率最高的实现类。
HashMap 允许使用 null 键和 null 值,与 HashSet 一样,不保证映射的顺序。
所有的 key 构成的集合是 Set:无序的、不可重复的。所以,key 所在的类要重写:
hashCode()和equals()。- HashMap 判断两个 key 相等的标准是:两个 key 的 hashCode 值相等,同时通过
equals()判断返回 true。
- HashMap 判断两个 key 相等的标准是:两个 key 的 hashCode 值相等,同时通过
所有的 value 构成的集合是 Collection:无序的、可以重复的。所以,value 所在的类要重写:
equals()。- HashMap 判断两个 value 相等的标准是:两个 value 通过
equals()判断返回 true。
- HashMap 判断两个 value 相等的标准是:两个 value 通过
一个 key - value 对构成一个 entry,所有的 entry 构成的集合是 Set:无序的、不可重复的。
不要修改映射关系的 key:
- 映射关系存储到 HashMap 中时,会存储 key 的 hash 值,这样就不用在每次查找时重新计算每一个 Entry 或 Node (TreeNode) 的 hash 值了,因此如果已经 put 到 Map 中的映射关系,再修改 key 的属性,而这个属性又参与 hashcode 值的计算,那么会导致匹配不上。
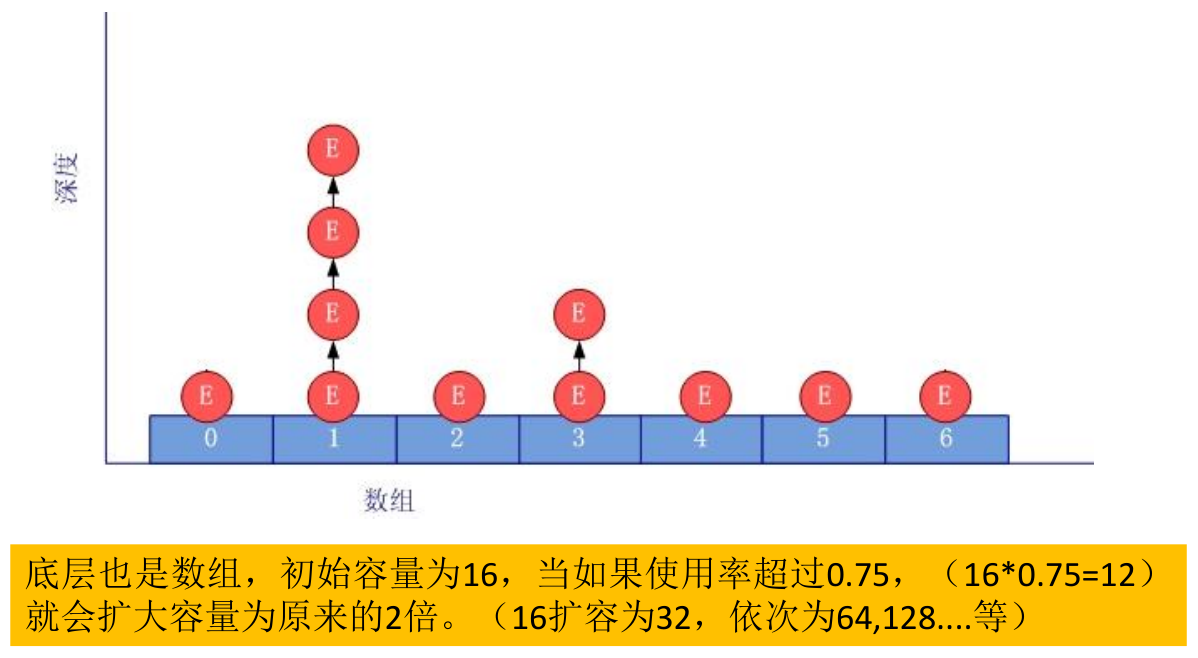
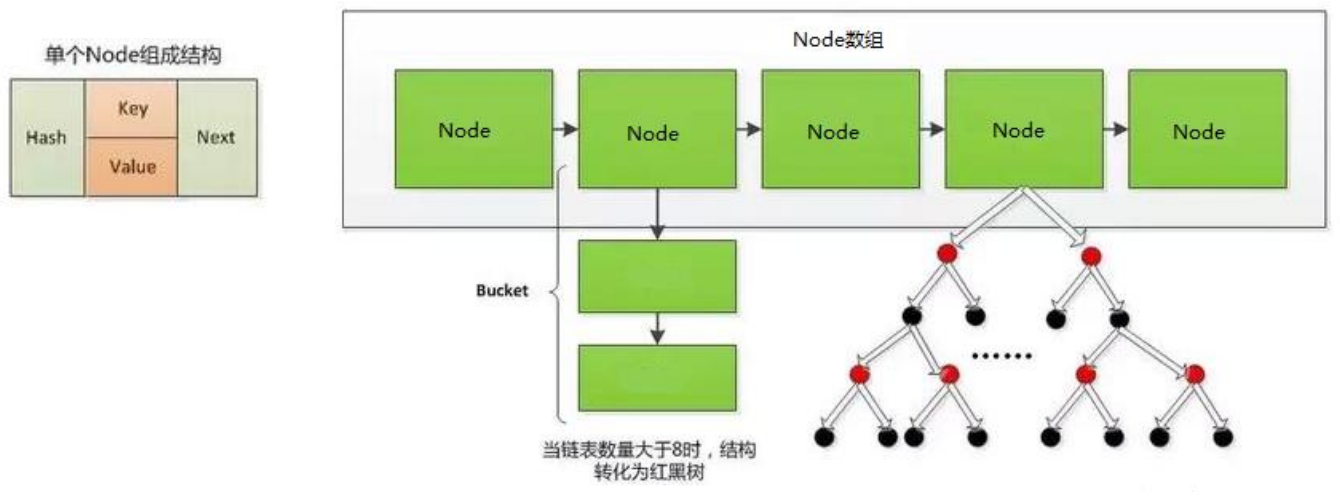
HashMap 源码中的重要常量:
DEFAULT_INITIAL_CAPACITY:HashMap 的默认容量,16。1
2
3
4/**
* The default initial capacity - MUST be a power of two.
*/
static final int DEFAULT_INITIAL_CAPACITY = 1 << 4; // aka 16MAXIMUM_CAPACITY:HashMap 的最大支持容量,2^30。1
2
3
4
5
6/**
* The maximum capacity, used if a higher value is implicitly specified
* by either of the constructors with arguments.
* MUST be a power of two <= 1<<30.
*/
static final int MAXIMUM_CAPACITY = 1 << 30;DEFAULT_LOAD_FACTOR:HashMap 的默认加载因子,0.75。不同于 ArrayList,HashMap 不是在底层数组全部填满时才进行扩容操作,因为数组上有一些位置可能会一直都没有添加元素,但其他位置上元素可能有很多,导致链表和二叉树结构变多。因此,会在元素添加到一定数量时,就执行扩容操作,即添加元素数量达到 threshold 值时扩容。默认加载因子如果过小,会导致数组还有很多空位置时扩容,数组利用率低;默认加载因子如果过大,会导致数组中存在很多元素时才扩容,链表和二叉树结构过多。因此,默认加载因子在 0.7 ~ 0.75 左右比较合适。1
2
3
4/**
* The load factor used when none specified in constructor.
*/
static final float DEFAULT_LOAD_FACTOR = 0.75f;TREEIFY_THRESHOLD:Bucket 中链表存储的 Node 长度大于该默认值,判断是否转换为红黑树,默认为 8。Since JDK 8.0。1
2
3
4
5
6
7
8
9/**
* The bin count threshold for using a tree rather than list for a
* bin. Bins are converted to trees when adding an element to a
* bin with at least this many nodes. The value must be greater
* than 2 and should be at least 8 to mesh with assumptions in
* tree removal about conversion back to plain bins upon
* shrinkage.
*/
static final int TREEIFY_THRESHOLD = 8;UNTREEIFY_THRESHOLD:Bucket 中红黑树存储的 Node 长度小于该默认值,转换为链表,默认为 6,Since JDK 8.0。1
2
3
4
5
6/**
* The bin count threshold for untreeifying a (split) bin during a
* resize operation. Should be less than TREEIFY_THRESHOLD, and at
* most 6 to mesh with shrinkage detection under removal.
*/
static final int UNTREEIFY_THRESHOLD = 6;MIN_TREEIFY_CAPACITY:桶中的 Node 被树化时最小的 hash 表容量,默认为 64。当桶中 Node 的数量大到需要变红黑树 (8) 时,若 hash 表容量小于MIN_TREEIFY_CAPACITY,此时应执行resize()进行扩容操作。MIN_TREEIFY_CAPACITY的值至少是TREEIFY_THRESHOLD的 4 倍。Since JDK 8.0。1
2
3
4
5
6
7/**
* The smallest table capacity for which bins may be treeified.
* (Otherwise the table is resized if too many nodes in a bin.)
* Should be at least 4 * TREEIFY_THRESHOLD to avoid conflicts
* between resizing and treeification thresholds.
*/
static final int MIN_TREEIFY_CAPACITY = 64;table :存储元素的数组,长度总是 2 的 n 次幂。JDK 7.0 中是
transient Entry<K, V>[] table;,JDK 8.0 中是transient Node<K,V>[] table;。entrySet:存储具体元素的集。
size:HashMap 中已存储的键值对的数量。
modCount:HashMap 扩容和结构改变的次数。
threshold:扩容的临界值,其值一般等于容量 * 加载因子,
(int) Math.min(capacity * loadFactor, MAXIMUM_CAPACITY + 1);。扩容的操作不是当底层数组全部被填满后再扩容,而是达到临界值后的下一次添加操作进行扩容。loadFactor:加载因子。
源码分析:
JDK 7.0:
初始化操作,以无参构造器为例:
HashMap hashMap = new HashMap();,在实例化以后,底层创建了长度是 16 的一维数组 Entry[] table:1
2
3
4
5
6
7/**
* Constructs an empty <tt>HashMap</tt> with the default initial capacity
* (16) and the default load factor (0.75).
*/
public HashMap() {
this(DEFAULT_INITIAL_CAPACITY, DEFAULT_LOAD_FACTOR);// 默认初始化长度:16,加载因子:0.75。
}1
2
3
4
5
6
7
8
9
10
11
12
13
14
15
16
17
18
19
20
21
22
23
24
25
26
27
28
29
30
31/**
* Constructs an empty <tt>HashMap</tt> with the specified initial
* capacity and load factor.
*
* @param initialCapacity the initial capacity
* @param loadFactor the load factor
* @throws IllegalArgumentException if the initial capacity is negative
* or the load factor is nonpositive
*/
public HashMap(int initialCapacity, float loadFactor) {
if (initialCapacity < 0)
throw new IllegalArgumentException("Illegal initial capacity: " +
initialCapacity);
if (initialCapacity > MAXIMUM_CAPACITY)// map最大长度:1073741824
initialCapacity = MAXIMUM_CAPACITY;
if (loadFactor <= 0 || Float.isNaN(loadFactor))
throw new IllegalArgumentException("Illegal load factor: " +
loadFactor);
// Find a power of 2 >= initialCapacity
int capacity = 1;
while (capacity < initialCapacity)
capacity <<= 1;// map初始化时的长度,总是2的n次幂
this.loadFactor = loadFactor;
threshold = (int)Math.min(capacity * loadFactor, MAXIMUM_CAPACITY + 1);// 扩容的临界值16*0.75=12
table = new Entry[capacity];// 底层创建了长度是16的一维数组Entry[] table
useAltHashing = sun.misc.VM.isBooted() &&
(capacity >= Holder.ALTERNATIVE_HASHING_THRESHOLD);
init();
}向数组中添加数据操作,
hashMap.put(key1, value1);:1
2
3
4
5
6
7
8
9
10
11
12
13
14
15
16
17
18
19
20
21
22
23
24
25
26
27
28
29
30
31
32
33/**
* Associates the specified value with the specified key in this map.
* If the map previously contained a mapping for the key, the old
* value is replaced.
*
* @param key key with which the specified value is to be associated
* @param value value to be associated with the specified key
* @return the previous value associated with <tt>key</tt>, or
* <tt>null</tt> if there was no mapping for <tt>key</tt>.
* (A <tt>null</tt> return can also indicate that the map
* previously associated <tt>null</tt> with <tt>key</tt>.)
*/
public V put(K key, V value) {
if (key == null)
return putForNullKey(value);// HashMap可以添加key为null的键值对
int hash = hash(key);// 计算key的hash值,中间调用了key的hashCode()方法
int i = indexFor(hash, table.length);// 获取当前数据在数组中的索引位置
// 取出数组的i位置上的元素,i位置上的元素可能不止一个,需要一个一个对比
for (Entry<K,V> e = table[i]; e != null; e = e.next) {
Object k;
// 如果i位置上有元素,对比该元素与当前key的hash值和equals()是否相等
if (e.hash == hash && ((k = e.key) == key || key.equals(k))) {
V oldValue = e.value;// i位置上元素与当前key相同,则将当前value替换i位置上原值
e.value = value;
e.recordAccess(this);
return oldValue;
}
}
modCount++;
addEntry(hash, key, value, i);// 如果数组的i位置上没有元素,则直接添加当前key-value对在i位置上
return null;
}计算 key 的 hash值:
1
2
3
4
5
6
7
8
9
10
11
12
13
14
15
16
17
18
19
20
21
22
23
24/**
* Retrieve object hash code and applies a supplemental hash function to the
* result hash, which defends against poor quality hash functions. This is
* critical because HashMap uses power-of-two length hash tables, that
* otherwise encounter collisions for hashCodes that do not differ
* in lower bits. Note: Null keys always map to hash 0, thus index 0.
*/
final int hash(Object k) {
int h = 0;
if (useAltHashing) {
if (k instanceof String) {
return sun.misc.Hashing.stringHash32((String) k);
}
h = hashSeed;
}
h ^= k.hashCode();
// This function ensures that hashCodes that differ only by
// constant multiples at each bit position have a bounded
// number of collisions (approximately 8 at default load factor).
h ^= (h >>> 20) ^ (h >>> 12);
return h ^ (h >>> 7) ^ (h >>> 4);
}获取位置:
1
2
3
4
5
6
/**
* Returns index for hash code h.
*/
static int indexFor(int h, int length) {
return h & (length-1);
}添加数据:
1
2
3
4
5
6
7
8
9
10
11
12
13
14
15
16
17
18/**
* Adds a new entry with the specified key, value and hash code to
* the specified bucket. It is the responsibility of this
* method to resize the table if appropriate.
*
* Subclass overrides this to alter the behavior of put method.
*/
void addEntry(int hash, K key, V value, int bucketIndex) {
// 如果已添加的元素数量≥扩容的临界值,且即将添加元素的数组bucketIndex位置上已存在元素
if ((size >= threshold) && (null != table[bucketIndex])) {
resize(2 * table.length);// 扩容为原来数组长度的的2倍,并将原有的数据复制到新数组中
hash = (null != key) ? hash(key) : 0;
bucketIndex = indexFor(hash, table.length);// 重新计算当前key在新数组中的位置
}
// 不需要扩容,或扩容完成,将当前元素存放到数组的bucketIndex位置上
createEntry(hash, key, value, bucketIndex);
}1
2
3
4
5
6
7
8
9
10
11
12
13
14
15/**
* Like addEntry except that this version is used when creating entries
* as part of Map construction or "pseudo-construction" (cloning,
* deserialization). This version needn't worry about resizing the table.
*
* Subclass overrides this to alter the behavior of HashMap(Map),
* clone, and readObject.
*/
void createEntry(int hash, K key, V value, int bucketIndex) {
// 取出bucketIndex位置上原有的元素
Entry<K,V> e = table[bucketIndex];
// 将当前的元素存放在bucketIndex位置上,并指向原有的元素
table[bucketIndex] = new Entry<>(hash, key, value, e);
size++;
}总结,JDK 7.0 中 HashMap 的底层实现原理,以
HashMap map = new HashMap();为例说明:在实例化以后,底层创建了长度是 16 的一维数组 Entry[] table。
执行
map.put(key1, value1)操作,可能已经执行过多次 put:- 首先,计算 key1 所在类的
hashCode()以及其他操作计算 key1 的哈希值,此哈希值经过某种算法计算以后,得到在 Entry 数组中的存放位置。 - 如果此位置上的数据为空,此时的 key1 - value1 添加成功。—> 情况 1
- 如果此位置上的数据不为空,(意味着此位置上存在一个或多个数据(以链表形式存在)),比较 key1 和已经存在的一个或多个数据的哈希值:
- 如果 key1 的哈希值与已经存在的数据的哈希值都不相同,此时 key1 - value1 添加成功。—> 情况 2
- 如果 key1 的哈希值和已经存在的某一个数据 (key2 - value2) 的哈希值相同,则调用 key1 所在类的
equals(key2),继续比较:- 如果
equals()返回 false:此时 key1 - value1 添加成功。—> 情况 3 - 如果
equals()返回 true:使用 value1 替换 value2。
- 如果
- 补充:关于情况 2 和情况 3,此时 key1 - value1 和原来的数据以链表的方式存储。
- 首先,计算 key1 所在类的
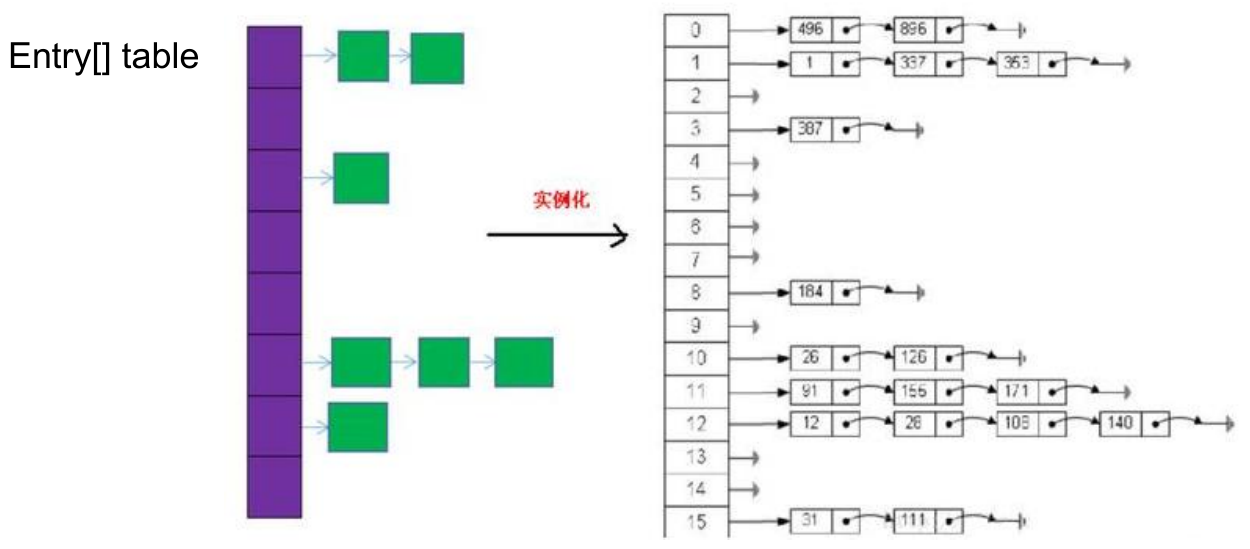
存储结构:HashMap是数组+链表结构
HashMap 的内部存储结构其实是数组和链表的结合 (即为链地址法)。当实例化一个 HashMap 时,系统会创建一个长度为 Capacity 的 Entry 数组,这个长度在哈希表中被称为容量 (Capacity),在这个数组中可以存放元素的位置我们称之为 “桶” (bucket),每个 bucket 都有自己的索引,系统可以根据索引快速的查找 bucket 中的元素。
每个 bucket 中存储一个元素,即一个 Entry 对象,但每一个 Entry 对象可以带一个引用变量,用于指向下一个元素,因此,在一个桶中,就有可能生成一个 Entry 链,而且新添加的元素是整个链表的 head。
结构图示意:
扩容过程:
- 当 HashMap 中的元素越来越多的时候,hash 冲突的几率也就越来越高,因为底层数组的长度是固定的。所以为了提高查询的效率,就要对 HashMap 的底层数组进行扩容,而在 HashMap 数组扩容之后,最消耗性能的点就出现了:原数组中的数据必须重新计算其在新数组中的位置,并放进去,这就是
resize()。 - 当 HashMap 中的元素个数超过数组大小 (数组总大小 length,不是数组中存储的元素个数 size) * loadFactor 时 , 就 会 进 行 数 组 扩 容 。loadFactor 的 默 认 值为 0.75,这是一个折中的取值,默认情况下,数组大小为 16,那么当 HashMap 中元素个数 ≥ 16 * 0.75 = 12 (这个值就是代码中的 threshold 值,也叫做临界值) 且要存放的位置非空的时候,就把数组的大小扩展为 2 * 16 = 32,即扩大一倍,然后重新计算每个元素在数组中的位置,把原有的数据复制到新数组中。
- 扩容是一个非常消耗性能的操作,如果已经预知 HashMap 中元素的个数,那么预设元素的个数能够有效的提高 HashMap 的性能。
- 当 HashMap 中的元素越来越多的时候,hash 冲突的几率也就越来越高,因为底层数组的长度是固定的。所以为了提高查询的效率,就要对 HashMap 的底层数组进行扩容,而在 HashMap 数组扩容之后,最消耗性能的点就出现了:原数组中的数据必须重新计算其在新数组中的位置,并放进去,这就是
JDK 8.0:
初始化操作,以无参构造器为例:
HashMap hashMap = new HashMap();,在实例化时,底层没有创建一个长度为 16 的数组,只是给加载因子赋值 0.75:1
2
3public HashMap() {
this.loadFactor = DEFAULT_LOAD_FACTOR; // all other fields defaulted
}底层的数组是 Node[],而非 Entry[],但 Node 实现了 Entry 接口:
1
transient Node<K,V>[] table;
1
static class Node<K,V> implements Map.Entry<K,V> {}
首次调用
put()方法时:1
2
3public V put(K key, V value) {
return putVal(hash(key), key, value, false, true);
}1
2
3
4
5
6
7
8
9
10
11
12
13
14
15
16
17
18
19
20
21
22
23
24
25
26
27
28
29
30
31
32
33
34
35
36
37
38
39
40
41
42
43
44
45
46
47
48final V putVal(int hash, K key, V value, boolean onlyIfAbsent,
boolean evict) {
Node<K,V>[] tab; Node<K,V> p; int n, i;
if ((tab = table) == null || (n = tab.length) == 0)
// 第一次进入put(),table还未初始化,为null,进入resize(),如果不是第一次put(),不会进入此逻辑
n = (tab = resize()).length;
// 查看当前元素在新创建的数组中的位置i所在的位置的元素p,是否为null
if ((p = tab[i = (n - 1) & hash]) == null)
tab[i] = newNode(hash, key, value, null);// 如果p为null,当前位置i没有元素,添加成功 ---> 情况1
else {
Node<K,V> e; K k;
if (p.hash == hash &&
((k = p.key) == key || (key != null && key.equals(k))))
e = p;// 位置i上的元素,与当前待添加元素的key相同
else if (p instanceof TreeNode)
e = ((TreeNode<K,V>)p).putTreeVal(this, tab, hash, key, value);
else {// 位置i上的元素,与当前待添加元素的key不同
for (int binCount = 0; ; ++binCount) {
if ((e = p.next) == null) {// 位置i上只有一个元素
// 位置i上的原元素指向当前待添加的元素,"八下",添加成功 ---> 情况2和3
p.next = newNode(hash, key, value, null);
if (binCount >= TREEIFY_THRESHOLD - 1) // -1 for 1st
// 链表的长度超过8时,判断是否转为红黑树结构
treeifyBin(tab, hash);
break;
}
// 位置i上不止一个元素,依次获得该链表中的每一个元素,与待添加元素的key,对比hash值和equals()
if (e.hash == hash &&
((k = e.key) == key || (key != null && key.equals(k))))
break;
p = e;
}
}
// 替换操作
if (e != null) { // existing mapping for key
V oldValue = e.value;
if (!onlyIfAbsent || oldValue == null)
e.value = value;
afterNodeAccess(e);
return oldValue;
}
}
++modCount;
if (++size > threshold)
resize();
afterNodeInsertion(evict);
return null;
}从
put()第一次进入resize(),底层创建了长度为 16 的 Node 数组:1
2
3
4
5
6
7
8
9
10
11
12
13
14
15
16
17
18
19
20
21
22
23
24
25
26
27
28
29
30
31
32
33
34
35
36
37
38
39
40
41
42
43
44
45
46
47
48
49
50
51
52
53
54
55
56
57
58
59
60
61
62
63
64
65
66
67
68
69
70
71
72
73final Node<K,V>[] resize() {
Node<K,V>[] oldTab = table;// 从put()第一次进入resize(),table为null
int oldCap = (oldTab == null) ? 0 : oldTab.length;// 0
int oldThr = threshold;// 此时扩容的临界值为0
int newCap, newThr = 0;
if (oldCap > 0) {
if (oldCap >= MAXIMUM_CAPACITY) {
threshold = Integer.MAX_VALUE;
return oldTab;
}
else if ((newCap = oldCap << 1) < MAXIMUM_CAPACITY &&
oldCap >= DEFAULT_INITIAL_CAPACITY)
newThr = oldThr << 1; // double threshold
}
else if (oldThr > 0) // initial capacity was placed in threshold
newCap = oldThr;
else { // zero initial threshold signifies using defaults
newCap = DEFAULT_INITIAL_CAPACITY;// 默认数组长度16
newThr = (int)(DEFAULT_LOAD_FACTOR * DEFAULT_INITIAL_CAPACITY);// 默认扩容的临界值:12
}
if (newThr == 0) {
float ft = (float)newCap * loadFactor;
newThr = (newCap < MAXIMUM_CAPACITY && ft < (float)MAXIMUM_CAPACITY ?
(int)ft : Integer.MAX_VALUE);
}
threshold = newThr;// 赋值扩容的临界值
Node<K,V>[] newTab = (Node<K,V>[])new Node[newCap];// 创建一个长度为16的Node数组
table = newTab;
if (oldTab != null) {
for (int j = 0; j < oldCap; ++j) {
Node<K,V> e;
if ((e = oldTab[j]) != null) {
oldTab[j] = null;
if (e.next == null)
newTab[e.hash & (newCap - 1)] = e;
else if (e instanceof TreeNode)
((TreeNode<K,V>)e).split(this, newTab, j, oldCap);
else { // preserve order
Node<K,V> loHead = null, loTail = null;
Node<K,V> hiHead = null, hiTail = null;
Node<K,V> next;
do {
next = e.next;
if ((e.hash & oldCap) == 0) {
if (loTail == null)
loHead = e;
else
loTail.next = e;
loTail = e;
}
else {
if (hiTail == null)
hiHead = e;
else
hiTail.next = e;
hiTail = e;
}
} while ((e = next) != null);
if (loTail != null) {
loTail.next = null;
newTab[j] = loHead;
}
if (hiTail != null) {
hiTail.next = null;
newTab[j + oldCap] = hiHead;
}
}
}
}
}
return newTab;
}计算 key 的 hash 值:
1
2
3
4static final int hash(Object key) {
int h;
return (key == null) ? 0 : (h = key.hashCode()) ^ (h >>> 16);
}链表转红黑树:
1
2
3
4
5
6
7
8
9
10
11
12
13
14
15
16
17
18
19
20final void treeifyBin(Node<K,V>[] tab, int hash) {
int n, index; Node<K,V> e;
if (tab == null || (n = tab.length) < MIN_TREEIFY_CAPACITY)
resize();// 如果底层数组的长度小玉64,只扩容,不转红黑树
else if ((e = tab[index = (n - 1) & hash]) != null) {
TreeNode<K,V> hd = null, tl = null;
do {
TreeNode<K,V> p = replacementTreeNode(e, null);
if (tl == null)
hd = p;
else {
p.prev = tl;
tl.next = p;
}
tl = p;
} while ((e = e.next) != null);
if ((tab[index] = hd) != null)
hd.treeify(tab);
}
}总结,JDK 8.0 相较于 JDK 7.0 在底层实现方面的不同:
new HashMap()时,底层没有创建一个长度为 16 的数组。- JDK 8.0 底层的数组是 Node[],而非 Entry[]。
- 首次调用
put()时,底层创建长度为 16 的数组。 - JDK 7.0 底层结构只有:数组 + 链表。JDK 8.0 中底层结构是:数组 + 链表 + 红黑树。
形成链表时,”七上八下”: JDK 7.0 中新的元素指向旧的元素,JDK 8.0 中旧的元素指向新的元素。
当数组的某一个索引位置上的元素以链表形式存在的数据个数 > 8 且当前数组的长度 > 64时,此时此索引位置上的所数据改为使用红黑树存储。
存储结构:
HashMap 的内部存储结构其实是数组+ 链表 + 树的结合。当实例化一个 HashMap 时,会初始化 initialCapacity 和 loadFactor,在 put 第一对映射关系时,系统会创建一个长度为 initialCapacity 的 Node 数组,这个长度在哈希表中被称为容量 (Capacity),在这个数组中可以存放元素的位置我们称之为 “桶” (bucket),每个 bucket 都有自己的索引,系统可以根据索引快速的查找 bucket 中的元素。
每个 bucket 中存储一个元素,即一个 Node 对象,但每一个 Node 对象可以带一个引用变量 next,用于指向下一个元素,因此,在一个桶中,就有可能生成一个 Node 链。也可能是一个一个 TreeNode 对象,每一个 TreeNode 对象可以有两个叶子结点 left 和 right,因此,在一个桶中,就有可能生成一个 TreeNode 树。而新添加的元素作为链表的 last,或树的叶子结点。
结构图示意:
扩容过程:
- 扩容过程与 JDK 7.0 相同。
- 树形化:当 HashMap 中的其中一个链的对象个数如果达到了 8 个,此时如果 capacity 没有达到 64,那么 HashMap 会先扩容解决,如果已经达到了 64,那么这个链会变成树,结点类型由 Node 变成 TreeNode 类型。当然,如果当映射关系被移除后,下次
resize()时判断树的结点个数低于 6 个,也会把树再转为链表。
面试题
- 谈谈你对 HashMap 中
put()和get()的认识?如果了解再谈谈 HashMap 的扩容机制?默认大小是多少?什么是负载因子 (或填充比)?什么是吞吐临界值 (或阈值、threshold)? - 负载因子值的大小,对 HashMap 有什么影响?
- 负载因子的大小决定了 HashMap 的数据密度。
- 负载因子越大,数据密度越大,发生碰撞的几率越高,数组中的链表越容易长,造成查询或插入时的比较次数增多,性能会下降。
- 负载因子越小,就越容易触发扩容,数据密度也越小,意味着发生碰撞的几率越小,数组中的链表也就越短,查询和插入时比较的次数也越小,性能会更高。但是会浪费一定的内容空间,而且经常扩容也会影响性能,建议初始化预设大一点的空间。
- 按照其他语言的参考及研究经验,会考虑将负载因子设置为 0.7 ~ 0.75,此时平均检索长度接近于常数。
- 谈谈你对 HashMap 中
LinkedHashMap
LinkedHashMap 是 HashMap 的子类。
在 HashMap 存储结构的基础上,使用了一对双向链表来记录添加元素的顺序。
HashMap 中的内部类 Node:
1
2
3
4
5
6static class Node<K,V> implements Map.Entry<K,V> {
final int hash;
final K key;
V value;
Node<K,V> next;
}LinkedHashMap 中的内部类 Entry,用以替换 Node:
1
2
3
4
5
6static class Entry<K,V> extends HashMap.Node<K,V> {
Entry<K,V> before, after;
Entry(int hash, K key, V value, Node<K,V> next) {
super(hash, key, value, next);
}
}LinkedHashMap 在原有的 HashMap 底层结构基础上,添加了一对指针 befor 和 after,指向当前元素的前一个和后一个元素。
与 LinkedHashSet 类似,LinkedHashMap 可以维护 Map 的迭代顺序:迭代顺序与 key - value 对的插入顺序一致。
LinkedHashMap 在遍历元素时,可以按照添加的顺序实现遍历。
实例:
1
2
3
4
5
6
7
8
9
10
11
12
13
14
15public class Test {
public static void main(String[] args) {
Map map = new HashMap();
map.put(123, "AA");
map.put(345, "BB");
map.put(12, "CC");
System.out.println(map);// {345=BB, 123=AA, 12=CC}
map = new LinkedHashMap();
map.put(123, "AA");
map.put(345, "BB");
map.put(12, "CC");
System.out.println(map);// {123=AA, 345=BB, 12=CC}
}
}
对于频繁的遍历操作,此类执行效率高于 HashMap。
TreeMap
TreeMap 存储 key - value 对时,需要根据 key - value 对进行排序。TreeMap 可以保证所有的 key - value 对处于有序状态。
TreeMap 底层使用红黑树结构存储数据。
TreeMap 的 key 的排序:
自然排序:TreeMap 的所有的 key 应该是同一个类的对象,否则将会抛出 ClasssCastException 异常,同时,key 所在的类需要实现 Comparable 接口。
1
2
3
4
5
6
7
8
9
10
11
12
13
14
15
16
17
18
19
20
21
22
23
24
25
26
27
28
29
30
31
32
33
34
35
36
37
38
39
40
41
42
43
44
45
46
47
48
49
50
51
52
53
54
55
56
57
58
59
60
61
62
63
64
65
66
67
68
69
70
71
72
73
74
75
76
77
78
79
80
81
82
83
84
85
86
87
88
89
90
91
92
93
94
95
96
97
98
99
100
101
102
103
104
105
106public class Test {
public static void main(String[] args) {
TreeMap map = new TreeMap();
User u1 = new User("Tom", 23);
User u2 = new User("Jerry", 32);
User u3 = new User("Jack", 20);
User u4 = new User("Rose", 18);
map.put(u1, 98);
map.put(u2, 89);
map.put(u3, 76);
map.put(u4, 100);
Set entrySet = map.entrySet();
Iterator iterator1 = entrySet.iterator();
while (iterator1.hasNext()) {
Object obj = iterator1.next();
Map.Entry entry = (Map.Entry) obj;
System.out.println(entry.getKey() + "---->" + entry.getValue());
}
}
}
class User implements Comparable {
private String name;
private int age;
public User() {
}
public User(String name, int age) {
this.name = name;
this.age = age;
}
public String getName() {
return name;
}
public void setName(String name) {
this.name = name;
}
public int getAge() {
return age;
}
public void setAge(int age) {
this.age = age;
}
public String toString() {
return "User{" +
"name='" + name + '\'' +
", age=" + age +
'}';
}
public boolean equals(Object o) {
System.out.println("User equals()....");
if (this == o) {
return true;
}
if (o == null || getClass() != o.getClass()) {
return false;
}
User user = (User) o;
if (age != user.age) {
return false;
}
return name != null ? name.equals(user.name) : user.name == null;
}
public int hashCode() { //return name.hashCode() + age;
int result = name != null ? name.hashCode() : 0;
result = 31 * result + age;
return result;
}
// 按照姓名从大到小排列,年龄从小到大排列
public int compareTo(Object o) {
if (o instanceof User) {
User user = (User) o;
// return -this.name.compareTo(user.name);
int compare = -this.name.compareTo(user.name);
if (compare != 0) {
return compare;
} else {
return Integer.compare(this.age, user.age);
}
} else {
throw new RuntimeException("输入的类型不匹配");
}
}
}
输出结果:
User{name='Tom', age=23}---->98
User{name='Rose', age=18}---->100
User{name='Jerry', age=32}---->89
User{name='Jack', age=20}---->76定制排序:创建 TreeMap 时,传入一个 Comparator 对象,该对象负责对 TreeMap 中的所有 key 进行排序。此时不需要 Map 的 key 实现 Comparable 接口。
1
2
3
4
5
6
7
8
9
10
11
12
13
14
15
16
17
18
19
20
21
22
23
24
25
26
27
28
29
30
31
32
33
34
35
36
37
38
39
40
41
42
43
44
45
46
47
48
49
50
51
52
53
54
55
56
57
58
59
60
61
62
63
64
65
66
67
68
69
70
71
72
73
74
75
76
77
78
79
80
81
82
83
84
85
86
87
88
89
90
91
92
93
94
95
96
97
98
99
100
101
102
103
104
105
106
107
108
109
110
111
112
113
114
115
116
117public class Test {
public static void main(String[] args) {
// 按照年龄从小到大排序
TreeMap map = new TreeMap(new Comparator() {
public int compare(Object o1, Object o2) {
if (o1 instanceof User && o2 instanceof User) {
User u1 = (User) o1;
User u2 = (User) o2;
return Integer.compare(u1.getAge(), u2.getAge());
}
throw new RuntimeException("输入的类型不匹配!");
}
});
User u1 = new User("Tom", 23);
User u2 = new User("Jerry", 32);
User u3 = new User("Jack", 20);
User u4 = new User("Rose", 18);
map.put(u1, 98);
map.put(u2, 89);
map.put(u3, 76);
map.put(u4, 100);
Set entrySet = map.entrySet();
Iterator iterator1 = entrySet.iterator();
while (iterator1.hasNext()) {
Object obj = iterator1.next();
Map.Entry entry = (Map.Entry) obj;
System.out.println(entry.getKey() + "---->" + entry.getValue());
}
}
}
class User implements Comparable {
private String name;
private int age;
public User() {
}
public User(String name, int age) {
this.name = name;
this.age = age;
}
public String getName() {
return name;
}
public void setName(String name) {
this.name = name;
}
public int getAge() {
return age;
}
public void setAge(int age) {
this.age = age;
}
public String toString() {
return "User{" +
"name='" + name + '\'' +
", age=" + age +
'}';
}
public boolean equals(Object o) {
System.out.println("User equals()....");
if (this == o) {
return true;
}
if (o == null || getClass() != o.getClass()) {
return false;
}
User user = (User) o;
if (age != user.age) {
return false;
}
return name != null ? name.equals(user.name) : user.name == null;
}
public int hashCode() { //return name.hashCode() + age;
int result = name != null ? name.hashCode() : 0;
result = 31 * result + age;
return result;
}
// 按照姓名从大到小排列,年龄从小到大排列
public int compareTo(Object o) {
if (o instanceof User) {
User user = (User) o;
// return -this.name.compareTo(user.name);
int compare = -this.name.compareTo(user.name);
if (compare != 0) {
return compare;
} else {
return Integer.compare(this.age, user.age);
}
} else {
throw new RuntimeException("输入的类型不匹配");
}
}
}
输出结果:
User{name='Rose', age=18}---->100
User{name='Jack', age=20}---->76
User{name='Tom', age=23}---->98
User{name='Jerry', age=32}---->89
TreeMap 判断两个 key 相等的标准:两个 key 通过
compareTo()或者compare()返回 0。
Hashtable
Hashtable 是个古老的 Map 实现类,JDK 1.0 就提供了。不同于 HashMap,Hashtable 是线程安全的,但效率低。
Hashtable 实现原理和 HashMap 相同,功能相同。底层都使用哈希表结构,查询速度快,很多情况下可以互用。
与 HashMap 不同,Hashtable 不允许使用 null 作为 key 和 value。
实例:
1
2
3
4
5
6
7
8
9
10
11public class Test {
public static void main(String[] args) {
Map map = new HashMap();
map.put(null, 123);
map.put(123, null);
map.put(null, null);
System.out.println(map);// {null=null, 123=null}
map = new Hashtable();
map.put(null, 123);// java.lang.NullPointerException
}
}
与 HashMap 一样,Hashtable 也不能保证其中 key - value 对的顺序。
Hashtable 判断两个 key 相等、两个 value 相等的标准,与 HashMap 一致。
Properties
Properties 类是 Hashtable 的子类,常用于处理配置文件。
由于属性文件里的 key、value 都是字符串类型,所以 Properties 里的 key 和 value 都是字符串类型。
存取数据时,建议使用
setProperty(String key, String value)和getProperty(String key)。public Object setProperty(String key, String value): 保存一对属性。public String getProperty(String key):使用此属性列表中指定的键搜索属性值。public Set<String> stringPropertyNames():所有键的名称的集合。1
2
3
4
5
6
7
8
9
10
11
12
13
14
15
16
17
18
19
20
21
22
23
24
25public class ProDemo {
public static void main(String[] args) {
// 创建属性集对象
Properties properties = new Properties();
// 添加键值对元素
properties.setProperty("filename", "a.txt");
properties.setProperty("length", "209385038");
properties.setProperty("location", "D:\\a.txt");
// 打印属性集对象
System.out.println(properties);
// 通过键,获取属性值
System.out.println(properties.getProperty("filename"));
System.out.println(properties.getProperty("length"));
System.out.println(properties.getProperty("location"));
// 遍历属性集,获取所有键的集合
Set<String> strings = properties.stringPropertyNames();
// 打印键值对
for (String key : strings) {
System.out.println(key + " -- " + properties.getProperty(key));
}
}
}
与流有关的方法:
public void load(InputStream inStream): 从字节输入流中读取键值对。public void load(Reader reader):从字符输入流中读取键值对。public void store(Writer writer,String comments)public void store(OutputStream out,String comments)
实例:
1
2
3
4
5
6
7
8
9
10
11
12Properties pros = new Properties();
try (FileInputStream fis = new FileInputStream("jdbc.properties")) {
// 加载流对应的文件
pros.load(fis);
// 遍历集合并打印
Set<String> strings = properties.stringPropertyNames();
for (String key : strings) {
System.out.println(key + " -- " + properties.getProperty(key));
}
} catch (Exception e) {
e.printStackTrace();
}jdbc.properties 格式,以 = 连接,不要有空格:
1
2user=Tom
password=123qwe
Collections 工具类
Collections 是一个操作 Set、List 和 Map 等集合的工具类。
- 操作数组的工具类:Arrays。
Collections 中提供了一系列静态的方法对集合元素进行排序、查询和修改等操作,还提供了对集合对象设置不可变、对集合对象实现同步控制等方法。
常用方法:
排序操作:
reverse(List list):反转 list 中元素的顺序。shuffle(List list):对 list 集合元素进行随机排序。sort(List list):根据元素的自然顺序对指定 list 集合元素按升序排序 (自然排序)。sort(List list, Comparator comparator):根据指定的 comparator 产生的顺序对 list 集合元素进行排序 (定制排序)。swap(List list, int i, int j):将指定 list 集合中的 i 处元素和 j 处元素进行交换。实例:
1
2
3
4
5
6
7
8
9
10
11
12
13
14
15
16
17
18
19
20public class Test {
public static void main(String[] args) {
List list = new ArrayList();
list.add(123);
list.add(43);
list.add(765);
list.add(765);
list.add(765);
list.add(-97);
list.add(0);
System.out.println(list);// [123, 43, 765, 765, 765, -97, 0]
// Collections.reverse(list);// [0, -97, 765, 765, 765, 43, 123]
// Collections.shuffle(list);// [765, 43, 123, 0, -97, 765, 765]
// Collections.sort(list);// [-97, 0, 43, 123, 765, 765, 765]
// Collections.swap(list, 1, 2);// [123, 765, 43, 765, 765, -97, 0]
System.out.println(list);
}
}
查找和替换操作:
Object max(Collection coll):根据元素的自然顺序,返回给定集合 coll 中的最大元素 (自然排序)。Object max(Collection coll, Comparator ):根据 comparator 指定的顺序,返回给定集合 coll 中的最大元素 (定制排序)。Object min(Collection):根据元素的自然顺序,返回给定集合 coll 中的最小元素 (自然排序)。Object min(Collection,Comparator):根据 comparator 指定的顺序,返回给定集合 coll 中的最小元素 (定制排序)。int frequency(Collection coll, Object obj):返回指定集合 coll 中指定元素 obj 出现的次数。1
2
3
4
5
6
7
8
9
10
11
12
13
14public class Test {
public static void main(String[] args) {
List list = new ArrayList();
list.add(123);
list.add(43);
list.add(765);
list.add(765);
list.add(765);
list.add(-97);
list.add(0);
int frequency = Collections.frequency(list, 123);
System.out.println(frequency);// 1
}
}void copy(List dest, List src):将 src 中的内容复制到 dest 中。注意:需要将dest数组中填充元素,数量不低于src的长度。1
2
3
4
5
6
7
8
9
10
11
12
13
14
15
16
17
18
19
20
21
22public class Test {
public static void main(String[] args) {
List src = new ArrayList();
src.add(123);
src.add(43);
src.add(765);
src.add(-97);
src.add(0);
// 错误的写法:java.lang.IndexOutOfBoundsException: Source does not fit in dest
/*List dest = new ArrayList();
List dest = new ArrayList(src.size());
Collections.copy(dest, src);*/
// 正确的写法:需要将dest数组中填充元素,数量不低于src的长度
List dest = Arrays.asList(new Object[src.size()]);// 1.先填充dest集合
System.out.println(dest.size());// = list.size();
Collections.copy(dest, src);// 2.再复制src集合
System.out.println(dest);// [123, 43, 765, -97, 0]
}
}boolean replaceAll(List list, Object oldVal, Object newVal):使用新值 newVal 替换 list 对象的所有旧值 oldVal。1
2
3
4
5
6
7
8
9
10
11
12
13
14
15public class Test {
public static void main(String[] args) {
List list = new ArrayList();
list.add(123);
list.add(43);
list.add(765);
list.add(765);
list.add(765);
list.add(-97);
list.add(0);
System.out.println(list);// [123, 43, 765, 765, 765, -97, 0]
Collections.replaceAll(list, 765, 888);
System.out.println(list);// [123, 43, 888, 888, 888, -97, 0]
}
}
同步控制操作:
Collections 类中提供了多个
synchronizedXxx(),该方法可使将指定集合包装成线程同步的集合,从而可以解决多线程并发访问集合时的线程安全问题。有了这些方法,涉及到线程安全的集合,可以不需要使用 Vector 或 Hashtable。
1
2
3
4
5
6
7
8
9
10
11
12
13public class Test {
public static void main(String[] args) {
List list = new ArrayList();
list.add(123);
list.add(43);
list.add(765);
list.add(-97);
list.add(0);
// 返回的list1即为线程安全的List
List list1 = Collections.synchronizedList(list);
}
}
本文参考
https://www.gulixueyuan.com/goods/show/203?targetId=309&preview=0
声明:写作本文初衷是个人学习记录,鉴于本人学识有限,如有侵权或不当之处,请联系 wdshfut@163.com。