Spring Boot 简介
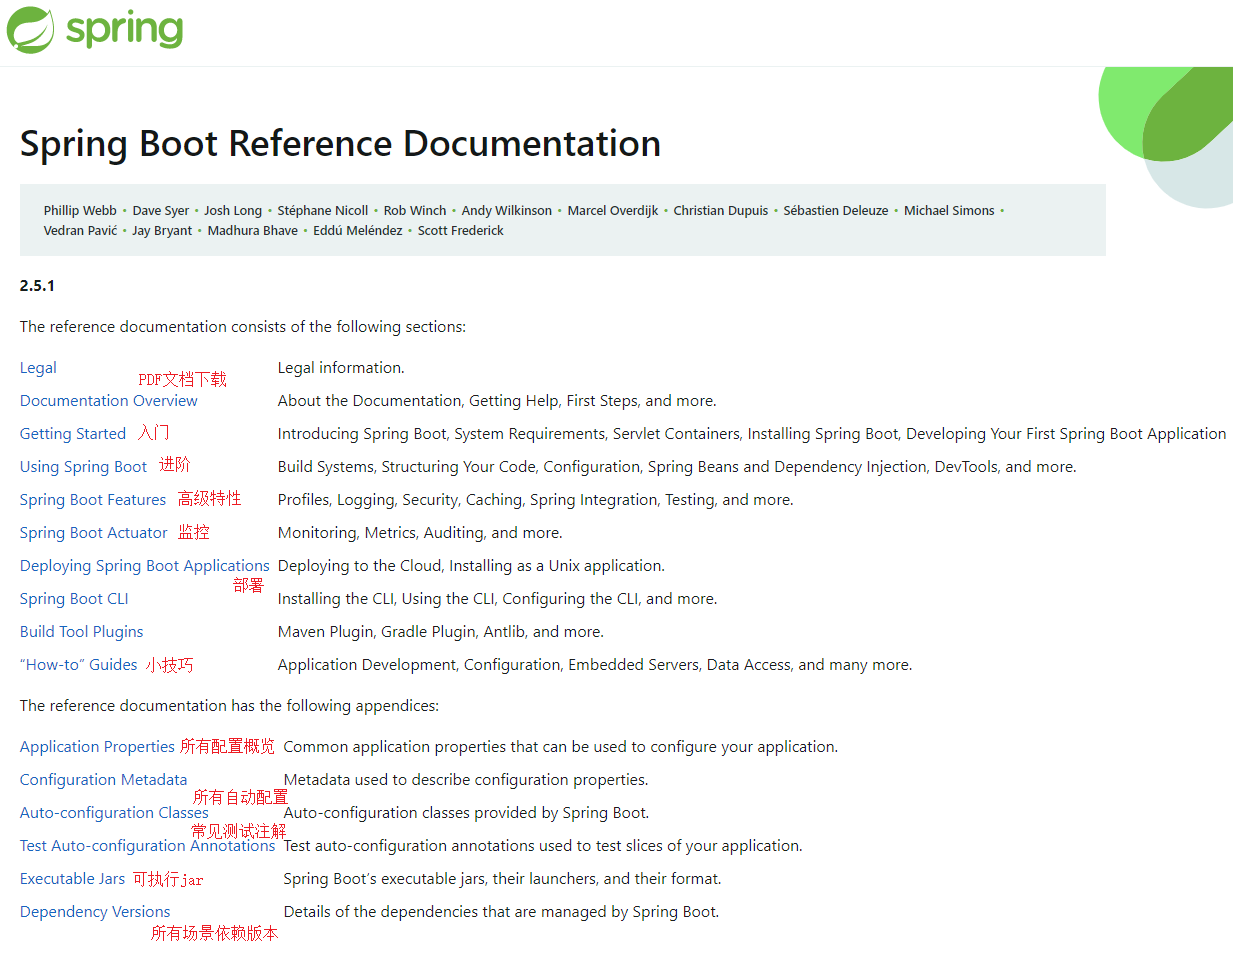
文档:https://spring.io/projects/spring-boot#learn
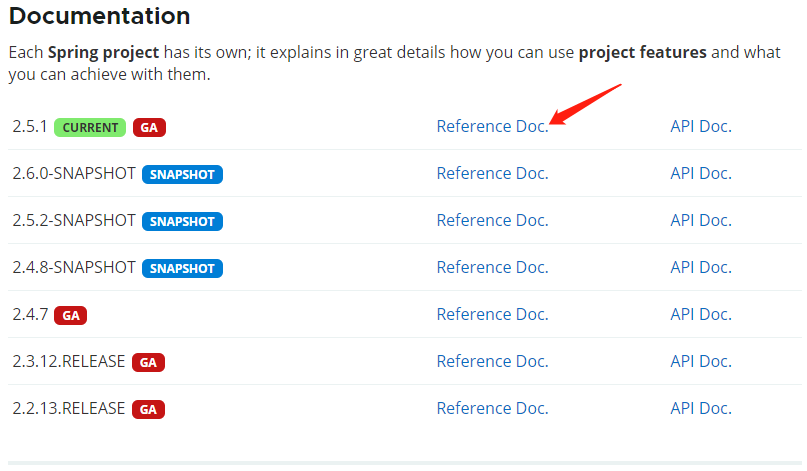
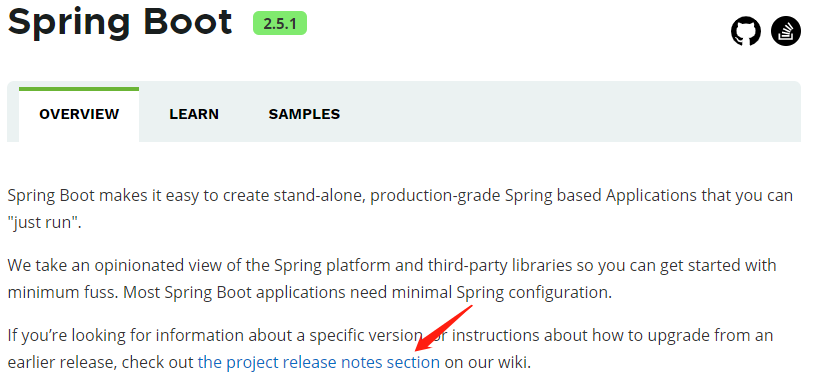
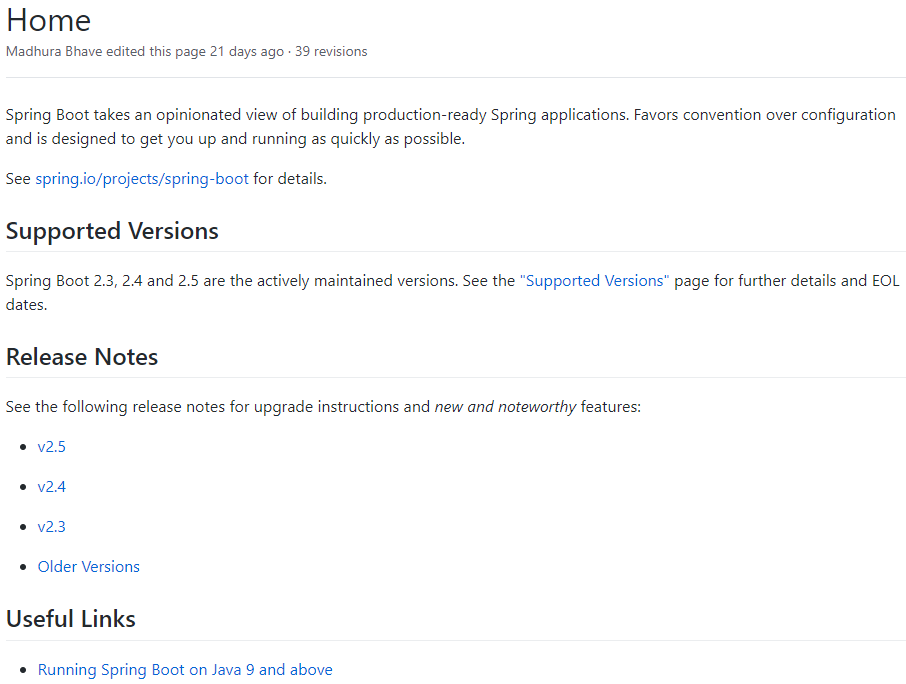
查看各版本的新特性:https://github.com/spring-projects/spring-boot/wiki#release-notes
Spring Boot 的作用
- Spring Boot makes it easy to create stand-alone, production-grade Spring based Applications that you can “just run”.
- Spring Boot 能快速创建出生产级别的 Spring 应用。
Spring Boot 的优点
Create stand-alone Spring applications
- 创建独立的 Spring 应用。
Embed Tomcat, Jetty or Undertow directly (no need to deploy WAR files)
- 内嵌 web 服务器。
Provide opinionated ‘starter’ dependencies to simplify your build configuration
- 自动 starter 依赖,简化构建配置。
Automatically configure Spring and 3rd party libraries whenever possible
- 自动配置 Spring 以及第三方功能。
Provide production-ready features such as metrics, health checks, and externalized configuration
- 提供生产级别的监控、健康检查及外部化配置。
Absolutely no code generation and no requirement for XML configuration
- 无代码生成、无需编写 XML。
Spring Boot 的缺点
- 人称版本帝,迭代快,需要时刻关注变化。
- 封装太深,内部原理复杂,不容易精通。
Spring Boot 2 入门
系统要求
Java 8 +:
1
2
3
4
PS C:\Users\XiSun> java -version
openjdk version "1.8.0_222"
OpenJDK Runtime Environment (AdoptOpenJDK)(build 1.8.0_222-b10)
OpenJDK 64-Bit Server VM (AdoptOpenJDK)(build 25.222-b10, mixed mode)Maven 3.5 +:
1
2
3
4
5
6
PS C:\Users\XiSun> mvn -v
Apache Maven 3.6.3 (cecedd343002696d0abb50b32b541b8a6ba2883f)
Maven home: D:\Program Files\Maven\apache-maven-3.6.3\bin\..
Java version: 1.8.0_222, vendor: AdoptOpenJDK, runtime: D:\Program Files\AdoptOpenJDK\jdk-8.0.222.10-hotspot\jre
Default locale: zh_CN, platform encoding: GBK
OS name: "windows 10", version: "10.0", arch: "amd64", family: "windows"Maven setting.xml 的设置:
1
2
3
4
5
6
7
8
9
10
11
12
13
14
15
16
17
18
19
20
21
22
23<mirrors>
<mirror>
<id>nexus-aliyun</id>
<mirrorOf>central</mirrorOf>
<name>Nexus aliyun</name>
<url>http://maven.aliyun.com/nexus/content/groups/public</url>
</mirror>
</mirrors>
<profiles>
<profile>
<id>jdk-1.8</id>
<activation>
<activeByDefault>true</activeByDefault>
<jdk>1.8</jdk>
</activation>
<properties>
<maven.compiler.source>1.8</maven.compiler.source>
<maven.compiler.target>1.8</maven.compiler.target>
<maven.compiler.compilerVersion>1.8</maven.compiler.compilerVersion>
</properties>
</profile>
</profiles>说明:添加上面的配置后,项目中每次 Maven 更新依赖时,不会改变 Compiler 的版本。如果针对单个项目配置,则在该项目的 pom.xml 文件中添加:
1
2
3
4
5
6
7
8
9
10
11
12
13
14
15
16
17
18
19
20
21<properties>
<app.main.class>cn.matgene.reaction.extractor.FlinkKafkaJob</app.main.class>
<project.build.sourceEncoding>UTF-8</project.build.sourceEncoding>
<java.version>1.8</java.version>
<maven.compiler.version>3.6.1</maven.compiler.version>
<maven.compiler.source>${java.version}</maven.compiler.source>
<maven.compiler.target>${java.version}</maven.compiler.target>
</properties>
<build>
<plugins>
<plugin>
<groupId>org.apache.maven.plugins</groupId>
<artifactId>maven-compiler-plugin</artifactId>
<version>${maven.compiler.version}</version>
<configuration>
<source>${maven.compiler.source}</source>
<target>${maven.compiler.target}</target>
</configuration>
</plugin>
</build>
HelloWorld
需求:浏览器发送
/hello请求,服务器响应Hello, Spring Boot 2!。创建 Maven 工程,并添加 parent 依赖:

1
2
3
4
5
6
7
8
9
10
11
12
13
14
15
16
17
<project xmlns="http://maven.apache.org/POM/4.0.0"
xmlns:xsi="http://www.w3.org/2001/XMLSchema-instance"
xsi:schemaLocation="http://maven.apache.org/POM/4.0.0 http://maven.apache.org/xsd/maven-4.0.0.xsd">
<modelVersion>4.0.0</modelVersion>
<groupId>cn.xisun</groupId>
<artifactId>springboot-helloworld</artifactId>
<version>1.0-SNAPSHOT</version>
<parent>
<groupId>org.springframework.boot</groupId>
<artifactId>spring-boot-starter-parent</artifactId>
<version>2.5.1</version>
</parent>
</project>parent 节点为手动添加。
引入 web 相关依赖:
1
2
3
4<dependency>
<groupId>org.springframework.boot</groupId>
<artifactId>spring-boot-starter-web</artifactId>
</dependency>创建主程序:
1
2
3
4
5
6
7
8
9
10
11/**
* @Author XiSun
* @Date 2021/6/20 15:03
* @Description 主程序类
*/
public class MainApplication {
public static void main(String[] args) {
SpringApplication.run(MainApplication.class, args);
}
}业务层:
1
2
3
4
5
6
7
8
9
10
11
12/**
* @Author XiSun
* @Date 2021/6/20 15:17
*/
public class HelloController {
public String hello() {
return "Hello, Spring Boot 2!";
}
}运行 MainApplication.class 的 main 方法,启动程序,在浏览器输入地址
http://localhost:8080/hello,查看结果:1
2
3
4
5
6
7
8
9
10
11
12
13
14
15
16
17
18
19
20. ____ _ __ _ _
/\\ / ___'_ __ _ _(_)_ __ __ _ \ \ \ \
( ( )\___ | '_ | '_| | '_ \/ _` | \ \ \ \
\\/ ___)| |_)| | | | | || (_| | ) ) ) )
' |____| .__|_| |_|_| |_\__, | / / / /
=========|_|==============|___/=/_/_/_/
:: Spring Boot :: (v2.5.1)
2021-06-20 15:37:47.623 INFO 14268 --- [ main] cn.xisun.web.MainApplication : Starting MainApplication using Java 1.8.0_222 on DESKTOP-OJKMETJ with PID 14268 (D:\JetBrainsWorkSpace\IDEAProjects\xisun-springboot\target\classes started by XiSun in D:\JetBrainsWorkSpace\IDEAProjects\xisun-springboot)
2021-06-20 15:37:47.627 INFO 14268 --- [ main] cn.xisun.web.MainApplication : No active profile set, falling back to default profiles: default
2021-06-20 15:37:48.380 INFO 14268 --- [ main] o.s.b.w.embedded.tomcat.TomcatWebServer : Tomcat initialized with port(s): 8080 (http)
2021-06-20 15:37:48.386 INFO 14268 --- [ main] o.apache.catalina.core.StandardService : Starting service [Tomcat]
2021-06-20 15:37:48.386 INFO 14268 --- [ main] org.apache.catalina.core.StandardEngine : Starting Servlet engine: [Apache Tomcat/9.0.46]
2021-06-20 15:37:48.438 INFO 14268 --- [ main] o.a.c.c.C.[Tomcat].[localhost].[/] : Initializing Spring embedded WebApplicationContext
2021-06-20 15:37:48.439 INFO 14268 --- [ main] w.s.c.ServletWebServerApplicationContext : Root WebApplicationContext: initialization completed in 760 ms
2021-06-20 15:37:48.674 INFO 14268 --- [ main] o.s.b.w.embedded.tomcat.TomcatWebServer : Tomcat started on port(s): 8080 (http) with context path ''
2021-06-20 15:37:48.681 INFO 14268 --- [ main] cn.xisun.web.MainApplication : Started MainApplication in 1.374 seconds (JVM running for 2.301)
2021-06-20 15:37:59.504 INFO 14268 --- [nio-8080-exec-1] o.a.c.c.C.[Tomcat].[localhost].[/] : Initializing Spring DispatcherServlet 'dispatcherServlet'
2021-06-20 15:37:59.504 INFO 14268 --- [nio-8080-exec-1] o.s.web.servlet.DispatcherServlet : Initializing Servlet 'dispatcherServlet'
2021-06-20 15:37:59.504 INFO 14268 --- [nio-8080-exec-1] o.s.web.servlet.DispatcherServlet : Completed initialization in 0 ms
简化配置:
在 resources 目录下新建 application.properties 文件,项目中的一些配置可在此文件中进行修改。
如,修改 tomcat 端口:
1
=8888
简化部署:
添加
spring-boot-maven-plugin:1
2
3
4
5
6
7
8<build>
<plugins>
<plugin>
<groupId>org.springframework.boot</groupId>
<artifactId>spring-boot-maven-plugin</artifactId>
</plugin>
</plugins>
</build>打包:
1
2
3
4
5
6
7
8
9
10
11
12
13
14
15
16
17
18
19
20
21
22
23
24
25
26
27
28
29
30
31
32
33
34
35
36
37
38
39
40
41
42D:\JetBrainsWorkSpace\IDEAProjects\xisun-springboot>mvn clean package -DskipTests
[INFO] Scanning for projects...
[INFO]
[INFO] -------------------< cn.xisun:springboot-helloworld >-------------------
[INFO] Building springboot-helloworld 1.0-SNAPSHOT
[INFO] --------------------------------[ jar ]---------------------------------
[INFO]
[INFO] --- maven-clean-plugin:3.1.0:clean (default-clean) @ springboot-helloworld ---
[INFO] Deleting D:\JetBrainsWorkSpace\IDEAProjects\xisun-springboot\target
[INFO]
[INFO] --- maven-resources-plugin:3.2.0:resources (default-resources) @ springboot-helloworld ---
[INFO] Using 'UTF-8' encoding to copy filtered resources.
[INFO] Using 'UTF-8' encoding to copy filtered properties files.
[INFO] Copying 1 resource
[INFO] Copying 0 resource
[INFO]
[INFO] --- maven-compiler-plugin:3.8.1:compile (default-compile) @ springboot-helloworld ---
[INFO] Changes detected - recompiling the module!
[INFO] Compiling 2 source files to D:\JetBrainsWorkSpace\IDEAProjects\xisun-springboot\target\classes
[INFO]
[INFO] --- maven-resources-plugin:3.2.0:testResources (default-testResources) @ springboot-helloworld ---
[INFO] Using 'UTF-8' encoding to copy filtered resources.
[INFO] Using 'UTF-8' encoding to copy filtered properties files.
[INFO] skip non existing resourceDirectory D:\JetBrainsWorkSpace\IDEAProjects\xisun-springboot\src\test\resources
[INFO]
[INFO] --- maven-compiler-plugin:3.8.1:testCompile (default-testCompile) @ springboot-helloworld ---
[INFO] Changes detected - recompiling the module!
[INFO]
[INFO] --- maven-surefire-plugin:2.22.2:test (default-test) @ springboot-helloworld ---
[INFO] Tests are skipped.
[INFO]
[INFO] --- maven-jar-plugin:3.2.0:jar (default-jar) @ springboot-helloworld ---
[INFO] Building jar: D:\JetBrainsWorkSpace\IDEAProjects\xisun-springboot\target\springboot-helloworld-1.0-SNAPSHOT.jar
[INFO]
[INFO] --- spring-boot-maven-plugin:2.5.1:repackage (repackage) @ springboot-helloworld ---
[INFO] Replacing main artifact with repackaged archive
[INFO] ------------------------------------------------------------------------
[INFO] BUILD SUCCESS
[INFO] ------------------------------------------------------------------------
[INFO] Total time: 1.890 s
[INFO] Finished at: 2021-06-20T16:47:43+08:00
[INFO] ------------------------------------------------------------------------
Spring Boot 的特点
依赖管理
Spring Boot 项目,都会添加一个 parent 依赖
spring-boot-starter-parent:1
2
3
4
5<parent>
<groupId>org.springframework.boot</groupId>
<artifactId>spring-boot-starter-parent</artifactId>
<version>2.5.1</version>
</parent>父项目一般都是做依赖管理的,后续在项目中添加的依赖,其版本号和父项目 version 一致,不需要再单独指定。
spring-boot-starter-parent有自己的父项目spring-boot-dependencies,在该项目中几乎声明了所有开发中常用的依赖的版本号,这个版本号一般适应当前项目对应的版本。这是自动版本仲裁机制。1
2
3
4
5<parent>
<groupId>org.springframework.boot</groupId>
<artifactId>spring-boot-dependencies</artifactId>
<version>2.5.1</version>
</parent>1
2
3
4
5
6
7
8
9
10
11
12
13
14
15
16
17
18
19
20
21
22
23
24
25
26
27
28
29
30
31
32
33
34
35
36
37
38
39
40
41
42
43
44
45
46
47
48
49
50
51
52
53
54
55
56
57
58
59
60
61
62
63
64
65
66
67
68
69
70
71
72
73
74
75
76
77
78
79
80
81
82
83
84
85
86
87
88
89
90
91
92
93
94
95
96
97
98
99
100
101
102
103
104
105
106
107
108
109
110
111
112
113
114
115
116
117
118
119
120
121
122
123
124
125
126
127
128
129
130
131
132
133
134
135
136
137
138
139
140
141
142
143
144
145
146
147
148
149
150
151
152
153
154
155
156
157
158
159
160
161
162
163
164
165
166
167
168
169
170
171
172
173
174
175
176
177
178
179
180
181
182
183
184
185
186
187
188
189
190
191
192
193
194
195
196
197
198
199<properties>
<activemq.version>5.16.2</activemq.version>
<antlr2.version>2.7.7</antlr2.version>
<appengine-sdk.version>1.9.89</appengine-sdk.version>
<artemis.version>2.17.0</artemis.version>
<aspectj.version>1.9.6</aspectj.version>
<assertj.version>3.19.0</assertj.version>
<atomikos.version>4.0.6</atomikos.version>
<awaitility.version>4.0.3</awaitility.version>
<build-helper-maven-plugin.version>3.2.0</build-helper-maven-plugin.version>
<byte-buddy.version>1.10.22</byte-buddy.version>
<caffeine.version>2.9.1</caffeine.version>
<cassandra-driver.version>4.11.1</cassandra-driver.version>
<classmate.version>1.5.1</classmate.version>
<commons-codec.version>1.15</commons-codec.version>
<commons-dbcp2.version>2.8.0</commons-dbcp2.version>
<commons-lang3.version>3.12.0</commons-lang3.version>
<commons-pool.version>1.6</commons-pool.version>
<commons-pool2.version>2.9.0</commons-pool2.version>
<couchbase-client.version>3.1.6</couchbase-client.version>
<db2-jdbc.version>11.5.5.0</db2-jdbc.version>
<dependency-management-plugin.version>1.0.11.RELEASE</dependency-management-plugin.version>
<derby.version>10.14.2.0</derby.version>
<dropwizard-metrics.version>4.1.22</dropwizard-metrics.version>
<ehcache.version>2.10.9.2</ehcache.version>
<ehcache3.version>3.9.4</ehcache3.version>
<elasticsearch.version>7.12.1</elasticsearch.version>
<embedded-mongo.version>3.0.0</embedded-mongo.version>
<flyway.version>7.7.3</flyway.version>
<freemarker.version>2.3.31</freemarker.version>
<git-commit-id-plugin.version>4.0.5</git-commit-id-plugin.version>
<glassfish-el.version>3.0.3</glassfish-el.version>
<glassfish-jaxb.version>2.3.4</glassfish-jaxb.version>
<groovy.version>3.0.8</groovy.version>
<gson.version>2.8.7</gson.version>
<h2.version>1.4.200</h2.version>
<hamcrest.version>2.2</hamcrest.version>
<hazelcast.version>4.1.3</hazelcast.version>
<hazelcast-hibernate5.version>2.2.0</hazelcast-hibernate5.version>
<hibernate.version>5.4.32.Final</hibernate.version>
<hibernate-validator.version>6.2.0.Final</hibernate-validator.version>
<hikaricp.version>4.0.3</hikaricp.version>
<hsqldb.version>2.5.2</hsqldb.version>
<htmlunit.version>2.49.1</htmlunit.version>
<httpasyncclient.version>4.1.4</httpasyncclient.version>
<httpclient.version>4.5.13</httpclient.version>
<httpclient5.version>5.0.4</httpclient5.version>
<httpcore.version>4.4.14</httpcore.version>
<httpcore5.version>5.1.1</httpcore5.version>
<infinispan.version>12.1.4.Final</infinispan.version>
<influxdb-java.version>2.21</influxdb-java.version>
<jackson-bom.version>2.12.3</jackson-bom.version>
<jakarta-activation.version>1.2.2</jakarta-activation.version>
<jakarta-annotation.version>1.3.5</jakarta-annotation.version>
<jakarta-jms.version>2.0.3</jakarta-jms.version>
<jakarta-json.version>1.1.6</jakarta-json.version>
<jakarta-json-bind.version>1.0.2</jakarta-json-bind.version>
<jakarta-mail.version>1.6.7</jakarta-mail.version>
<jakarta-persistence.version>2.2.3</jakarta-persistence.version>
<jakarta-servlet.version>4.0.4</jakarta-servlet.version>
<jakarta-servlet-jsp-jstl.version>1.2.7</jakarta-servlet-jsp-jstl.version>
<jakarta-transaction.version>1.3.3</jakarta-transaction.version>
<jakarta-validation.version>2.0.2</jakarta-validation.version>
<jakarta-websocket.version>1.1.2</jakarta-websocket.version>
<jakarta-ws-rs.version>2.1.6</jakarta-ws-rs.version>
<jakarta-xml-bind.version>2.3.3</jakarta-xml-bind.version>
<jakarta-xml-soap.version>1.4.2</jakarta-xml-soap.version>
<jakarta-xml-ws.version>2.3.3</jakarta-xml-ws.version>
<janino.version>3.1.4</janino.version>
<javax-activation.version>1.2.0</javax-activation.version>
<javax-annotation.version>1.3.2</javax-annotation.version>
<javax-cache.version>1.1.1</javax-cache.version>
<javax-jaxb.version>2.3.1</javax-jaxb.version>
<javax-jaxws.version>2.3.1</javax-jaxws.version>
<javax-jms.version>2.0.1</javax-jms.version>
<javax-json.version>1.1.4</javax-json.version>
<javax-jsonb.version>1.0</javax-jsonb.version>
<javax-mail.version>1.6.2</javax-mail.version>
<javax-money.version>1.1</javax-money.version>
<javax-persistence.version>2.2</javax-persistence.version>
<javax-transaction.version>1.3</javax-transaction.version>
<javax-validation.version>2.0.1.Final</javax-validation.version>
<javax-websocket.version>1.1</javax-websocket.version>
<jaxen.version>1.2.0</jaxen.version>
<jaybird.version>4.0.3.java8</jaybird.version>
<jboss-logging.version>3.4.2.Final</jboss-logging.version>
<jboss-transaction-spi.version>7.6.1.Final</jboss-transaction-spi.version>
<jdom2.version>2.0.6</jdom2.version>
<jedis.version>3.6.0</jedis.version>
<jersey.version>2.33</jersey.version>
<jetty-el.version>9.0.29</jetty-el.version>
<jetty-jsp.version>2.2.0.v201112011158</jetty-jsp.version>
<jetty-reactive-httpclient.version>1.1.9</jetty-reactive-httpclient.version>
<jetty.version>9.4.42.v20210604</jetty.version>
<jmustache.version>1.15</jmustache.version>
<johnzon.version>1.2.13</johnzon.version>
<jolokia.version>1.6.2</jolokia.version>
<jooq.version>3.14.11</jooq.version>
<json-path.version>2.5.0</json-path.version>
<json-smart.version>2.4.7</json-smart.version>
<jsonassert.version>1.5.0</jsonassert.version>
<jstl.version>1.2</jstl.version>
<jtds.version>1.3.1</jtds.version>
<junit.version>4.13.2</junit.version>
<junit-jupiter.version>5.7.2</junit-jupiter.version>
<kafka.version>2.7.1</kafka.version>
<kotlin.version>1.5.10</kotlin.version>
<kotlin-coroutines.version>1.5.0</kotlin-coroutines.version>
<lettuce.version>6.1.2.RELEASE</lettuce.version>
<liquibase.version>4.3.5</liquibase.version>
<log4j2.version>2.14.1</log4j2.version>
<logback.version>1.2.3</logback.version>
<lombok.version>1.18.20</lombok.version>
<mariadb.version>2.7.3</mariadb.version>
<maven-antrun-plugin.version>1.8</maven-antrun-plugin.version>
<maven-assembly-plugin.version>3.3.0</maven-assembly-plugin.version>
<maven-clean-plugin.version>3.1.0</maven-clean-plugin.version>
<maven-compiler-plugin.version>3.8.1</maven-compiler-plugin.version>
<maven-dependency-plugin.version>3.1.2</maven-dependency-plugin.version>
<maven-deploy-plugin.version>2.8.2</maven-deploy-plugin.version>
<maven-enforcer-plugin.version>3.0.0-M3</maven-enforcer-plugin.version>
<maven-failsafe-plugin.version>2.22.2</maven-failsafe-plugin.version>
<maven-help-plugin.version>3.2.0</maven-help-plugin.version>
<maven-install-plugin.version>2.5.2</maven-install-plugin.version>
<maven-invoker-plugin.version>3.2.2</maven-invoker-plugin.version>
<maven-jar-plugin.version>3.2.0</maven-jar-plugin.version>
<maven-javadoc-plugin.version>3.2.0</maven-javadoc-plugin.version>
<maven-resources-plugin.version>3.2.0</maven-resources-plugin.version>
<maven-shade-plugin.version>3.2.4</maven-shade-plugin.version>
<maven-source-plugin.version>3.2.1</maven-source-plugin.version>
<maven-surefire-plugin.version>2.22.2</maven-surefire-plugin.version>
<maven-war-plugin.version>3.3.1</maven-war-plugin.version>
<micrometer.version>1.7.0</micrometer.version>
<mimepull.version>1.9.14</mimepull.version>
<mockito.version>3.9.0</mockito.version>
<mongodb.version>4.2.3</mongodb.version>
<mssql-jdbc.version>9.2.1.jre8</mssql-jdbc.version>
<mysql.version>8.0.25</mysql.version>
<nekohtml.version>1.9.22</nekohtml.version>
<neo4j-java-driver.version>4.2.6</neo4j-java-driver.version>
<netty.version>4.1.65.Final</netty.version>
<netty-tcnative.version>2.0.39.Final</netty-tcnative.version>
<oauth2-oidc-sdk.version>9.3.3</oauth2-oidc-sdk.version>
<nimbus-jose-jwt.version>9.8.1</nimbus-jose-jwt.version>
<ojdbc.version>19.3.0.0</ojdbc.version>
<okhttp3.version>3.14.9</okhttp3.version>
<oracle-database.version>21.1.0.0</oracle-database.version>
<pooled-jms.version>1.2.2</pooled-jms.version>
<postgresql.version>42.2.20</postgresql.version>
<prometheus-pushgateway.version>0.10.0</prometheus-pushgateway.version>
<quartz.version>2.3.2</quartz.version>
<querydsl.version>4.4.0</querydsl.version>
<r2dbc-bom.version>Arabba-SR10</r2dbc-bom.version>
<rabbit-amqp-client.version>5.12.0</rabbit-amqp-client.version>
<reactive-streams.version>1.0.3</reactive-streams.version>
<reactor-bom.version>2020.0.7</reactor-bom.version>
<rest-assured.version>4.3.3</rest-assured.version>
<rsocket.version>1.1.1</rsocket.version>
<rxjava.version>1.3.8</rxjava.version>
<rxjava-adapter.version>1.2.1</rxjava-adapter.version>
<rxjava2.version>2.2.21</rxjava2.version>
<saaj-impl.version>1.5.3</saaj-impl.version>
<selenium.version>3.141.59</selenium.version>
<selenium-htmlunit.version>2.49.1</selenium-htmlunit.version>
<sendgrid.version>4.7.2</sendgrid.version>
<servlet-api.version>4.0.1</servlet-api.version>
<slf4j.version>1.7.30</slf4j.version>
<snakeyaml.version>1.28</snakeyaml.version>
<solr.version>8.8.2</solr.version>
<spring-amqp.version>2.3.8</spring-amqp.version>
<spring-batch.version>4.3.3</spring-batch.version>
<spring-data-bom.version>2021.0.1</spring-data-bom.version>
<spring-framework.version>5.3.8</spring-framework.version>
<spring-hateoas.version>1.3.1</spring-hateoas.version>
<spring-integration.version>5.5.0</spring-integration.version>
<spring-kafka.version>2.7.2</spring-kafka.version>
<spring-ldap.version>2.3.4.RELEASE</spring-ldap.version>
<spring-restdocs.version>2.0.5.RELEASE</spring-restdocs.version>
<spring-retry.version>1.3.1</spring-retry.version>
<spring-security.version>5.5.0</spring-security.version>
<spring-session-bom.version>2021.0.0</spring-session-bom.version>
<spring-ws.version>3.1.1</spring-ws.version>
<sqlite-jdbc.version>3.34.0</sqlite-jdbc.version>
<sun-mail.version>1.6.7</sun-mail.version>
<thymeleaf.version>3.0.12.RELEASE</thymeleaf.version>
<thymeleaf-extras-data-attribute.version>2.0.1</thymeleaf-extras-data-attribute.version>
<thymeleaf-extras-java8time.version>3.0.4.RELEASE</thymeleaf-extras-java8time.version>
<thymeleaf-extras-springsecurity.version>3.0.4.RELEASE</thymeleaf-extras-springsecurity.version>
<thymeleaf-layout-dialect.version>2.5.3</thymeleaf-layout-dialect.version>
<tomcat.version>9.0.46</tomcat.version>
<unboundid-ldapsdk.version>4.0.14</unboundid-ldapsdk.version>
<undertow.version>2.2.8.Final</undertow.version>
<versions-maven-plugin.version>2.8.1</versions-maven-plugin.version>
<webjars-hal-browser.version>3325375</webjars-hal-browser.version>
<webjars-locator-core.version>0.46</webjars-locator-core.version>
<wsdl4j.version>1.6.3</wsdl4j.version>
<xml-maven-plugin.version>1.0.2</xml-maven-plugin.version>
<xmlunit2.version>2.8.2</xmlunit2.version>
</properties>通过
spring-boot-dependencies,可以查看适应当前版本的其他依赖的 version。
场景启动器:
场景启动器表示的是实现某种功能时,所需要的一组常规的依赖,当引入这个启动器后,会自动添加这一组依赖。比如
spring-boot-start-web: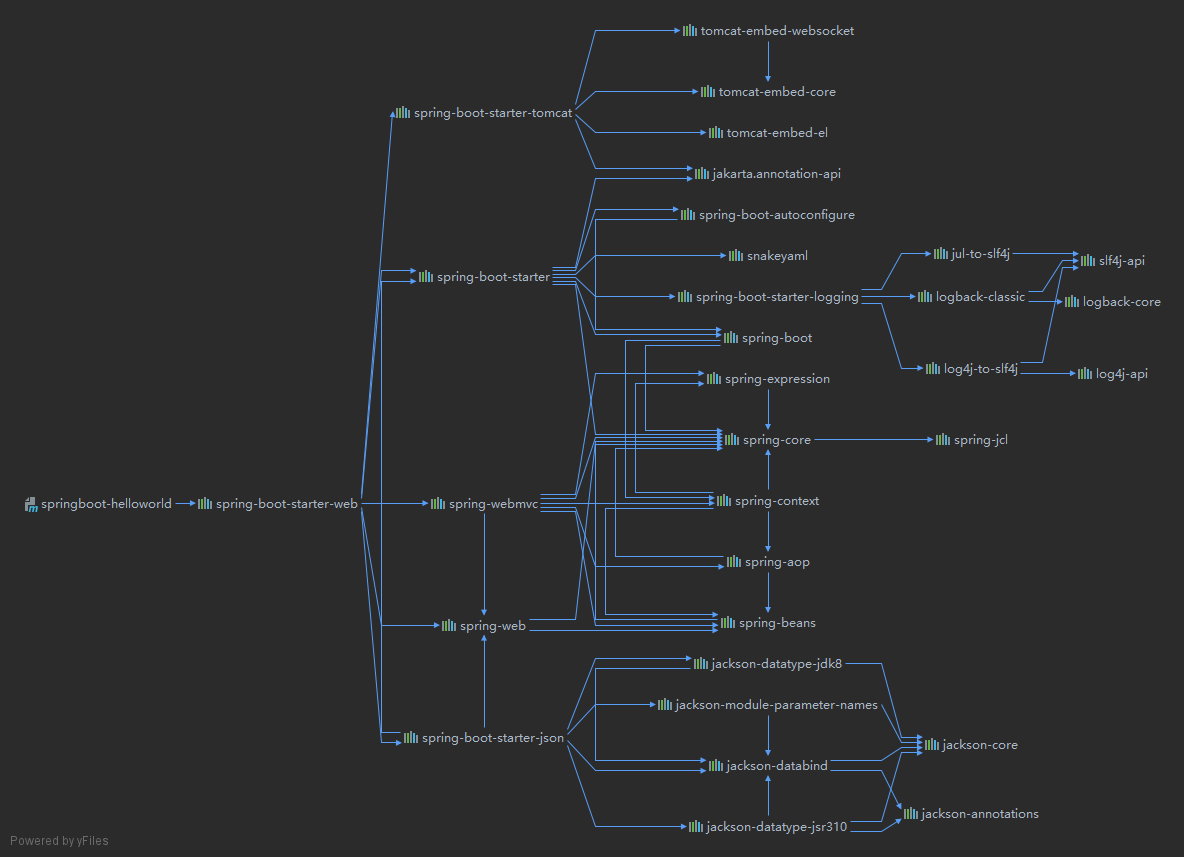
Spring 官方的启动器命名规则为
spring-boot-start-*,* 代表的就是某种场景。自定义的第三方启动器,命名规则一般为
thirdpartyproject-spring-boot-starter。所有场景启动器最底层的依赖:
1
2
3
4
5
6<dependency>
<groupId>org.springframework.boot</groupId>
<artifactId>spring-boot-starter</artifactId>
<version>2.5.1</version>
<scope>compile</scope>
</dependency>
自动配置
比如,引入
spring-boot-start-web启动器时,会自动引入 Tomcat、SpringMVC 的相关依赖,并配置好。也会自动配好 Web 的常见功能,如:字符编码问题。默认的包结构:
主程序所在包及其下面的所有子包里面的组件都会被默认扫描进来,无需自行设置包扫描。
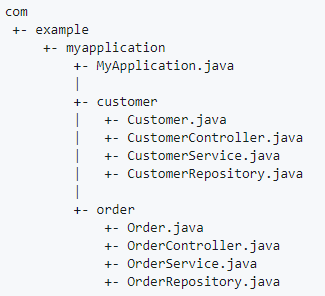
如果想要改变扫描路径,使用 **
@SpringBootApplication(scanBasePackages="cn.xisun")**。1
2
3
4
5
6
public class MainApplication {
public static void main(String[] args) {
SpringApplication.run(MainApplication.class, args);
}
}@SpringBootApplication注解等同于@SpringBootConfiguration,@EnableAutoConfiguration和@ComponentScan,复写此三个注解,然后使用@ComponentScan也可以重新指定扫码路径。1
2
3
4
5
6
7
8
public class MainApplication {
public static void main(String[] args) {
SpringApplication.run(MainApplication.class, args);
}
}
各种配置拥有默认值:
- 默认配置最终都是映射到某个类上,如:MultipartProperties。
- 配置文件的值最终会绑定每个类上,这个类会在容器中会创建对象。
- 在 application.properties 文件内可以修改各种配置的默认值。
按需加载所有自动配置项:
- 引入了一个场景启动器后,这个场景的自动配置才会开启。
- Spring Boot 所有的自动配置功能,都在 spring-boot-autoconfigure 包里面。
Spring Boot 的容器功能
添加组件
新建 User 类和 Pet 类,用于测试:
1
2
3
4
5
6
7
8
9
10
11
12
13
14
15
16
17
18
19
20
21
22
23
24
25
26
27
28
29
30
31package cn.xisun.web.bean;
/**
* @Author XiSun
* @Date 2021/6/23 16:28
*/
public class Pet {
private String name;
public Pet() {
}
public Pet(String name) {
this.name = name;
}
public String getName() {
return name;
}
public void setName(String name) {
this.name = name;
}
public String toString() {
return "Pet{" +
"name='" + name + '\'' +
'}';
}
}1
2
3
4
5
6
7
8
9
10
11
12
13
14
15
16
17
18
19
20
21
22
23
24
25
26
27
28
29
30
31
32
33
34
35
36
37
38
39
40
41
42
43
44
45
46
47
48
49
50
51
52
53
54package cn.xisun.web.bean;
/**
* @Author XiSun
* @Date 2021/6/23 15:23
*/
public class User {
private String name;
private int age;
private Pet pet;
public User() {
}
public User(String name, int age) {
this.name = name;
this.age = age;
}
public String getName() {
return name;
}
public void setName(String name) {
this.name = name;
}
public int getAge() {
return age;
}
public void setAge(int age) {
this.age = age;
}
public Pet getPet() {
return pet;
}
public void setPet(Pet pet) {
this.pet = pet;
}
public String toString() {
return "User{" +
"name='" + name + '\'' +
", age=" + age +
", pet=" + pet +
'}';
}
}@Configuration1
2
3
4
5
6
7
8
9
10
11
12
13
14
15
16
17
18
19
20
21
22
23
24
25
26
27
28
29
30
31
32
33
34
35
36
37
38
39
40
41
42
43
44
45
46
47
48
49
50
51/**
* @Author XiSun
* @Date 2021/6/23 15:24
* @Description 1.@Configuration注解标识当前类是一个配置类,作用等同于Spring的配置文件
* 2.@Configuration注解标识的配置类本身也是一个组件
* 3.配置类里可以使用@Bean注解,标注在方法上给容器注册组件,组件是单实例的
* 4.@Configuration注解有一个proxyBeanMethods属性,表示是否代理配置类中Bean的方法,默认为true,即代理
*/
public class MyConfig {
/**
* 使用@Bean注解给容器中注册组件
*
* @return 以方法名作为组件的id,返回类型就是组件的类型,返回的值,就是组件在容器中的实例
*/
public User user01() {
User zhangsan = new User("zhangsan", 18);
/*
* user01组件依赖了tom组件:
* 如果proxyBeanMethods = true,user01组件依赖的tom组件,就是容器中注册的那个
* 如果proxyBeanMethods = false,user01组件依赖的tom组件,是新建的,与容器中注册的那个无关
*/
zhangsan.setPet(tomcatPet());
return zhangsan;
}
/**
* @return 可以重新指定组件的id
*/
public User user02() {
return new User("lisi", 19);
}
public Pet tomcatPet() {
return new Pet("tomcat");
}
/**
* 使用@Scope("prototype")注解,指定注册的组件是多实例的,默认情况是单实例
*
* @return 每次从容器中获得的tom1组件,都不相同
*/
public Pet tomcatPet1() {
return new Pet("tomcat2");
}
}1
2
3
4
5
6
7
8
9
10
11
12
13
14
15
16
17
18
19
20
21
22
23
24
25
26
27
28
29
30
31
32
33
34
35
36
37
38
39
40
41
42
43
44
45
46
47
48
49
50
51
52
53
54
55/**
* @Author XiSun
* @Date 2021/6/20 15:03
* @Description 主程序类
*/
public class MainApplication {
public static void main(String[] args) {
// 1.返回IOC容器
ConfigurableApplicationContext run = SpringApplication.run(MainApplication.class, args);
// 2.查看容器内的所有组件
String[] beanDefinitionNames = run.getBeanDefinitionNames();
for (String beanDefinitionName : beanDefinitionNames) {
System.out.println(beanDefinitionName);
}
// 3.从容器中获取配置类本身的组件
MyConfig myConfig = run.getBean(MyConfig.class);
System.out.println(myConfig);
// 4.从容器中获取配置类中注册的组件,每次获取的实例都相同
User user01 = run.getBean("user01", User.class);
User user011 = run.getBean("user01", User.class);
System.out.println(user01);
System.out.println("单例? " + (user01 == user011));
User lisi = run.getBean("lisi", User.class);
System.out.println(lisi);
/*
* 5.通过配置类的方法获取实例
* @Configuration(proxyBeanMethods = true):
* 此时,配置类是一个MyConfig$$EnhancerBySpringCGLIB$$70400c34@1517f633对象(CGLIB代理对象)
* 在执行方法前,SpringBoot总会检查要获取的组件是否在容器中已存在,若存在,直接返回该组件---保持容器中组件单实例
* Full模式:外部无论对配置类中的这个组件的注册方法调用多少次,获取的都是之前已经注册在容器中的单实例对象,即user和user1总是相等
* 组件依赖必须使用Full模式
* @Configuration(proxyBeanMethods = false):
* 此时,配置类是一个MyConfig@644abb8f对象(普通对象)
* 在执行方法前,SpringBoot不会检查要获取的组件是否在容器中已存在
* Lite模式:外部对配置类中的这个组件的注册方法的每一次调用,都会获得一个新的实例,即user和user1总是不等
*/
User user = myConfig.user01();
User user1 = myConfig.user01();
System.out.println(user == user1);
// 根据proxyBeanMethods的属性为true或false,可以看出user01的pet属性,与容器中的tom组件是否相同
Pet tom = run.getBean("tom", Pet.class);
System.out.println("用户的宠物:" + (user01.getPet() == tom));
// tom1组件是多实例的,tom1对象和tom2对象不相同
Pet tom1 = run.getBean("tom1", Pet.class);
Pet tom2 = run.getBean("tom1", Pet.class);
System.out.println(tom1 == tom2);
}
}@Configuration标注在类上,表明该类是一个配置类,作用等同于 Spring 的 xml 配置文件中的 <beans> 标签,如下所示:1
2
3
4
5
6
7
8
9
10
11
12
13
14
15
16
17
18
19
<beans xmlns="http://www.springframework.org/schema/beans"
xmlns:xsi="http://www.w3.org/2001/XMLSchema-instance"
xsi:schemaLocation="http://www.springframework.org/schema/beans http://www.springframework.org/schema/beans/spring-beans.xsd">
<bean id="user01" class="cn.xisun.web.bean.User">
<property name="name" value="zhangsan"/>
<property name="age" value="18"/>
<property name="pet" ref="tom"/>
</bean>
<bean id="lisi" class="cn.xisun.web.bean.User">
<property name="name" value="lisi"/>
<property name="age" value="19"/>
</bean>
<bean id="tom" class="cn.xisun.web.bean.Pet">
<property name="name" value="tomcat"/>
</bean>
</beans>根据
@Configuration注解的 proxyBeanMethods 属性值:- false:Lite 模式。当配置类组件之间无依赖关系时,用 Lite 模式可以减少判断,加速容器启动过程。
- true:Full 模式。当配置类组件之间有依赖关系时,配置类里的 Bean 方法会被调用,为了得到之前容器中注册的单实例组件,需要使用 Full 模式。
- 组件依赖必须使用 Full 模式。
@ComponentScan:指定扫描的包,默认扫码主程序所在包及其下面的所有子包。@Import:给容器中自动创建出指定类型的组件,并且,默认组件的名字是全类名。1
2
3
4
5
6
7
8
9
10
11
12
13
public class MyConfig {
public User user01() {
return new User("zhangsan", 18);
}
public User user02() {
return new User("lisi", 19);
}
}1
2
3
4
5
6
7
8
9
10
11
12
13
14
15
16
17
18
19
20
21
22
public class MainApplication {
public static void main(String[] args) {
// 1.返回IOC容器
ConfigurableApplicationContext run = SpringApplication.run(MainApplication.class, args);
// 2.按User类型获取容器中注册的实例
String[] beanNamesForType = run.getBeanNamesForType(User.class);
for (String bean : beanNamesForType) {
System.out.println(bean);
}
ThrowableToStringArray bean = run.getBean(ThrowableToStringArray.class);
System.out.println(bean);
}
}
输出结果:
cn.xisun.web.bean.User // 全类名
user01 // 容器中注册的
lisi // 容器中注册的
ch.qos.logback.core.helpers.ThrowableToStringArray@312afbc7 // 全类名@Bean、@Component、@Controller、@Service、@Repository。@Conditional:条件装配,当满足@Conditional指定的条件时,则进行组件注入。@Conditional注解有多个派生注解,每一个派生注解都代表一种条件。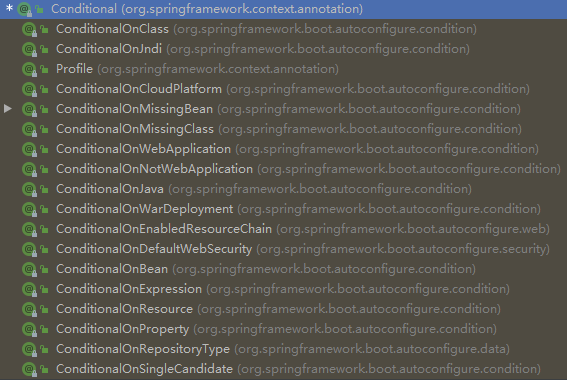
@ConditionalOnBean:当容器中存在指定的 Bean 时。@ConditionalOnMissingBean:当容器中不存在指定的 Bean 时。@ConditionalOnClass:当容器中存在指定的类时。@ConditionalOnMissingClass:当容器中不存在指定的类时。@ConditionalOnJava:当指定的 Java 版本时。@ConditionalOnResource:当指定资源存在时。
注意:配置类中定义的组件,是按照从上到下的顺序依次注册的,在使用类似
@ConditionalOnBean这样的条件装配注解时,需要注意组件的定义顺序。在这样的情况下,在配置类上使用条件装配注解时,需要额外注意。tom 组件在 user01 组件上面定义:
1
2
3
4
5
6
7
8
9
10
11
12
13
14
15
public class MyConfig {
public Pet tomcatPet() {
return new Pet("tomcat");
}
public User user01() {
User zhangsan = new User("zhangsan", 18);
zhangsan.setPet(tomcatPet());
return zhangsan;
}
}1
2
3
4
5
6
7
8
9
10
11
12
13
14
public class MainApplication {
public static void main(String[] args) {
ConfigurableApplicationContext run = SpringApplication.run(MainApplication.class, args);
boolean tom = run.containsBean("tom");
boolean user01 = run.containsBean("user01");
System.out.println("容器中存在tom?" + tom);
System.out.println("容器中存在user01?" + user01);
}
}
输出结果:
容器中存在tom?true
容器中存在user01?truetom 组件在 user01 组件下面定义:
1
2
3
4
5
6
7
8
9
10
11
12
13
14
15
public class MyConfig {
public User user01() {
User zhangsan = new User("zhangsan", 18);
zhangsan.setPet(tomcatPet());
return zhangsan;
}
public Pet tomcatPet() {
return new Pet("tomcat");
}
}1
2
3
4
5
6
7
8
9
10
11
12
13
14
public class MainApplication {
public static void main(String[] args) {
ConfigurableApplicationContext run = SpringApplication.run(MainApplication.class, args);
boolean tom = run.containsBean("tom");
boolean user01 = run.containsBean("user01");
System.out.println("容器中存在tom?" + tom);
System.out.println("容器中存在user01?" + user01);
}
}
输出结果:
容器中存在tom?true
容器中存在user01?false
原生配置文件引入
@ImportResource:导入 Spring 的配置文件,使用在主类上,或者任一配置类上。当旧项目更新,并存在很多配置文件时,会很有用处。oldBeans.xml:
1
2
3
4
5
6
7
8
9
10
11
12
13
14
<beans xmlns="http://www.springframework.org/schema/beans"
xmlns:xsi="http://www.w3.org/2001/XMLSchema-instance"
xsi:schemaLocation="http://www.springframework.org/schema/beans http://www.springframework.org/schema/beans/spring-beans.xsd">
<bean id="wangwu" class="cn.xisun.web.bean.User">
<property name="name" value="wangwu"/>
<property name="age" value="20"/>
<property name="pet" ref="jerry"/>
</bean>
<bean id="jerry" class="cn.xisun.web.bean.Pet">
<property name="name" value="jerry"/>
</bean>
</beans>MainApplication.java:
1
2
3
4
5
6
7
8
9
10
11
12
13
14
15
public class MainApplication {
public static void main(String[] args) {
ConfigurableApplicationContext run = SpringApplication.run(MainApplication.class, args);
boolean wangwu = run.containsBean("wangwu");
boolean jerry = run.containsBean("jerry");
System.out.println("容器中存在jerry?" + jerry);
System.out.println("容器中存在wangwu?" + wangwu);
}
}
输出结果:
容器中存在jerry?true
容器中存在wangwu?true
配置绑定
application.properties 文件:
1
2
3=8080
=BMW
=200000.0待封装的 JavaBean:
1
2
3
4
5
6
7
8
9
10
11
12
13
14
15
16
17
18
19
20
21
22
23
24
25
26
27
28
29public class Car {
private String brand;
private Double price;
public String getBrand() {
return brand;
}
public void setBrand(String brand) {
this.brand = brand;
}
public Double getPrice() {
return price;
}
public void setPrice(Double price) {
this.price = price;
}
public String toString() {
return "Car{" +
"brand='" + brand + '\'' +
", price=" + price +
'}';
}
}自定义的类和配置文件绑定一般没有提示,Car 类上会出现以下提示,需要添加
spring-boot-configuration-processo依赖:
1
2
3
4
5<dependency>
<groupId>org.springframework.boot</groupId>
<artifactId>spring-boot-configuration-processor</artifactId>
<optional>true</optional>
</dependency>该依赖只在开发时提供帮助,因此在打包 jar 包时,应该排除:
1
2
3
4
5
6
7
8
9
10
11
12
13
14
15
16
17
18<!-- 打包插件 -->
<build>
<plugins>
<plugin>
<groupId>org.springframework.boot</groupId>
<artifactId>spring-boot-maven-plugin</artifactId>
<!-- 打包时排除依赖 -->
<configuration>
<excludes>
<exclude>
<groupId>org.springframework.boot</groupId>
<artifactId>spring-boot-configuration-processor</artifactId>
</exclude>
</excludes>
</configuration>
</plugin>
</plugins>
</build>
从 application.properties 文件中读取内容,并且把它封装到 JavaBean 中的普通写法:
1
2
3
4
5
6
7
8
9
10
11
12
13public static void getProperties() throws IOException {
Properties properties = new Properties();
InputStream is = ClassLoader.getSystemClassLoader().getResourceAsStream("application.properties");
properties.load(is);
// 得到配置文件中的值
Enumeration<?> enumeration = properties.propertyNames();
while (enumeration.hasMoreElements()) {
String strKey = (String) enumeration.nextElement();
String strValue = properties.getProperty(strKey);
System.out.println(strKey + "=" + strValue);
// 封装到JavaBean的操作
}
}方式一:在需绑定的 JavaBean 上,添加
@Component和@ConfigurationProperties注解。1
2
3
4
5
6
7
8
9
10
11
12
13
14
15
16
17
18
19
20
21
22
23
24
25
26
27
28
29
30
31
32
33
34
35
36
37
38
39
40/**
* @Author XiSun
* @Date 2021/7/9 21:58
* 1.使用@Component注解将JavaBean注册到容器中,只有容器中的组件才能
* 拥有SpringBoot提供的功能,这是前提;
* 2.使用@ConfigurationProperties注解,将配置文件和JavaBean绑定,
* prefix属性指定配置文件中需绑定的值的前缀;
* 3.JavaBean的属性名,需和配置文件中对应值前缀后的值相同。
*/
public class Car {
private String brand;
private Double price;
public String getBrand() {
return brand;
}
public void setBrand(String brand) {
this.brand = brand;
}
public Double getPrice() {
return price;
}
public void setPrice(Double price) {
this.price = price;
}
public String toString() {
return "Car{" +
"brand='" + brand + '\'' +
", price=" + price +
'}';
}
}方式二:在需绑定的 JavaBean 上,添加
@ConfigurationProperties注解,在配置类上添加@EnableConfigurationProperties注解。1
2
3
4
5
6
7
8
9
10
11
12
13
14
15
16
17
18
19
20
21
22
23
24
25
26
27
28
29
30
31
32
33
34
35
36
37/**
* @Author XiSun
* @Date 2021/7/9 21:58
* 1.使用@ConfigurationProperties注解,将配置文件和JavaBean绑定,
* prefix属性指定配置文件中需绑定的值的前缀;
* 2.JavaBean的属性名,需和配置文件中对应值前缀后的值相同。
*/
public class Car {
private String brand;
private Double price;
public String getBrand() {
return brand;
}
public void setBrand(String brand) {
this.brand = brand;
}
public Double getPrice() {
return price;
}
public void setPrice(Double price) {
this.price = price;
}
public String toString() {
return "Car{" +
"brand='" + brand + '\'' +
", price=" + price +
'}';
}
}1
2
3
4
5
6
7
8
9
10
11
12
13
14
15
16
17
18
19
20
21/**
* 1.使用@EnableConfigurationProperties注解,开启待装配的JavaBean的配置绑定功能,
* 同时,将该JavaBean这个组件自动注入到容器中;
* 2.JavaBean上不需要使用@Component注解,某些时候,比如JavaBean是第三方依赖包中的
* 类,这个特点会很重要。
*/
public class MyConfig {
public User user01() {
User zhangsan = new User("zhangsan", 18);
zhangsan.setPet(tomcatPet());
return zhangsan;
}
public Pet tomcatPet() {
return new Pet("tomcat");
}
}主类测试:
1
2
3
4
5
6
7
8
9
10
11
12
13
14
15
16
17
18
19
20
21
22
23
24
25
26
27
28/**
* @Author XiSun
* @Date 2021/6/20 15:03
* @Description 主程序类
*/
public class MainApplication {
public static void main(String[] args) {
ConfigurableApplicationContext run = SpringApplication.run(MainApplication.class, args);
// 获取容器中的Car类型的组件
String[] beanNamesForType = run.getBeanNamesForType(Car.class);
for (String beanName : beanNamesForType) {
System.out.println(beanName);
}
Car car = run.getBean("car", Car.class);
System.out.println(car);
}
}
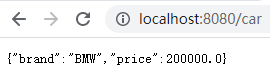
方式一输出结果:
car
Car{brand='BMW', price=200000.0}
方式二输出结果:
mycar-cn.xisun.web.bean.Car
Car{brand='BMW', price=200000.0}对于方式一,注册到容器中的组件名,就是 JavaBean 类名的首字母小写。
对于方式二,注册到容器中的组件名,有所不同,为前缀加 JavaBean 全类名。
Controller 中获取:
1
2
3
4
5
6
7
8
9
10
11
12
13
14
15
16
17
18
19
20
21/**
* @Author XiSun
* @Date 2021/6/20 15:17
*/
public class HelloController {
private Car car;
public Car car() {
return car;
}
public String hello() {
return "Hello, Spring Boot 2!";
}
}
Spring Boot 的自动配置原理入门
引导加载自动配置类
主类:
1
2
3
4
5
6
public class MainApplication {
public static void main(String[] args) {
SpringApplication.run(MainApplication.class, args);
}
}@SpringBootApplication:1
2
3
4
5
6
7
8
9
public SpringBootApplication {}@SpringBootConfiguration:是@Configuration的派生注解,表明当前主类实际上也是一个配置类。@ComponentScan:指定扫描的包,默认为当前主类所在包及其子包。@EnableAutoConfiguration:1
2
3
4
5
6
7
public EnableAutoConfiguration {}@AutoConfigurationPackage:1
2
3
4
5
6
public AutoConfigurationPackage {}@Import(AutoConfigurationPackages.Registrar.class):向容器中注册了一个 AutoConfigurationPackages.Registrar.class 组件。1
2
3
4
5
6
7
8
9
10
11
12
13
14
15
16
17/**
* {@link ImportBeanDefinitionRegistrar} to store the base package from the importing
* configuration.
*/
static class Registrar implements ImportBeanDefinitionRegistrar, DeterminableImports {
public void registerBeanDefinitions(AnnotationMetadata metadata, BeanDefinitionRegistry registry) {
register(registry, new PackageImports(metadata).getPackageNames().toArray(new String[0]));
}
public Set<Object> determineImports(AnnotationMetadata metadata) {
return Collections.singleton(new PackageImports(metadata));
}
}new PackageImports(metadata).getPackageNames():拿到元注解所包含的包信息,实际上就是主类所在的包,如cn.xisun.web。register()的功能,也就是将主类所在包下的所有组件,批量注册到容器中。这也就是默认包路径为主类所在包的原因。
@Import(AutoConfigurationImportSelector.class):向容器中注册了一个 AutoConfigurationImportSelector.class 组件,执行如下方法。1
2
3
4
5
6
7
8
public String[] selectImports(AnnotationMetadata annotationMetadata) {
if (!isEnabled(annotationMetadata)) {
return NO_IMPORTS;
}
AutoConfigurationEntry autoConfigurationEntry = getAutoConfigurationEntry(annotationMetadata);
return StringUtils.toStringArray(autoConfigurationEntry.getConfigurations());
}getAutoConfigurationEntry(annotationMetadata):向容器中批量注册一些组件。1
2
3
4
5
6
7
8
9
10
11
12
13
14protected AutoConfigurationEntry getAutoConfigurationEntry(AnnotationMetadata annotationMetadata) {
if (!isEnabled(annotationMetadata)) {
return EMPTY_ENTRY;
}
AnnotationAttributes attributes = getAttributes(annotationMetadata);
List<String> configurations = getCandidateConfigurations(annotationMetadata, attributes);
configurations = removeDuplicates(configurations);
Set<String> exclusions = getExclusions(annotationMetadata, attributes);
checkExcludedClasses(configurations, exclusions);
configurations.removeAll(exclusions);
configurations = getConfigurationClassFilter().filter(configurations);
fireAutoConfigurationImportEvents(configurations, exclusions);
return new AutoConfigurationEntry(configurations, exclusions);
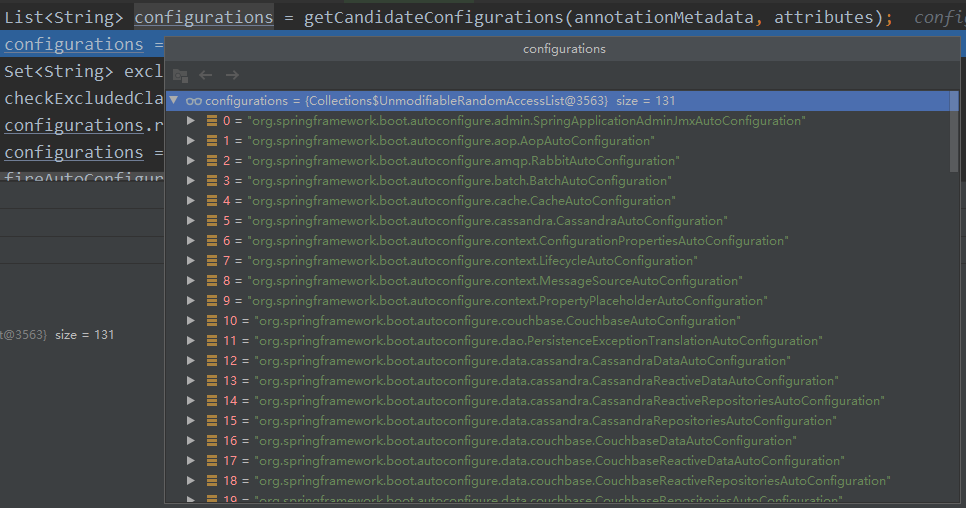
}getCandidateConfigurations(annotationMetadata, attributes);:获取所有待批量注册的组件。1
2
3
4
5
6
7protected List<String> getCandidateConfigurations(AnnotationMetadata metadata, AnnotationAttributes attributes) {
List<String> configurations = SpringFactoriesLoader.loadFactoryNames(getSpringFactoriesLoaderFactoryClass(),
getBeanClassLoader());
Assert.notEmpty(configurations, "No auto configuration classes found in META-INF/spring.factories. If you "
+ "are using a custom packaging, make sure that file is correct.");
return configurations;
}SpringFactoriesLoader.loadFactoryNames(getSpringFactoriesLoaderFactoryClass(), getBeanClassLoader());:具体通过 SpringFactoriesLoader 工厂加载所有的组件。1
2
3
4
5
6
7
8
9
10
11
12
13
14
15
16
17
18
19
20
21
22
23
24
25
26
27
28
29
30
31
32
33
34
35
36
37
38
39
40
41
42
43
44
45
46
47
48
49
50
51/**
* The location to look for factories.
* <p>Can be present in multiple JAR files.
*/
public static final String FACTORIES_RESOURCE_LOCATION = "META-INF/spring.factories";
public static List<String> loadFactoryNames(Class<?> factoryType, ClassLoader classLoader) {
ClassLoader classLoaderToUse = classLoader;
if (classLoaderToUse == null) {
classLoaderToUse = SpringFactoriesLoader.class.getClassLoader();
}
String factoryTypeName = factoryType.getName();
return loadSpringFactories(classLoaderToUse).getOrDefault(factoryTypeName, Collections.emptyList());
}
private static Map<String, List<String>> loadSpringFactories(ClassLoader classLoader) {
Map<String, List<String>> result = cache.get(classLoader);
if (result != null) {
return result;
}
result = new HashMap<>();
try {
// 在此处,加载项目里
Enumeration<URL> urls = classLoader.getResources(FACTORIES_RESOURCE_LOCATION);
while (urls.hasMoreElements()) {
URL url = urls.nextElement();
UrlResource resource = new UrlResource(url);
Properties properties = PropertiesLoaderUtils.loadProperties(resource);
for (Map.Entry<?, ?> entry : properties.entrySet()) {
String factoryTypeName = ((String) entry.getKey()).trim();
String[] factoryImplementationNames =
StringUtils.commaDelimitedListToStringArray((String) entry.getValue());
for (String factoryImplementationName : factoryImplementationNames) {
result.computeIfAbsent(factoryTypeName, key -> new ArrayList<>())
.add(factoryImplementationName.trim());
}
}
}
// Replace all lists with unmodifiable lists containing unique elements
result.replaceAll((factoryType, implementations) -> implementations.stream().distinct()
.collect(Collectors.collectingAndThen(Collectors.toList(), Collections::unmodifiableList)));
cache.put(classLoader, result);
}
catch (IOException ex) {
throw new IllegalArgumentException("Unable to load factories from location [" +
FACTORIES_RESOURCE_LOCATION + "]", ex);
}
return result;
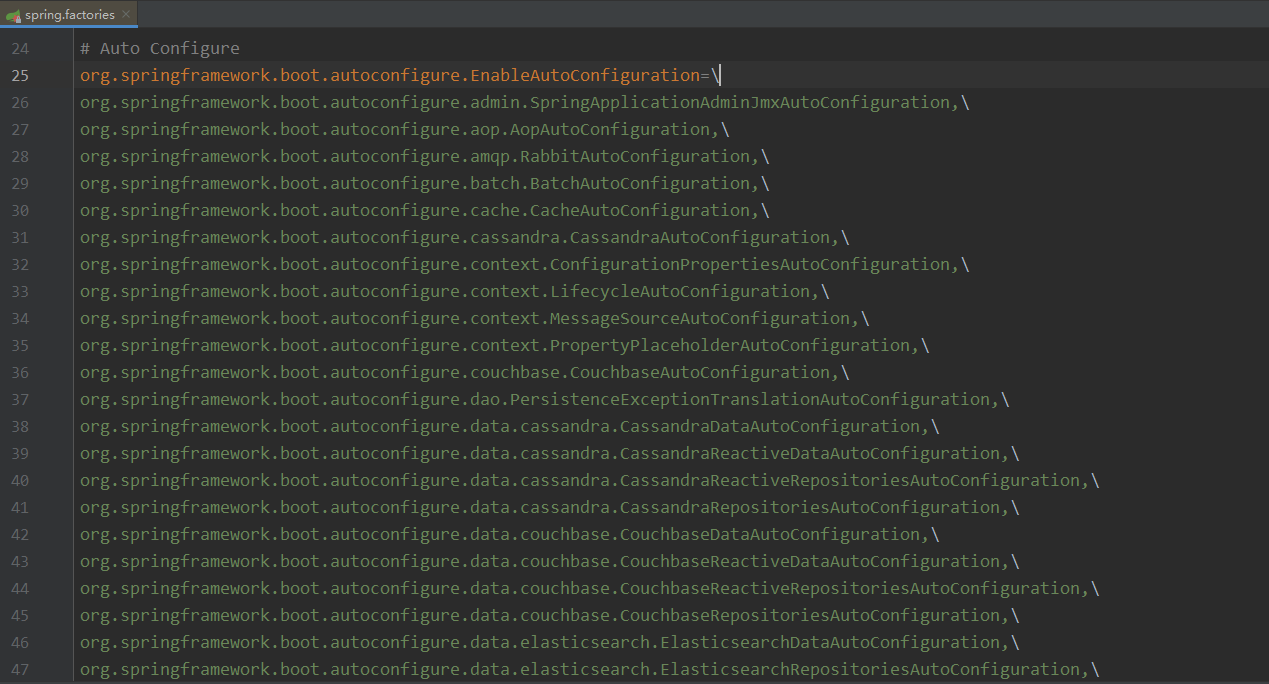
}classLoader.getResources(FACTORIES_RESOURCE_LOCATION);:此方法扫描项目内各 jar 包的META-INF/spring.factories路径内声明的资源。主要看spring-boot-autoconfigure-2.5.1.jar包下的 spring.factories 文件,该文件内声明了 131 个需要自动注册的组件,当 Spring Boot 启动时,就会向容器中注册这些声明的组件: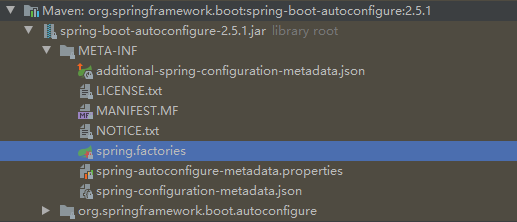
按需开启自动配置项
在上面的分析中,Spring Boot 在启动时,默认会加载 131 个自动配置的组件。但在实际启动时,各 xxxxAutoConfiguration 组件,会根据
@Conditional注解,即按照条件装配规则,实现按需配置。例如,
org.springframework.boot.autoconfigure.aop.AopAutoConfiguration:1
2
3
4
5
6
7
8
9
10
11
12
13
14
15
16
17
18
19
20
21
22
23
24
25
26
27
28
29
30
31
32
33
34
35
36
37
38
39
40
41
42
43
44
45
46
47
48
public class AopAutoConfiguration {
/**
* 当org.aspectj.weaver.Advice.class文件存在时,AspectJAutoProxyingConfiguration生效
*/
static class AspectJAutoProxyingConfiguration {
static class JdkDynamicAutoProxyConfiguration {
}
static class CglibAutoProxyConfiguration {
}
}
/**
* 当org.aspectj.weaver.Advice.class文件不存在,且配置文件中spring.aop.proxy-target-class属性值为true(默认为true)时,
* ClassProxyingConfiguration生效
*/
static class ClassProxyingConfiguration {
static BeanFactoryPostProcessor forceAutoProxyCreatorToUseClassProxying() {
return (beanFactory) -> {
if (beanFactory instanceof BeanDefinitionRegistry) {
BeanDefinitionRegistry registry = (BeanDefinitionRegistry) beanFactory;
AopConfigUtils.registerAutoProxyCreatorIfNecessary(registry);
AopConfigUtils.forceAutoProxyCreatorToUseClassProxying(registry);
}
};
}
}
}@ConditionalOnProperty(prefix = "spring.aop", name = "auto", havingValue = "true", matchIfMissing = true):当配置文件中配置了spring.aop.auto属性,且值为 true 时,AopAutoConfiguration 生效。默认情况下,即使没有配置此属性,也认为其生效。- 可以看出,当导入 aop 依赖时,会注册 AspectJAutoProxyingConfiguration 配置类,否则,注册 ClassProxyingConfiguration 配置类,且后者是 Spring Boot 默认开启的一个简单的 aop 功能。
例如,
org.springframework.boot.autoconfigure.web.servlet.DispatcherServletAutoConfiguration:1
2
3
4
5
6
7
8
9
10
11
12
13
14
15
16
17
18
19
20
21
22
23
24
25
26
27
28
29
30
31
32
33
34
35
36
37
38
39
40
41
42
43
44
45
46
47
48
49
50
51
52
53
54
55
56
57
58
59
60
61
62
63
64
65
66
67
68
69
70
71
72
73
74
75
76
77
78
79
80
81
82
83
84
85
86
87
88
89
90
91
92
93
94
95
96
97
98
99
100
101
102
103
104
105
106
107
108
109
110
111
112
113
114
115
116
117
118
119
120
121
122
123
124
125
126
127
128
129
130
131
132
133
134
135
136
137
138
139
140
141
142
143
144
145
146
147
148
149
150
151
152
153
154
155
156
157// 当前配置类的配置顺序
// 当项目是一个原生的Web Servlet应用时
// 当容器中存在DispatcherServlet.class时
// 在ServletWebServerFactoryAutoConfiguration后配置
public class DispatcherServletAutoConfiguration {
/**
* The bean name for a DispatcherServlet that will be mapped to the root URL "/".
*/
public static final String DEFAULT_DISPATCHER_SERVLET_BEAN_NAME = "dispatcherServlet";
/**
* The bean name for a ServletRegistrationBean for the DispatcherServlet "/".
*/
public static final String DEFAULT_DISPATCHER_SERVLET_REGISTRATION_BEAN_NAME = "dispatcherServletRegistration";
// 当容器中存在ServletRegistration.class时
// 开启WebMvcProperties类的配置绑定功能,并注册到容器中
protected static class DispatcherServletConfiguration {
// 注册DispatcherServlet组件到容器中,名字为dispatcherServlet
public DispatcherServlet dispatcherServlet(WebMvcProperties webMvcProperties) {
DispatcherServlet dispatcherServlet = new DispatcherServlet();// 新建了一个DispatcherServlet对象
dispatcherServlet.setDispatchOptionsRequest(webMvcProperties.isDispatchOptionsRequest());
dispatcherServlet.setDispatchTraceRequest(webMvcProperties.isDispatchTraceRequest());
dispatcherServlet.setThrowExceptionIfNoHandlerFound(webMvcProperties.isThrowExceptionIfNoHandlerFound());
dispatcherServlet.setPublishEvents(webMvcProperties.isPublishRequestHandledEvents());
dispatcherServlet.setEnableLoggingRequestDetails(webMvcProperties.isLogRequestDetails());
return dispatcherServlet;
}
// 注册MultipartResolver组件到容器中,即文件上传解析器
// 当容器中存在MultipartResolver.class时
// 当容器中没有name为multipartResolver的MultipartResolver对象时
// 用@Bean标注的方法传入的对象参数,会从容器中找一个该参数所属类型的对象,并赋值
public MultipartResolver multipartResolver(MultipartResolver resolver) {
// 因为容器中有MultipartResolver的对象,所以resolver参数会自动绑定该对象
// 此方法的作用是,防止有些用户配置的文件上传解析器不符合规范:
// 将用户自己配置的文件上传解析器重新注册给容器,并重命名为multipartResolver(方法名)
// (Spring Boot种的文件上传解析器的名字,就叫multipartResolver)
// Detect if the user has created a MultipartResolver but named it incorrectly
return resolver;
}
}
protected static class DispatcherServletRegistrationConfiguration {
public DispatcherServletRegistrationBean dispatcherServletRegistration(DispatcherServlet dispatcherServlet,
WebMvcProperties webMvcProperties, ObjectProvider<MultipartConfigElement> multipartConfig) {
DispatcherServletRegistrationBean registration = new DispatcherServletRegistrationBean(dispatcherServlet,
webMvcProperties.getServlet().getPath());
registration.setName(DEFAULT_DISPATCHER_SERVLET_BEAN_NAME);
registration.setLoadOnStartup(webMvcProperties.getServlet().getLoadOnStartup());
multipartConfig.ifAvailable(registration::setMultipartConfig);
return registration;
}
}
private static class DefaultDispatcherServletCondition extends SpringBootCondition {
public ConditionOutcome getMatchOutcome(ConditionContext context, AnnotatedTypeMetadata metadata) {
ConditionMessage.Builder message = ConditionMessage.forCondition("Default DispatcherServlet");
ConfigurableListableBeanFactory beanFactory = context.getBeanFactory();
List<String> dispatchServletBeans = Arrays
.asList(beanFactory.getBeanNamesForType(DispatcherServlet.class, false, false));
if (dispatchServletBeans.contains(DEFAULT_DISPATCHER_SERVLET_BEAN_NAME)) {
return ConditionOutcome
.noMatch(message.found("dispatcher servlet bean").items(DEFAULT_DISPATCHER_SERVLET_BEAN_NAME));
}
if (beanFactory.containsBean(DEFAULT_DISPATCHER_SERVLET_BEAN_NAME)) {
return ConditionOutcome.noMatch(
message.found("non dispatcher servlet bean").items(DEFAULT_DISPATCHER_SERVLET_BEAN_NAME));
}
if (dispatchServletBeans.isEmpty()) {
return ConditionOutcome.match(message.didNotFind("dispatcher servlet beans").atAll());
}
return ConditionOutcome.match(message.found("dispatcher servlet bean", "dispatcher servlet beans")
.items(Style.QUOTE, dispatchServletBeans)
.append("and none is named " + DEFAULT_DISPATCHER_SERVLET_BEAN_NAME));
}
}
private static class DispatcherServletRegistrationCondition extends SpringBootCondition {
public ConditionOutcome getMatchOutcome(ConditionContext context, AnnotatedTypeMetadata metadata) {
ConfigurableListableBeanFactory beanFactory = context.getBeanFactory();
ConditionOutcome outcome = checkDefaultDispatcherName(beanFactory);
if (!outcome.isMatch()) {
return outcome;
}
return checkServletRegistration(beanFactory);
}
private ConditionOutcome checkDefaultDispatcherName(ConfigurableListableBeanFactory beanFactory) {
boolean containsDispatcherBean = beanFactory.containsBean(DEFAULT_DISPATCHER_SERVLET_BEAN_NAME);
if (!containsDispatcherBean) {
return ConditionOutcome.match();
}
List<String> servlets = Arrays
.asList(beanFactory.getBeanNamesForType(DispatcherServlet.class, false, false));
if (!servlets.contains(DEFAULT_DISPATCHER_SERVLET_BEAN_NAME)) {
return ConditionOutcome.noMatch(
startMessage().found("non dispatcher servlet").items(DEFAULT_DISPATCHER_SERVLET_BEAN_NAME));
}
return ConditionOutcome.match();
}
private ConditionOutcome checkServletRegistration(ConfigurableListableBeanFactory beanFactory) {
ConditionMessage.Builder message = startMessage();
List<String> registrations = Arrays
.asList(beanFactory.getBeanNamesForType(ServletRegistrationBean.class, false, false));
boolean containsDispatcherRegistrationBean = beanFactory
.containsBean(DEFAULT_DISPATCHER_SERVLET_REGISTRATION_BEAN_NAME);
if (registrations.isEmpty()) {
if (containsDispatcherRegistrationBean) {
return ConditionOutcome.noMatch(message.found("non servlet registration bean")
.items(DEFAULT_DISPATCHER_SERVLET_REGISTRATION_BEAN_NAME));
}
return ConditionOutcome.match(message.didNotFind("servlet registration bean").atAll());
}
if (registrations.contains(DEFAULT_DISPATCHER_SERVLET_REGISTRATION_BEAN_NAME)) {
return ConditionOutcome.noMatch(message.found("servlet registration bean")
.items(DEFAULT_DISPATCHER_SERVLET_REGISTRATION_BEAN_NAME));
}
if (containsDispatcherRegistrationBean) {
return ConditionOutcome.noMatch(message.found("non servlet registration bean")
.items(DEFAULT_DISPATCHER_SERVLET_REGISTRATION_BEAN_NAME));
}
return ConditionOutcome.match(message.found("servlet registration beans").items(Style.QUOTE, registrations)
.append("and none is named " + DEFAULT_DISPATCHER_SERVLET_REGISTRATION_BEAN_NAME));
}
private ConditionMessage.Builder startMessage() {
return ConditionMessage.forCondition("DispatcherServlet Registration");
}
}
}@ConditionalOnWebApplication(type = Type.SERVLET):Spring Boot 支持两种类型的 Web 应用开发,一种是响应式,一种是原生 Servlet。响应式 Web 开发导入spring-boot-starter-webflux依赖,原生 Servlet Web 开发导入spring-boot-starter-web依赖。@ConditionalOnClass(DispatcherServlet.class):在主类中可以验证项目中存在 DispatcherServlet 类。1
2
3
4
5
6
7
8
9
public class MainApplication {
public static void main(String[] args) {
ConfigurableApplicationContext run = SpringApplication.run(MainApplication.class, args);
String[] beanNamesForType = run.getBeanNamesForType(DispatcherServlet.class);
System.out.println(beanNamesForType.length);// 1
}
}
例如,
org.springframework.boot.autoconfigure.web.servlet.HttpEncodingAutoConfiguration:1
2
3
4
5
6
7
8
9
10
11
12
13
14
15
16
17
18
19
20
21
22
23
24
25
26
27
28
29
30
31
32
33
34
35
36
37
38
39
40
41
42
43
44
45
46
47
48
49
50
51
52
53
54
55
56
// 开启ServerProperties类的配置绑定功能,并注册到容器中
// 当项目是一个原生的Web Servlet应用时
// 当容器中存在CharacterEncodingFilter.class时
// 当配置文件中server.servlet.encoding属性值为enabled(默认为true)时
public class HttpEncodingAutoConfiguration {
private final Encoding properties;
public HttpEncodingAutoConfiguration(ServerProperties properties) {
this.properties = properties.getServlet().getEncoding();
}
/**
* 向容器中注册一个CharacterEncodingFilter组件,此组件就是解决Spring Boot收到的请求出现乱码的问题
*/
// 当容器中没有这个Bean时才配置,即用户未配置时,Spring Boot才主动配置一个
public CharacterEncodingFilter characterEncodingFilter() {
CharacterEncodingFilter filter = new OrderedCharacterEncodingFilter();
filter.setEncoding(this.properties.getCharset().name());
filter.setForceRequestEncoding(this.properties.shouldForce(Encoding.Type.REQUEST));
filter.setForceResponseEncoding(this.properties.shouldForce(Encoding.Type.RESPONSE));
return filter;
}
public LocaleCharsetMappingsCustomizer localeCharsetMappingsCustomizer() {
return new LocaleCharsetMappingsCustomizer(this.properties);
}
static class LocaleCharsetMappingsCustomizer
implements WebServerFactoryCustomizer<ConfigurableServletWebServerFactory>, Ordered {
private final Encoding properties;
LocaleCharsetMappingsCustomizer(Encoding properties) {
this.properties = properties;
}
public void customize(ConfigurableServletWebServerFactory factory) {
if (this.properties.getMapping() != null) {
factory.setLocaleCharsetMappings(this.properties.getMapping());
}
}
public int getOrder() {
return 0;
}
}
}HttpEncodingAutoConfiguration 配置类会防止 Spring Boot 乱码。
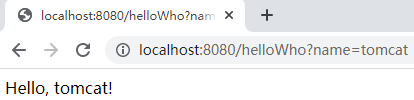
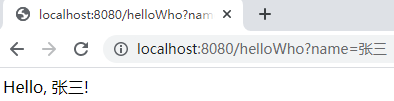
测试:
1
2
3
4
5
6
7
8
public class HelloController {
public String helloWho( String name) {
return "Hello, " + name + "!";
}
}
修改默认配置
一般来说,Spring Boot 默认会在底层配好所有需要的组件,但是如果用户自己配置了,就会以用户配置的优先。
以 CharacterEncodingFilter 为例,如果用户希望按自己的需求进行配置,可以在配置类中自行添加:
1
2
3
4
5
6
7
8
public class MyConfig {
public CharacterEncodingFilter characterEncodingFilter() {
// filter的实现代码
return null;
}
}从前面对 CharacterEncodingFilter 的分析可以看出,当用户自己配置了 CharacterEncodingFilter 的实例时,Spring Boot 就不会再配置。
总结
Spring Boot 先加载所有的自动配置类,即 xxxxxAutoConfiguration.class。
每个自动配置类按照条件进行生效。xxxxxAutoConfiguration.class 在配置时,会从对应的 xxxxxProperties.class 中取值,而 xxxxxProperties.class 会和配置文件中对应的值进行绑定。比如:
1
2
3
4
5
6
7
8
9
10
11
12
13
14
15
16
17
// WebMvcProperties.class与配置文件绑定
protected static class DispatcherServletConfiguration {
public DispatcherServlet dispatcherServlet(WebMvcProperties webMvcProperties) {// 从容器中的webMvcProperties组件取值
DispatcherServlet dispatcherServlet = new DispatcherServlet();
dispatcherServlet.setDispatchOptionsRequest(webMvcProperties.isDispatchOptionsRequest());
dispatcherServlet.setDispatchTraceRequest(webMvcProperties.isDispatchTraceRequest());
dispatcherServlet.setThrowExceptionIfNoHandlerFound(webMvcProperties.isThrowExceptionIfNoHandlerFound());
dispatcherServlet.setPublishEvents(webMvcProperties.isPublishRequestHandledEvents());
dispatcherServlet.setEnableLoggingRequestDetails(webMvcProperties.isLogRequestDetails());
return dispatcherServlet;
}
}生效的配置类,会给容器中装配很多不同功能的组件;
这些组件装配到容器中后,项目就具有了该组件所具有的功能;
如果用户自行配置了某一个组件,则以用户配置的优先。
若想实现定制化配置,有两种方法:
- 方法一:用户自行配置组件,添加
@Bean注解,用以替换 Spring Boot 底层的默认组件。 - 方法二:用户查看该组件从配置文件种获取的是什么属性的值,然后按需求自行修改对应的属性值。比如 HttpEncodingAutoConfiguration 对应的就是配置文件中的
server.servlet.encoding属性。
- 方法一:用户自行配置组件,添加
过程:xxxxxAutoConfiguration.class —> 注册组件 —> 从 xxxxxProperties.class 里面拿值 —-> 绑定 application.properties 文件。
- 可以看出,一般通过修改 application.properties 文件中相应的配置,就可完成 Spring Boot 功能的修改。
最佳实践
第一步:引入相应的场景依赖。
第二步:查看 Spring Boot 做了哪些自动配置。
自己查看底层源码,找出对应配置的参数。一般来说,引入一个场景后,该场景对应的自动配置都会生效。
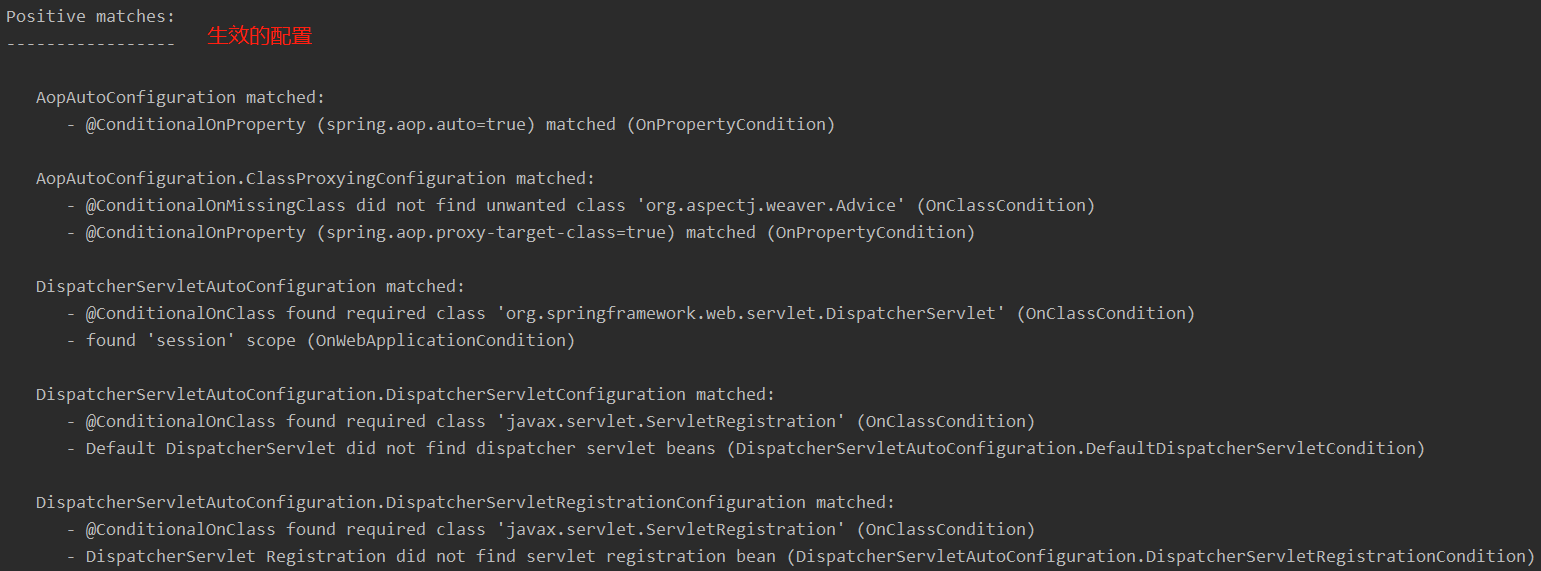
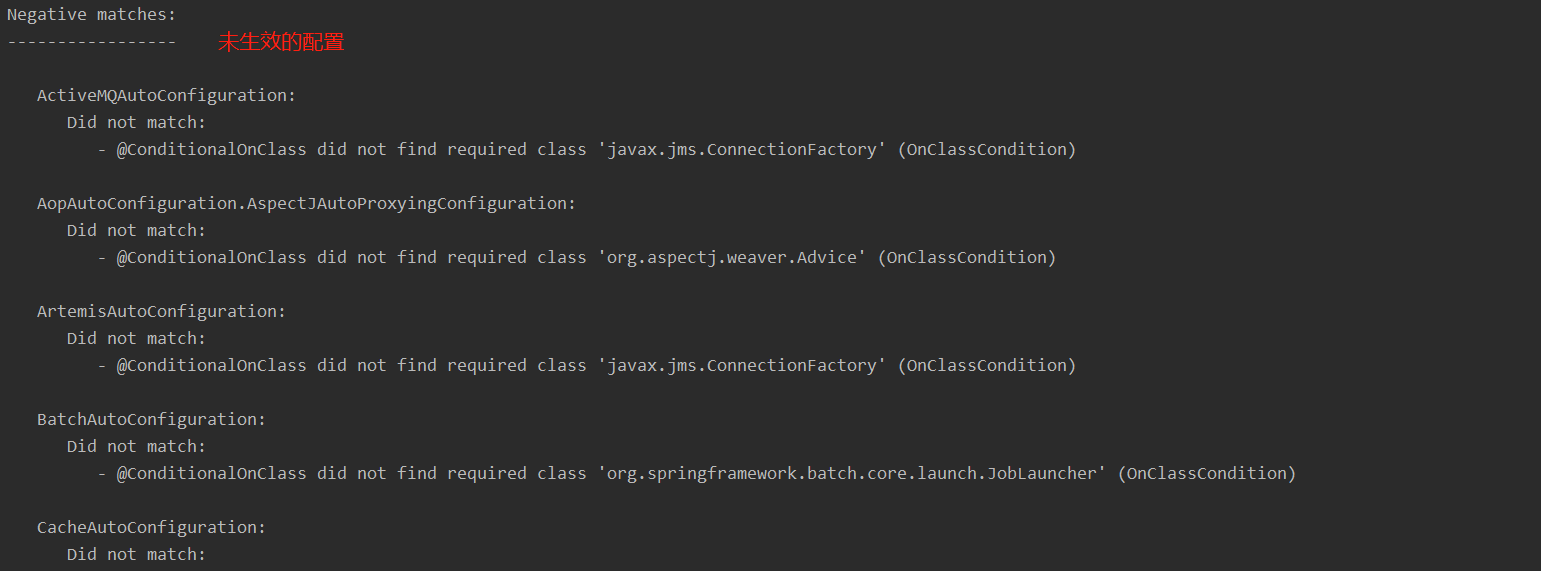
配置文件中添加
debug=true,开启自动配置的报告。启动主程序后,即可在控制台查看所有生效和未生效的配置 — Positive (生效) / Negative (未生效):1
debug=true
1
2
3
4
5
6
public class MainApplication {
public static void main(String[] args) {
SpringApplication.run(MainApplication.class, args);
}
}
第三步:按照需求,确定是否需要修改默写配置。
参照文档修改配置项
自己查看底层源码,分析 xxxxxProperties.class 绑定了配置文件的哪些属性。
比如,修改 Spring Boot 启动时的 banner 图:
原图:
spring.banner.image.locationBanner image file location (jpg or png can also be used). classpath:banner.gif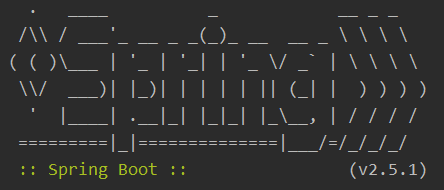
添加配置到配置文件中,或者将 classpath 路径下的 spring.jpg 重命名为 banner.jpg (Spring Boot 默认查找 classpath 下的 banner 图片):
1
=classpath:spring.jpg

新图:
自定义加入或者替换组件。
@Bean、@Component等。
自定义器 xxxxxCustomizer;
第四步:实现自己所需功能的业务逻辑。
Spring Boot 的开发工具
dev-tools
Maven 添加依赖:
1
2
3
4
5<dependency>
<groupId>org.springframework.boot</groupId>
<artifactId>spring-boot-devtools</artifactId>
<optional>true</optional>
</dependency>重新启动项目,在后续开发时,如果对项目有改动,使用
ctrl + F9快捷键,即可刷新项目,实现简单的热更新,其本质上是自动重启项目。如果项目做了某些改动,
ctrl + F9之后,控制台会打印重启信息。
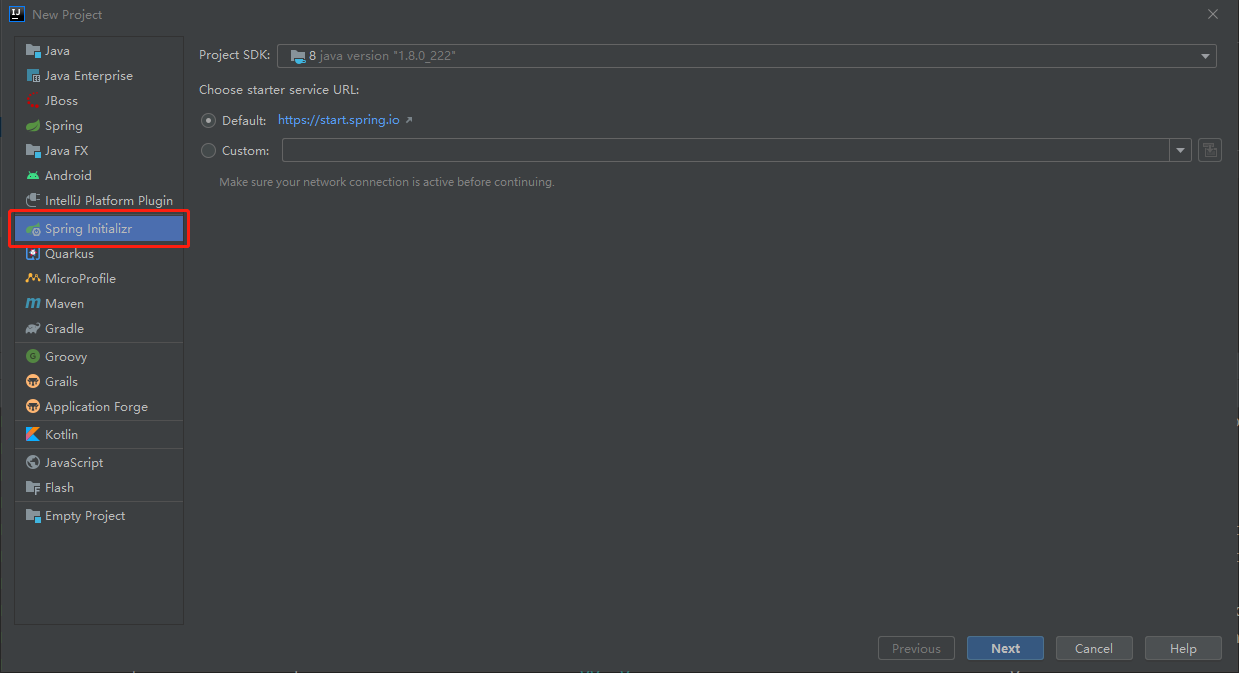
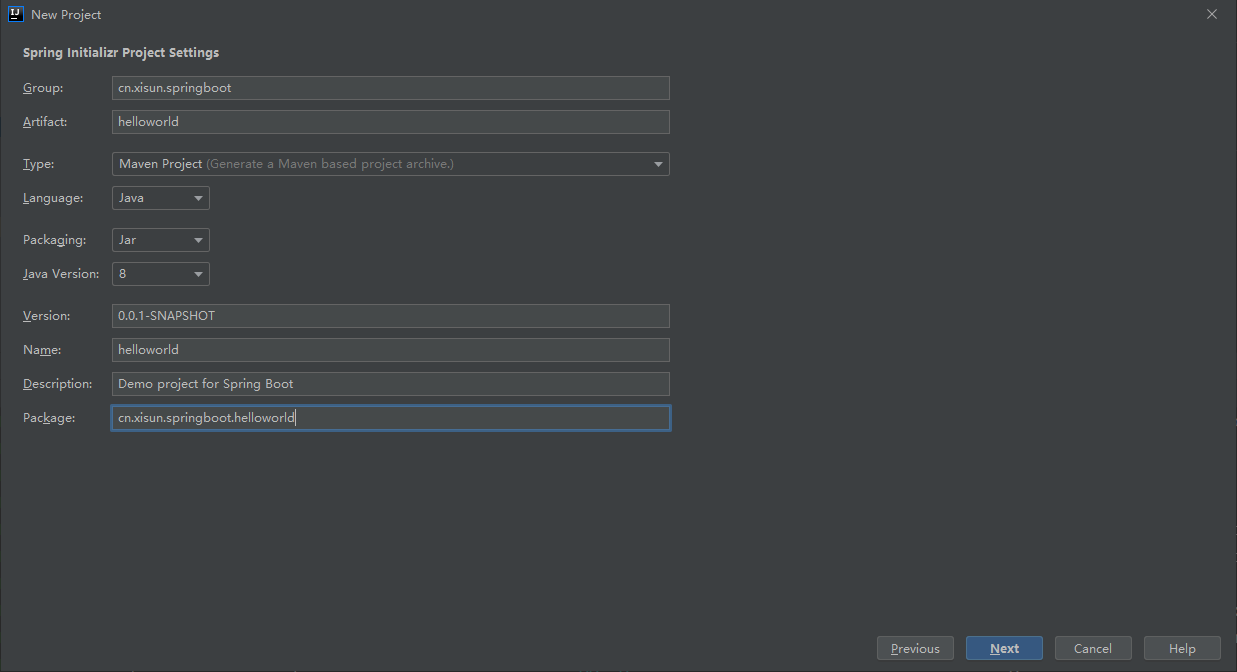
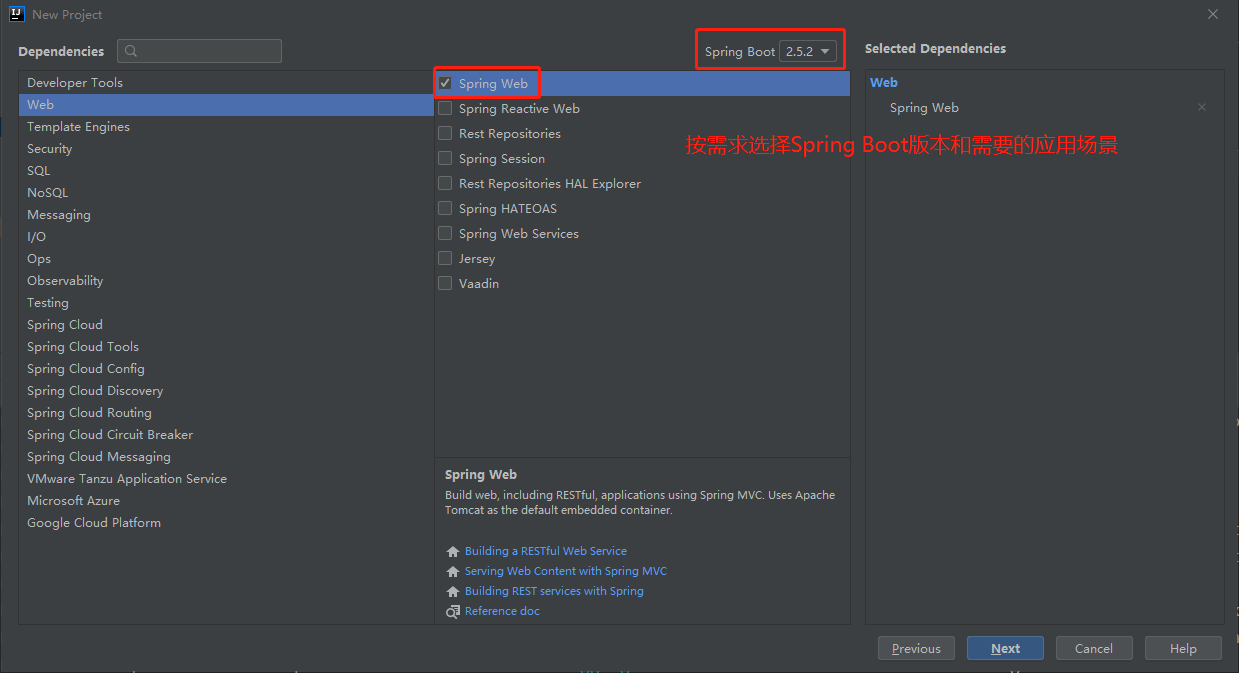
Spring Initailizr
项目初始化向导,能够快速的创建 Spring Boot 的项目。
New Project 时,选择需要的开发场景,Spring Boot 会自动添加所需要的依赖,并创建好主类:

static:静态资源,如 css,js 等;templates:Web 页面。
1
2
3
4
5
6
7
8
9
10
11
12
13
14
15
16
17
18
19
20
21
22
23
24
25
26
27
28
29
30
31
32
33
34
35
36
37
38
39
40
41
42
43
44
45
46
47
48
49
<project xmlns="http://maven.apache.org/POM/4.0.0" xmlns:xsi="http://www.w3.org/2001/XMLSchema-instance"
xsi:schemaLocation="http://maven.apache.org/POM/4.0.0 https://maven.apache.org/xsd/maven-4.0.0.xsd">
<modelVersion>4.0.0</modelVersion>
<!-- 自动添加parent -->
<parent>
<groupId>org.springframework.boot</groupId>
<artifactId>spring-boot-starter-parent</artifactId>
<version>2.5.2</version>
<relativePath/> <!-- lookup parent from repository -->
</parent>
<groupId>cn.xisun.springboot</groupId>
<artifactId>helloworld</artifactId>
<version>0.0.1-SNAPSHOT</version>
<name>helloworld</name>
<description>Demo project for Spring Boot</description>
<properties>
<java.version>1.8</java.version>
</properties>
<!-- 自动添加相关依赖 -->
<dependencies>
<!-- Web开发 -->
<dependency>
    <groupId>org.springframework.boot</groupId>
    <artifactId>spring-boot-starter-web</artifactId>
</dependency>
<!-- 单元测试 -->
<dependency>
<groupId>org.springframework.boot</groupId>
<artifactId>spring-boot-starter-test</artifactId>
<scope>test</scope>
</dependency>
</dependencies>
<!-- 自动添加打包插件 -->
<build>
<plugins>
<plugin>
<groupId>org.springframework.boot</groupId>
<artifactId>spring-boot-maven-plugin</artifactId>
</plugin>
</plugins>
</build>
</project>
Spring Boot 2 核心功能
配置文件
文件类型
properties:同前面 application.properties 配置文件的写法。
yaml:
YAML 是 “YAML Ain’t Markup Language” (YAML 不是一种标记语言 ) 的递归缩写。在开发这种语言时,YAML 的意思其实是:”Yet Another Markup Language” (仍是一种标记语言)。
yarm 非常适合用来做以数据为中心的配置文件。
基本语法:
书写格式:
key: value,key 和 value 之间有空格;大小写敏感;
使用缩进表示层级关系;
缩进不允许使用 tab,只允许使用空格;
缩进的空格数不重要,只要相同层级的元素左对齐即可;
# 表示注释;
文件中的字符串无需加引号,如果要加,’ ‘ 内的字符串内容会被转义,” “ 内的字符串内容不会被转义。
单引号:
1
2person:
userName: 'zhangsan \n 李四'1
2
3
4
5
6
7
8
9
10
11
public class HelloworldApplication {
public static void main(String[] args) {
ConfigurableApplicationContext run = SpringApplication.run(HelloworldApplication.class, args);
Person person = run.getBean("person", Person.class);
System.out.println(person.getUserName());
}
}
输出结果:
zhangsan \n 李四单引号内的 \n,没有表现出换行的本意,而是被转义为了 \n 字符串 — 单引号内的字符串内容会被转义。
双引号:
1
2person:
userName: "zhangsan \n 李四"1
2
3
4
5
6
7
8
9
10
11
12
public class HelloworldApplication {
public static void main(String[] args) {
ConfigurableApplicationContext run = SpringApplication.run(HelloworldApplication.class, args);
Person person = run.getBean("person", Person.class);
System.out.println(person.getUserName());
}
}
输出结果:
zhangsan
李四双引号内的 \n,表现出换行的本意,没有被转义为 \n 字符串 — 双引号内的字符串内容不会被转义。
数据类型:
字面量:单个的、不可再分的值。如 date、boolean、string、number、null。
1
key: value
对象:键值对的集合。如 map、hash、set、object。
1
2
3
4
5
6
7
8# 行内写法
key: {key1:value1, key2:value2, key3:value3}
# 缩进写法
key:
key1: value1
key2: value2
key3: value3数组:一组按次序排列的值。如 array、list、queue。
1
2
3
4
5
6
7
8# 行内写法
key: {value1, value2, value3}
# 缩进写法,一个-代表一个元素
key:
- value1
- value2
- value3
示例:
Person 和 Pet 类:
1
2
3
4
5
6
7
8
9
10
11
12
13
14
15
16
17
18
19
20
21
22
23
24
25
26
27
28
public class Person {
private String userName;
private Boolean boss;
private Date birth;
private Integer age;
private Pet pet;
private String[] interests;
private List<String> animal;
private Map<String, Object> score;
private Set<Double> salarys;
private Map<String, List<Pet>> allPets;
}1
2
3
4
5
6
7
8
9
10
11
12
public class Pet {
private String name;
private Double weight;
}application.yaml 配置文件 (也可以命名为 application.yml):
1
2
3
4
5
6
7
8
9
10
11
12
13
14
15
16
17
18
19
20
21
22
23
24
25person:
userName: zhangsan
boss: false
birth: 2019/12/12 20:12:33
age: 18
pet:
name: tomcat
weight: 23.4
interests: [篮球, 游泳]
animal:
- jerry
- tom
score:
english:
first: 30
second: 40
third: 50
math: [131, 140, 148]
chinese: {first: 128, second: 136}
salarys: [3999, 4999.98, 5999.99]
allPets:
sick:
- {name: tom1, weight: 33}
- {name: jerry1, weight: 47}
healthy: [{name: tom2, weight: 33}, {name: jerry2, weight: 47}]在实际开发时,配置文件的写法方式,应该统一为行内写法,或者缩进写法,不要混写。
Controller 测试:
1
2
3
4
5
6
7
8
9
10
11
public class HelloController {
private Person person;
public Person person() {
return person;
}
}
可以看出,容器中的 Person 组件,就是按照 application.yaml 配置文件进行属性配置的。
Spring Boot 项目,可以同时存在 properties 和 yaml 两种配置文件,当二者包含相同属性的配置时,propertire 配置文件会覆盖 yaml 配置文件。
application.properties:
1
=wangwu
application.yaml:
1
2person:
userName: zhangsan主类:
1
2
3
4
5
6
7
8
9
10
11
public class HelloworldApplication {
public static void main(String[] args) {
ConfigurableApplicationContext run = SpringApplication.run(HelloworldApplication.class, args);
Person person = run.getBean("person", Person.class);
System.out.println(person.getUserName());
}
}
输出结果:
wangwu
配置提示
自定义的类和配置文件绑定一般没有提示,需要添加
spring-boot-configuration-processor依赖,这样在配置文件书写时,会进行提示:1
2
3
4
5<dependency>
<groupId>org.springframework.boot</groupId>
<artifactId>spring-boot-configuration-processor</artifactId>
<optional>true</optional>
</dependency>
user-name 与 userName 效果等同。
因为
spring-boot-configuration-processor依赖是开发过程中提供帮助,在打包程序时,应将其排除,不打包:1
2
3
4
5
6
7
8
9
10
11
12
13
14
15
16
17
18<!-- 打包插件 -->
<build>
<plugins>
<plugin>
<groupId>org.springframework.boot</groupId>
<artifactId>spring-boot-maven-plugin</artifactId>
<!-- 打包时排除依赖 -->
<configuration>
<excludes>
<exclude>
<groupId>org.springframework.boot</groupId>
<artifactId>spring-boot-configuration-processor</artifactId>
</exclude>
</excludes>
</configuration>
</plugin>
</plugins>
</build>
Web 开发
Spring MVC 自动配置概览
Spring Boot provides auto-configuration for Spring MVC that works well with most applications.
- 大多场景都无需自定义配置。
The auto-configuration adds the following features on top of Spring’s defaults:
Inclusion of
ContentNegotiatingViewResolverandBeanNameViewResolverbeans.- 内容协商视图解析器和 BeanName 视图解析器。
Support for serving static resources, including support for WebJars (covered later in this document)).
- 静态资源 (包括 WebJars)。
Automatic registration of
Converter,GenericConverter, andFormatterbeans.- 自动注册
Converter,GenericConverter和Formatter。
- 自动注册
Support for
HttpMessageConverters(covered later in this document).- 支持
HttpMessageConverters(配合内容协商章节理解原理)。
- 支持
Automatic registration of
MessageCodesResolver(covered later in this document).- 自动注册
MessageCodesResolver(国际化用)。
- 自动注册
Static
index.htmlsupport.- 静态 index.html 页支持。
Custom
Faviconsupport (covered later in this document).- 自定义
Favicon。
- 自定义
Automatic use of a
ConfigurableWebBindingInitializerbean (covered later in this document).- 自动使用
ConfigurableWebBindingInitializer,(DataBinder 负责将请求数据绑定到 JavaBean 上)。
- 自动使用
If you want to keep those Spring Boot MVC customizations and make more MVC customizations (interceptors, formatters, view controllers, and other features), you can add your own
@Configurationclass of typeWebMvcConfigurerbut without@EnableWebMvc.- 不用
@EnableWebMvc注解,使用@Configuration+ WebMvcConfigurer 自定义规则。
- 不用
If you want to provide custom instances of
RequestMappingHandlerMapping,RequestMappingHandlerAdapter, orExceptionHandlerExceptionResolver, and still keep the Spring Boot MVC customizations, you can declare a bean of typeWebMvcRegistrationsand use it to provide custom instances of those components.- 声明 WebMvcRegistrations 改变默认底层组件。
If you want to take complete control of Spring MVC, you can add your own
@Configurationannotated with@EnableWebMvc, or alternatively add your own@Configuration-annotatedDelegatingWebMvcConfigurationas described in the Javadoc of@EnableWebMvc.- 使用
@EnableWebMvc+@Configuration+ DelegatingWebMvcConfiguration 全面接管 Spring MVC。
- 使用
Spring MVC 静态资源访问及原理
静态资源访问
静态资源目录
只要静态资源放在类路径下的
/static或者/public或者/resources或者/META-INF/resources,都可以访问。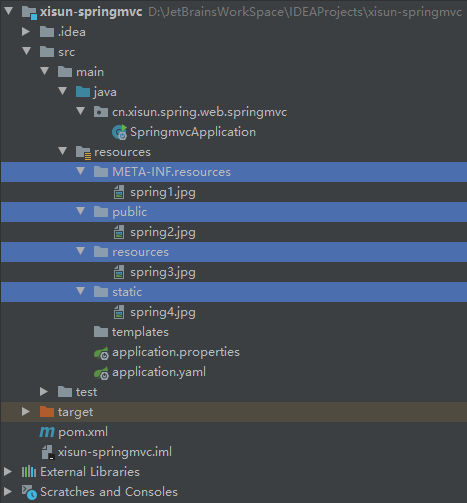
访问方式:
当前项目根路径 / + 静态资源名。例如:http://localhost:8080/spring1.jpg。原理:Spring Boot 静态资源访问映射
/**,即拦截所有的请求。当一个请求进来时,先去找 Controller 看能不能处理,不能处理的所有请求,都会交给静态资源处理器。如果静态资源也找不到,则响应 404 页面。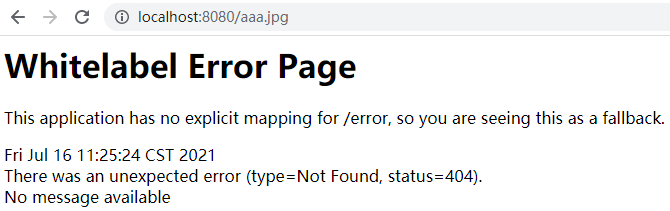
改变静态资源默认的存储路径:
1
2
3
4
5# 单个路径
spring:
web:
resources:
static-locations: classpath:images1
2
3
4
5# 多个路径
spring:
web:
resources:
static-locations: [classpath:images, classpath:statics]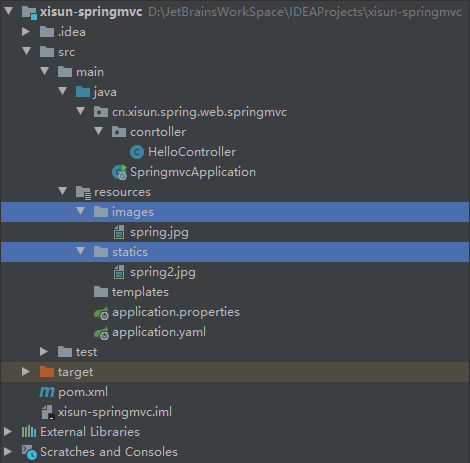
静态资源都需要放在 application.yaml 配置文件里标明的路径下 (有时可能不生效,更改一下路径名,刷新几次)。
默认的那几个路径不再生效,默认路径如下:
1
private static final String[] CLASSPATH_RESOURCE_LOCATIONS = new String[]{"classpath:/META-INF/resources/", "classpath:/resources/", "classpath:/static/", "classpath:/public/"};
静态资源访问前缀
静态资源访问时,默认没有前缀。
改变静态资源的访问前缀:
1
2
3spring:
mvc:
static-path-pattern: /res/**再次访问静态资源时,都需要添加前缀。比如:
http://localhost:8080/res/spring.jpg。
webjar (了解)
Spring 把常用的一些 js 打包成 jar 包,添加引用后即可使用。官方地址:https://www.webjars.org/
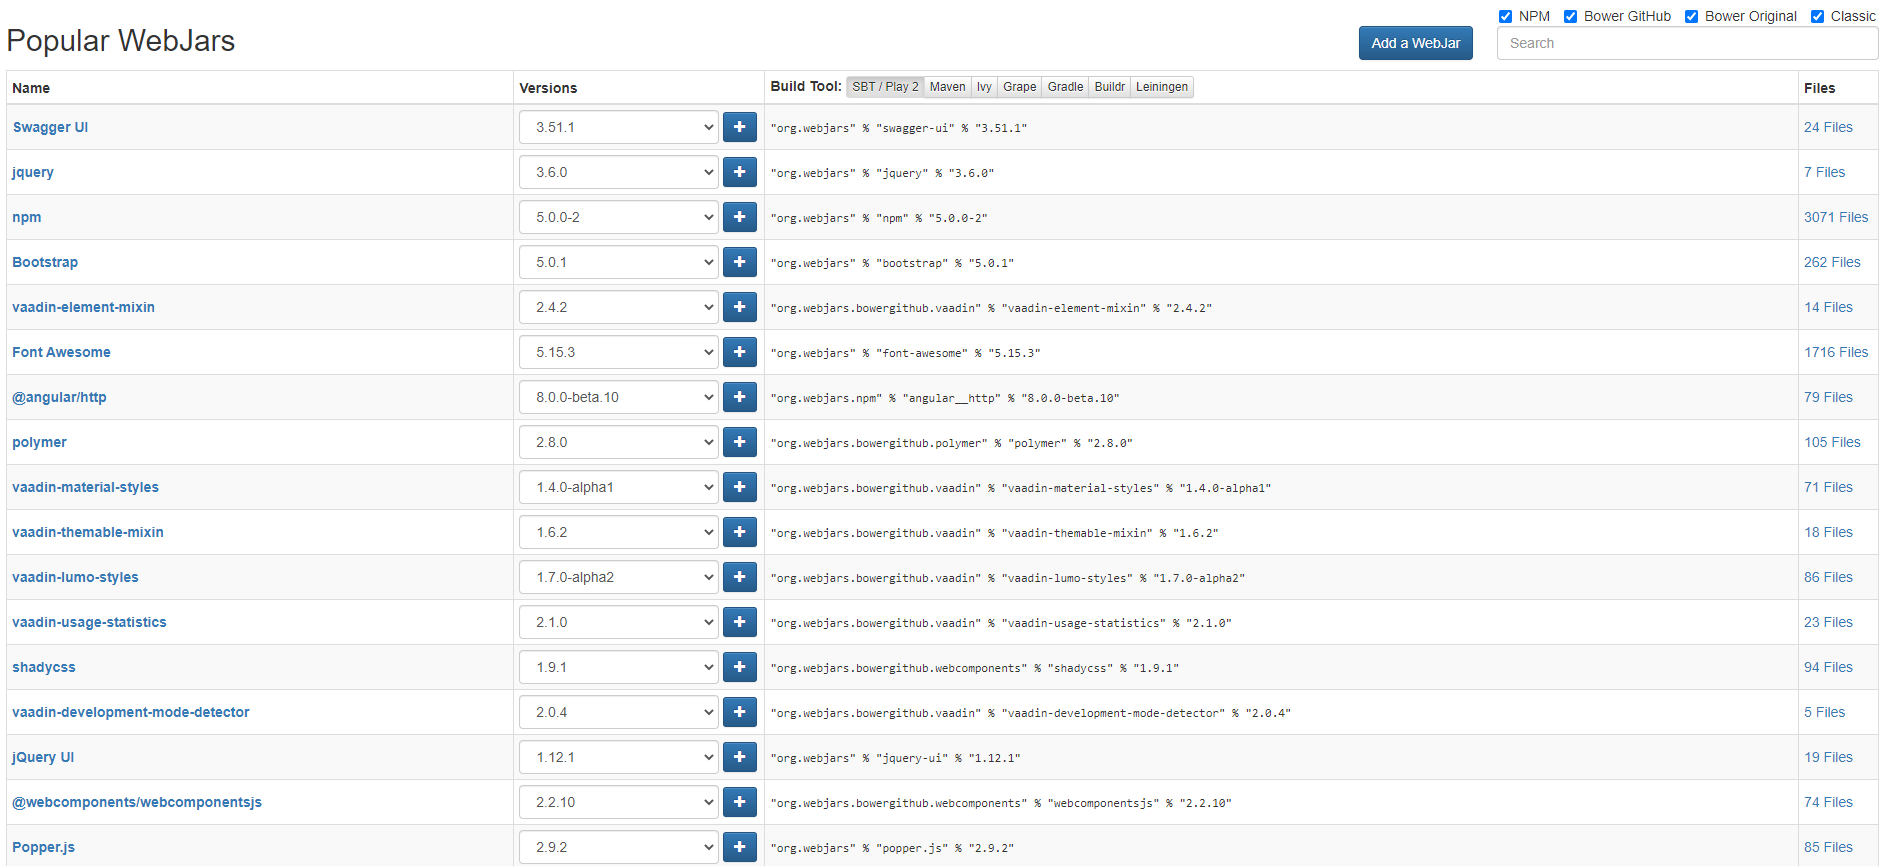
例如,使用 jquery,Maven 引入依赖:
1
2
3
4
5<dependency>
<groupId>org.webjars</groupId>
<artifactId>jquery</artifactId>
<version>3.6.0</version>
</dependency>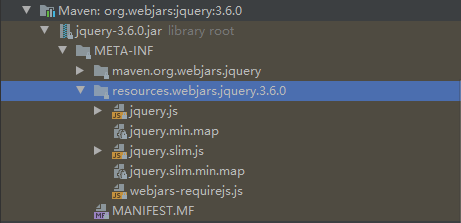
访问时,根据添加的 jquery 依赖的资源结构,确定访问地址:
http://localhost:8080/webjars/jquery/3.6.0/jquery.js。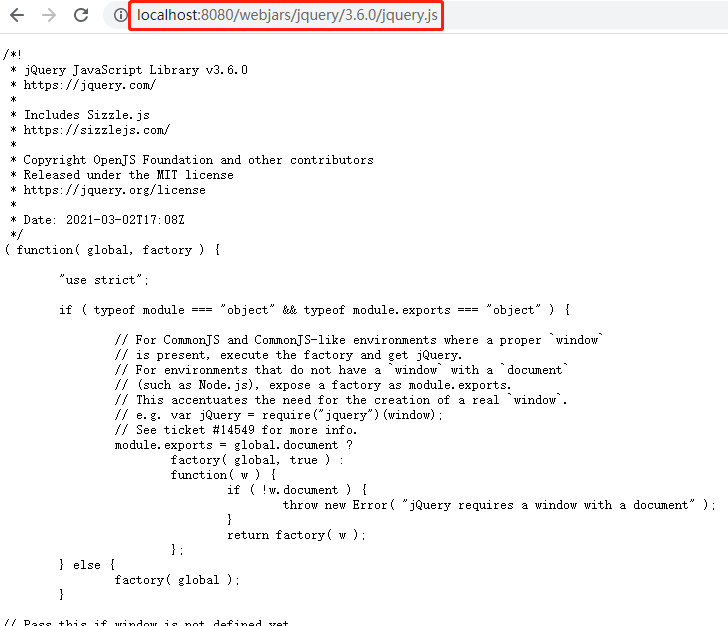
不同的 webjars,其访问地址可能不同,需要按照相应依赖里面的资源包路径确定。
欢迎页支持
Spring Boot supports both static and templated welcome pages. It first looks for an
index.htmlfile in the configured static content locations. If one is not found, it then looks for anindextemplate. If either is found, it is automatically used as the welcome page of the application.Spring Boot 支持两种方式的欢迎页,一种是存放在静态资源存储路径下的 index.html,另一种是能处理动态请求
/index的 Controller。静态欢迎页:
1
2
3
4
5
6
7
8spring:
# 配置静态资源路径,会导致welcome page失效
# mvc:
# static-path-pattern: /res/**
web:
resources:
static-locations: [classpath:images, classpath:statics]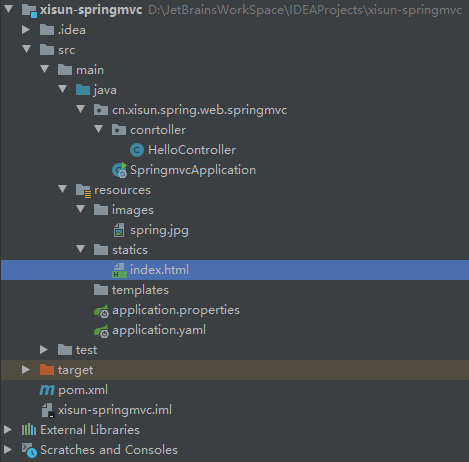
1
2
3
4
5
6
7
8
9
10
<html lang="en">
<head>
<meta charset="UTF-8">
<title>Title</title>
</head>
<body>
<h1>Hello, Xisun!</h1>
</body>
</html>
动态请求:
/index,交由相应的 Controller 处理。
静态资源配置原理
Spring Boot 在启动时,默认加载 xxxxxAutoConfiguration.class,即各种自动配置类。
- 分析 Spring Boot 的某一项功能时,应该先查找其对应的自动配置类,从底层源码开始。
与 Spring MVC 相关的自动配置类,是
org.springframework.boot.autoconfigure.web.servlet.WebMvcAutoConfiguration:1
2
3
4
5
6
7
8
public class WebMvcAutoConfiguration {}WebMvcAutoConfiguration 配置类中的 WebMvcAutoConfigurationAdapter 组件,对应了静态资源路径和访问前缀有关的规则:
1
2
3
4
5
6
7
8
9
10
11
12
13
14
15
16
17
18
19
20
21
22
23
24
25
26
27
28
29
30
31
32
33
34
35
36
37
38
39
40
41
42
43
44
45
46
47
48
49
50
51
52
53
54
55
56
57
58
59
60
61
62
63
// 开启WebMvcProperties、ResourceProperties和WebProperties类配置绑定功能,并注册到容器中
// 1.WebMvcProperties.class: spring.mvc
// 2.ResourceProperties.class: spring.resources
// 3.WebProperties.class: spring.web
public static class WebMvcAutoConfigurationAdapter implements WebMvcConfigurer, ServletContextAware {
/**
* WebMvcAutoConfigurationAdapter配置类只有一个有参构造器
* 有参构造器所有参数的值都会从容器中确定
* resourceProperties: 获取和spring.resources属性的所有值绑定的对象
* webProperties: 获取和spring.web属性的所有值绑定的对象;
* mvcProperties: 获取和spring.mvc属性的所有值绑定的对象;
* beanFactory: Spring的beanFactory;
* messageConvertersProvider: 找到所有的HttpMessageConverters;
* resourceHandlerRegistrationCustomizerProvider: 找到资源处理器的自定义器
* dispatcherServletPath:
* servletRegistrations: 给应用注册Servlet、Filter....
*/
public WebMvcAutoConfigurationAdapter(
org.springframework.boot.autoconfigure.web.ResourceProperties resourceProperties,
WebProperties webProperties, WebMvcProperties mvcProperties, ListableBeanFactory beanFactory,
ObjectProvider<HttpMessageConverters> messageConvertersProvider,
ObjectProvider<ResourceHandlerRegistrationCustomizer> resourceHandlerRegistrationCustomizerProvider,
ObjectProvider<DispatcherServletPath> dispatcherServletPath,
ObjectProvider<ServletRegistrationBean<?>> servletRegistrations) {
this.resourceProperties = resourceProperties.hasBeenCustomized() ? resourceProperties
: webProperties.getResources();
this.mvcProperties = mvcProperties;
this.beanFactory = beanFactory;
this.messageConvertersProvider = messageConvertersProvider;
this.resourceHandlerRegistrationCustomizer = resourceHandlerRegistrationCustomizerProvider.getIfAvailable();
this.dispatcherServletPath = dispatcherServletPath;
this.servletRegistrations = servletRegistrations;
this.mvcProperties.checkConfiguration();
}
/**
* webjars资源处理的默认规则
*/
public void addResourceHandlers(ResourceHandlerRegistry registry) {
if (!this.resourceProperties.isAddMappings()) {
logger.debug("Default resource handling disabled");
return;
}
// webjars: 映射规则是/webjars/**,资源路径是各jar包下的classpath:/META-INF/resources/webjars/
addResourceHandler(registry, "/webjars/**", "classpath:/META-INF/resources/webjars/");
// this.mvcProperties.getStaticPathPattern(): 静态资源默认映射是/**
addResourceHandler(registry, this.mvcProperties.getStaticPathPattern(), (registration) -> {
registration.addResourceLocations(this.resourceProperties.getStaticLocations());
if (this.servletContext != null) {
ServletContextResource resource = new ServletContextResource(this.servletContext, SERVLET_LOCATION);
registration.addResourceLocations(resource);
}
});
}
}1
2
3
4
5
6
7
8
9
10
11
12
13
14
15
16
public class WebProperties {
public static class Resources {
// 静态资源默认存储路径
private static final String[] CLASSPATH_RESOURCE_LOCATIONS = { "classpath:/META-INF/resources/",
"classpath:/resources/", "classpath:/static/", "classpath:/public/" };
/**
* Whether to enable default resource handling.
* 通过设置spring.web.add-mappings: false, 能够禁用所有静态资源的规则,
* 也就是说无论静态资源存放在哪,都无法访问,默认为true
*/
private boolean addMappings = true;
}
}WebMvcAutoConfiguration 配置类中的 EnableWebMvcConfiguration 组件,对应了欢迎页的处理规则:
1
2
3
4
5
6
7
8
9
10
11
12
13
14
15
16
17
public static class EnableWebMvcConfiguration extends DelegatingWebMvcConfiguration implements ResourceLoaderAware {
// HandlerMapping: 处理器映射,保存了每一个Handler能处理哪些请求.
public WelcomePageHandlerMapping welcomePageHandlerMapping(ApplicationContext applicationContext,
FormattingConversionService mvcConversionService, ResourceUrlProvider mvcResourceUrlProvider) {
WelcomePageHandlerMapping welcomePageHandlerMapping = new WelcomePageHandlerMapping(
new TemplateAvailabilityProviders(applicationContext), applicationContext, getWelcomePage(),
this.mvcProperties.getStaticPathPattern());
welcomePageHandlerMapping.setInterceptors(getInterceptors(mvcConversionService, mvcResourceUrlProvider));
welcomePageHandlerMapping.setCorsConfigurations(getCorsConfigurations());
return welcomePageHandlerMapping;
}
}1
2
3
4
5
6
7
8
9
10
11
12
13
14
15
16final class WelcomePageHandlerMapping extends AbstractUrlHandlerMapping {
WelcomePageHandlerMapping(TemplateAvailabilityProviders templateAvailabilityProviders,
ApplicationContext applicationContext, Resource welcomePage, String staticPathPattern) {
// 如果使用欢迎页功能,默认映射是/**,访问index.html
if (welcomePage != null && "/**".equals(staticPathPattern)) {
logger.info("Adding welcome page: " + welcomePage);
setRootViewName("forward:index.html");
}
// 如果上面的条件不满足,转为发送/index请求,查看Controller是否能匹配并处理
else if (welcomeTemplateExists(templateAvailabilityProviders, applicationContext)) {
logger.info("Adding welcome page template: index");
setRootViewName("index");
}
}
}
Spring MVC 请求参数的处理
请求映射
请求映射的方式
常使用
@RequestMapping注解声明请求映射。比如:1
2
3
4
5
6
7
8
9
10
11
12
13
14
15
16
17
18
19
20
21
22
23
public RequestMapping {
String name() default "";
String[] value() default {};
String[] path() default {};
RequestMethod[] method() default {};
String[] params() default {};
String[] headers() default {};
String[] consumes() default {};
String[] produces() default {};
}1
2
3
4
5
6
7
public class HelloController {
public String hello() {
return "HellO, Spring Boot!";
}
}Rest 风格支持:使用 HTTP 请求方式的动词来表示对资源的操作。
以前:
/getUser表示获取用户请求,/saveUser表示保存用户请求,/editUser表示修改用户请求,/deleteUser表示删除用户请求。现在:
/user表示所有与 User 相关的请求,GET 请求表示获取用户,POST 请求表示保存用户,PUT 请求表示修改用户,DELETE 请求表示删除用户。默认情况下,浏览器只发送 GET 和 POST 请求,不支持 PUT 和 DELETE 请求。如果要完成 Rest 风格的请求,需要在容器中配置一个 HiddenHttpMethodFilter 的组件。
1
2
3
4
5
6
7
8
9
10
11
12
13
14
15
16
17
18
19
20
21
22
23
24
25
26
27
28
29
30
31
32
33
34
35
36
37
38
39
40
41
42
43
44
45
46
47
48
49
50
51
52
53
54
55
56
57
58
59
60
61
62
63
64
65
66
67public class HiddenHttpMethodFilter extends OncePerRequestFilter {
private static final List<String> ALLOWED_METHODS =
Collections.unmodifiableList(Arrays.asList(HttpMethod.PUT.name(),
HttpMethod.DELETE.name(), HttpMethod.PATCH.name()));
// 表单提交时,添加一个隐藏的_method参数,该参数的值,作为最终的实际请求
/** Default method parameter: {@code _method}. */
public static final String DEFAULT_METHOD_PARAM = "_method";
private String methodParam = DEFAULT_METHOD_PARAM;
/**
* Set the parameter name to look for HTTP methods.
* @see #DEFAULT_METHOD_PARAM
*/
public void setMethodParam(String methodParam) {
Assert.hasText(methodParam, "'methodParam' must not be empty");
this.methodParam = methodParam;
}
protected void doFilterInternal(HttpServletRequest request, HttpServletResponse response, FilterChain filterChain)
throws ServletException, IOException {
// 原生Request(POST请求)
HttpServletRequest requestToUse = request;
// 原理: 发送的请求没有异常,且是POST请求时,会获取请求中的_method参数的值,并根据该值发送实际的请求
if ("POST".equals(request.getMethod()) && request.getAttribute(WebUtils.ERROR_EXCEPTION_ATTRIBUTE) == null) {
String paramValue = request.getParameter(this.methodParam);
if (StringUtils.hasLength(paramValue)) {
String method = paramValue.toUpperCase(Locale.ENGLISH);
// ALLOWED_METHODS: 兼容PUT、DELETE和PATCH请求
if (ALLOWED_METHODS.contains(method)) {
// 创建了一个新的请求,作为最终实际的请求
// 包装Request(根据_method参数的值,作为实际请求)
requestToUse = new HttpMethodRequestWrapper(request, method);
}
}
}
filterChain.doFilter(requestToUse, response);
}
/**
* Simple {@link HttpServletRequest} wrapper that returns the supplied method for
* {@link HttpServletRequest#getMethod()}.
*/
private static class HttpMethodRequestWrapper extends HttpServletRequestWrapper {
private final String method;
public HttpMethodRequestWrapper(HttpServletRequest request, String method) {
super(request);
this.method = method;
}
public String getMethod() {
return this.method;
}
}
}HiddenHttpMethodFilter 会拦截 POST 请求,并根据请求中的 _method 参数的值,发送实际的请求。
HiddenHttpMethodFilter 兼容 PUT、DELETE 和 PATCH 请求,也就是说,除了 GET 和 POST 请求,Rest 风格支持上述的三种请求。
Spring Boot 自动配置的 WebMvcAutoConfiguration 中,默认提供了一个 OrderedHiddenHttpMethodFilter,但
spring.mvc.hiddenmethod.filter值默认为 false,也就是说,Spring Boot 默认不开启 Rest 风格支持。1
2
3
4
5
6
7
8
9
10
11
12
13
14
15
public class WebMvcAutoConfiguration {
public OrderedHiddenHttpMethodFilter hiddenHttpMethodFilter() {
return new OrderedHiddenHttpMethodFilter();
}
}1
public class OrderedHiddenHttpMethodFilter extends HiddenHttpMethodFilter implements OrderedFilter {}
配置类中手动开启 Rest 风格支持:
1
2
3
4
5spring:
mvc:
hiddenmethod:
filter:
enabled: true用法:表单 method 设置为 POST,添加隐藏域 _method,值按需求设置为 PUT 和 DELETE。如果本意是发送 POST 请求,则不需要 _method 属性。
1
2
3
4
5
6
7
8
9
10
11
12
13
14
15
16
17
18
19
20
21
22
23
24
25
26
27
<html lang="en">
<head>
<meta charset="UTF-8">
<title>Title</title>
</head>
<body>
<h1>Hello, Xisun!</h1>
<form action="/user" method="get">
<input value="RESET-GET 提交" type="submit">
</form>
<form action="/user" method="post">
<input value="RESET-POST 提交" type="submit">
</form>
<form action="/user" method="post">
<input name="_method" value="PUT" type="hidden">
<input value="RESET-PUT 提交" type="submit">
</form>
<form action="/user" method="post">
<input name="_method" value="DELETE" type="hidden">
<input value="RESET-DELETE 提交" type="submit">
</form>
</body>
</html>1
2
3
4
5
6
7
8
9
10
11
12
13
14
15
16
17
18
19
20
21
22
23
24
25
26
public class HelloController {
// @RequestMapping(value = "/user", method = RequestMethod.GET)
public String getUser() {
return "GET-张三";
}
// @RequestMapping(value = "/user", method = RequestMethod.POST)
public String saveUser() {
return "POST-张三";
}
// @RequestMapping(value = "/user", method = RequestMethod.PUT)
public String putUser() {
return "PUT-张三";
}
// @RequestMapping(value = "/user", method = RequestMethod.DELETE)
public String deleteUser() {
return "DELETE-张三";
}
}@GetMapping、@PostMapping、@PutMapping和@DeleteMapping四个派生注解,效果等同上面的写法。原理 (表单提交时的情况):
- 表单提交时,只有 GET 请求和 POST 请求两种方式。
- 表单提交会带上 _method 参数,比如
_method=PUT。 - 请求过来时,会被 HiddenHttpMethodFilter 拦截:
- 判断请求是正常的,并且是 POST 请求;
- 获取到 _method 参数的值。
- 兼容以下请求:PUT、DELETE 和 PATCH。
- 将原生 Request (post 请求),使用包装模式 requesWrapper,重写
getMethod(),返回传入的 _method 的值。 - 过滤器链放行的时候用 requesWrapper。后续的方法调用
getMethod()时,调用的是 requesWrapper 重写后的方法。 - 经过以上过程,实现了表单提交时的 Rest 风格。
- 如果使用客户端工具,比如 PostMan,会直接发送 PUT、DELETE 等方式的请求,无需使用 HiddenHttpMethodFilter。
扩展:修改默认的 _method 参数名。
1
2
3
4
5
6
public OrderedHiddenHttpMethodFilter hiddenHttpMethodFilter() {
return new OrderedHiddenHttpMethodFilter();
}根据 OrderedHiddenHttpMethodFilter 的条件性注解,可以看出,当容器内没有 HiddenHttpMethodFilter 组件时,会默认注册一个 OrderedHiddenHttpMethodFilter 组件,而 OrderedHiddenHttpMethodFilter 组件默认使用 _method 参数。因此,如果希望修改 _method 参数,可以自己自定义注册一个 HiddenHttpMethodFilter 组件。
1
2
3
4
5
6
7
8
9
10
public class WebMvcConfig {
public HiddenHttpMethodFilter hiddenHttpMethodFilter() {
HiddenHttpMethodFilter hiddenHttpMethodFilter = new HiddenHttpMethodFilter();
// 修改默认的_method参数
hiddenHttpMethodFilter.setMethodParam("_real");
return hiddenHttpMethodFilter;
}
}
请求映射的原理
处理 Web 请求时,Spring Boot 底层使用的是 Spring MVC,当请求到达时,都会先经过 DispatcherServlet,这是 Web 请求的开始。
DispatcherServlet 的继承树结构 (
ctrl + H):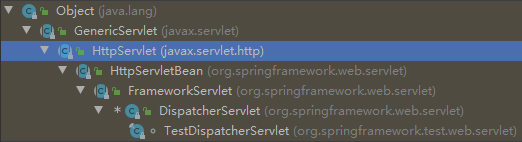
HttpServletBean:没有重写 HttpServlet 的
doGet()和doPost(),查看其子类。FrameworkServlet:重写了 HttpServlet 的
doGet()和doPost(),以及其他方法。可以看出,都调用了processRequest(),最终执行doService(),这个方法在 FrameworkServlet 类中没有实现,查看其子类。1
2
3
4
5
6
7
8
9
10
11
12
13
14
15
16
17
18
19
20
21
22
23
24
25
26
27
28
29
30
31
32
33
34
35
36
37
38
39
protected final void doGet(HttpServletRequest request, HttpServletResponse response)
throws ServletException, IOException {
processRequest(request, response);
}
/**
* Delegate POST requests to {@link #processRequest}.
* @see #doService
*/
protected final void doPost(HttpServletRequest request, HttpServletResponse response)
throws ServletException, IOException {
processRequest(request, response);
}
/**
* Delegate PUT requests to {@link #processRequest}.
* @see #doService
*/
protected final void doPut(HttpServletRequest request, HttpServletResponse response)
throws ServletException, IOException {
processRequest(request, response);
}
/**
* Delegate DELETE requests to {@link #processRequest}.
* @see #doService
*/
protected final void doDelete(HttpServletRequest request, HttpServletResponse response)
throws ServletException, IOException {
processRequest(request, response);
}1
2
3
4
5
6
7
8
9
10
11
12
13
14
15
16
17
18
19
20
21
22
23
24
25
26
27
28
29
30
31
32
33
34
35
36
37
38
39protected final void processRequest(HttpServletRequest request, HttpServletResponse response)
throws ServletException, IOException {
long startTime = System.currentTimeMillis();
Throwable failureCause = null;
LocaleContext previousLocaleContext = LocaleContextHolder.getLocaleContext();
LocaleContext localeContext = buildLocaleContext(request);
RequestAttributes previousAttributes = RequestContextHolder.getRequestAttributes();
ServletRequestAttributes requestAttributes = buildRequestAttributes(request, response, previousAttributes);
WebAsyncManager asyncManager = WebAsyncUtils.getAsyncManager(request);
asyncManager.registerCallableInterceptor(FrameworkServlet.class.getName(), new RequestBindingInterceptor());
initContextHolders(request, localeContext, requestAttributes);
try {
// 最终执行的方法
doService(request, response);
}
catch (ServletException | IOException ex) {
failureCause = ex;
throw ex;
}
catch (Throwable ex) {
failureCause = ex;
throw new NestedServletException("Request processing failed", ex);
}
finally {
resetContextHolders(request, previousLocaleContext, previousAttributes);
if (requestAttributes != null) {
requestAttributes.requestCompleted();
}
logResult(request, response, failureCause, asyncManager);
publishRequestHandledEvent(request, response, startTime, failureCause);
}
}1
2
3// FrameworkServlet中没有实现doService(),查看其子类的实现
protected abstract void doService(HttpServletRequest request, HttpServletResponse response)
throws Exception;DispatcherServlet:重写了
doService(),核心方法在于调用doDispatch(),这个方法是处理 Web 请求的最终方法。1
2
3
4
5
6
7
8
9
10
11
12
13
14
15
16
17
18
19
20
21
22
23
24
25
26
27
28
29
30
31
32
33
34
35
36
37
38
39
40
41
42
43
44
45
46
47
48
49
50
51
52
53
54
55
protected void doService(HttpServletRequest request, HttpServletResponse response) throws Exception {
logRequest(request);
// Keep a snapshot of the request attributes in case of an include,
// to be able to restore the original attributes after the include.
Map<String, Object> attributesSnapshot = null;
if (WebUtils.isIncludeRequest(request)) {
attributesSnapshot = new HashMap<>();
Enumeration<?> attrNames = request.getAttributeNames();
while (attrNames.hasMoreElements()) {
String attrName = (String) attrNames.nextElement();
if (this.cleanupAfterInclude || attrName.startsWith(DEFAULT_STRATEGIES_PREFIX)) {
attributesSnapshot.put(attrName, request.getAttribute(attrName));
}
}
}
// Make framework objects available to handlers and view objects.
request.setAttribute(WEB_APPLICATION_CONTEXT_ATTRIBUTE, getWebApplicationContext());
request.setAttribute(LOCALE_RESOLVER_ATTRIBUTE, this.localeResolver);
request.setAttribute(THEME_RESOLVER_ATTRIBUTE, this.themeResolver);
request.setAttribute(THEME_SOURCE_ATTRIBUTE, getThemeSource());
if (this.flashMapManager != null) {
FlashMap inputFlashMap = this.flashMapManager.retrieveAndUpdate(request, response);
if (inputFlashMap != null) {
request.setAttribute(INPUT_FLASH_MAP_ATTRIBUTE, Collections.unmodifiableMap(inputFlashMap));
}
request.setAttribute(OUTPUT_FLASH_MAP_ATTRIBUTE, new FlashMap());
request.setAttribute(FLASH_MAP_MANAGER_ATTRIBUTE, this.flashMapManager);
}
RequestPath previousRequestPath = null;
if (this.parseRequestPath) {
previousRequestPath = (RequestPath) request.getAttribute(ServletRequestPathUtils.PATH_ATTRIBUTE);
ServletRequestPathUtils.parseAndCache(request);
}
try {
// 核心方法
doDispatch(request, response);
}
finally {
if (!WebAsyncUtils.getAsyncManager(request).isConcurrentHandlingStarted()) {
// Restore the original attribute snapshot, in case of an include.
if (attributesSnapshot != null) {
restoreAttributesAfterInclude(request, attributesSnapshot);
}
}
if (this.parseRequestPath) {
ServletRequestPathUtils.setParsedRequestPath(previousRequestPath, request);
}
}
}1
2
3
4
5
6
7
8
9
10
11
12
13
14
15
16
17
18
19
20
21
22
23
24
25
26
27
28
29
30
31
32
33
34
35
36
37
38
39
40
41
42
43
44
45
46
47
48
49
50
51
52
53
54
55
56
57
58
59
60
61
62
63
64
65
66
67
68
69
70
71
72
73
74
75
76
77
78
79
80
81
82protected void doDispatch(HttpServletRequest request, HttpServletResponse response) throws Exception {
HttpServletRequest processedRequest = request;
HandlerExecutionChain mappedHandler = null;
boolean multipartRequestParsed = false;
WebAsyncManager asyncManager = WebAsyncUtils.getAsyncManager(request);
try {
ModelAndView mv = null;
Exception dispatchException = null;
try {
processedRequest = checkMultipart(request);
multipartRequestParsed = (processedRequest != request);
// Determine handler for the current request.
// 找出当前请求使用哪个Handler处理,也就是Controller里的哪个方法
mappedHandler = getHandler(processedRequest);
if (mappedHandler == null) {
noHandlerFound(processedRequest, response);
return;
}
// Determine handler adapter for the current request.
HandlerAdapter ha = getHandlerAdapter(mappedHandler.getHandler());
// Process last-modified header, if supported by the handler.
String method = request.getMethod();
boolean isGet = HttpMethod.GET.matches(method);
if (isGet || HttpMethod.HEAD.matches(method)) {
long lastModified = ha.getLastModified(request, mappedHandler.getHandler());
if (new ServletWebRequest(request, response).checkNotModified(lastModified) && isGet) {
return;
}
}
if (!mappedHandler.applyPreHandle(processedRequest, response)) {
return;
}
// Actually invoke the handler.
mv = ha.handle(processedRequest, response, mappedHandler.getHandler());
if (asyncManager.isConcurrentHandlingStarted()) {
return;
}
applyDefaultViewName(processedRequest, mv);
mappedHandler.applyPostHandle(processedRequest, response, mv);
}
catch (Exception ex) {
dispatchException = ex;
}
catch (Throwable err) {
// As of 4.3, we're processing Errors thrown from handler methods as well,
// making them available for @ExceptionHandler methods and other scenarios.
dispatchException = new NestedServletException("Handler dispatch failed", err);
}
processDispatchResult(processedRequest, response, mappedHandler, mv, dispatchException);
}
catch (Exception ex) {
triggerAfterCompletion(processedRequest, response, mappedHandler, ex);
}
catch (Throwable err) {
triggerAfterCompletion(processedRequest, response, mappedHandler,
new NestedServletException("Handler processing failed", err));
}
finally {
if (asyncManager.isConcurrentHandlingStarted()) {
// Instead of postHandle and afterCompletion
if (mappedHandler != null) {
mappedHandler.applyAfterConcurrentHandlingStarted(processedRequest, response);
}
}
else {
// Clean up any resources used by a multipart request.
if (multipartRequestParsed) {
cleanupMultipart(processedRequest);
}
}
}
}mappedHandler = getHandler(processedRequest);:找出当前请求使用哪个 Handler 处理,也就是 Controller 里的哪个方法。1
2
3
4
5
6
7
8
9
10
11
12
13
protected HandlerExecutionChain getHandler(HttpServletRequest request) throws Exception {
if (this.handlerMappings != null) {
// 对每一个handlerMapping映射规则循环,以找到符合当前请求的映射
for (HandlerMapping mapping : this.handlerMappings) {
HandlerExecutionChain handler = mapping.getHandler(request);
if (handler != null) {
return handler;
}
}
}
return null;
}processedRequest:当前的请求,包含了请求的路径。
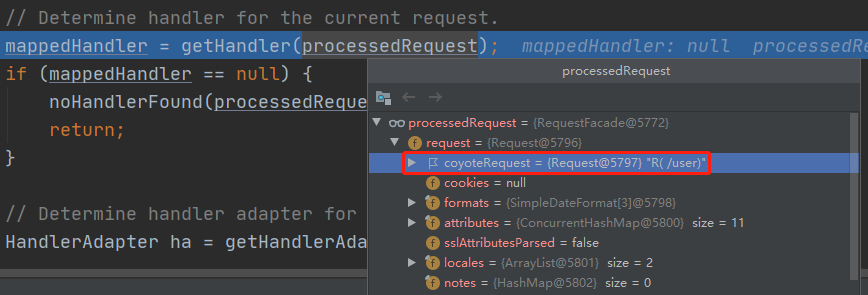
handlerMappings:处理器映射器,是对请求的处理规则。
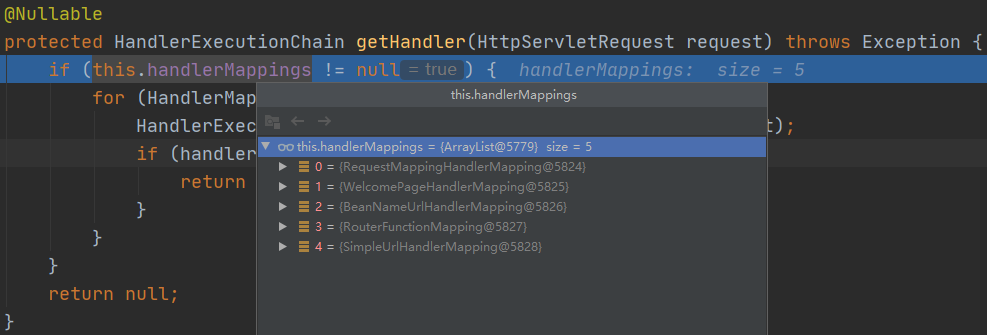
不同的 HandlerMapping 会处理不同的请求,上图中的五个 HandlerMapping,对应不同的功能。
- 此处先着重说明 RequestMappingHandlerMapping 和 WelcomePageHandlerMapping。
请求进来时,会遍历尝试所有的 HandlerMapping,看其是否有符合的请求信息。
- 如果有,就找到这个请求对应的 handler;
- 如果没有,就继续遍历下一个 HandlerMapping 查找。
RequestMappingHandlerMapping:
保存了所有
@RequestMapping注解对应的 handler 的映射规则。在 Spring Boot 启动时,就会扫描所有包内 Controller 中的
@RequestMapping注解,然后保存每一个注解中的规则。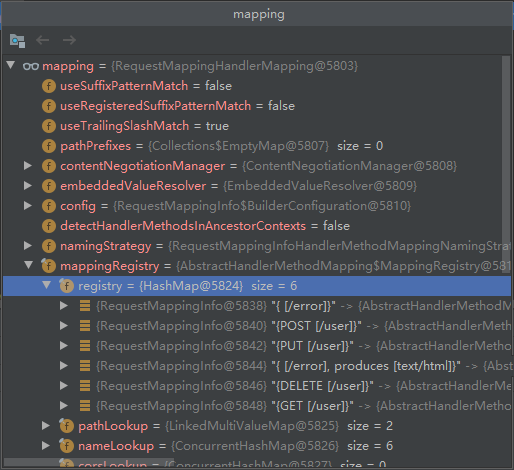
每一个映射规则,都有其所在的 Controller 和对应的方法:
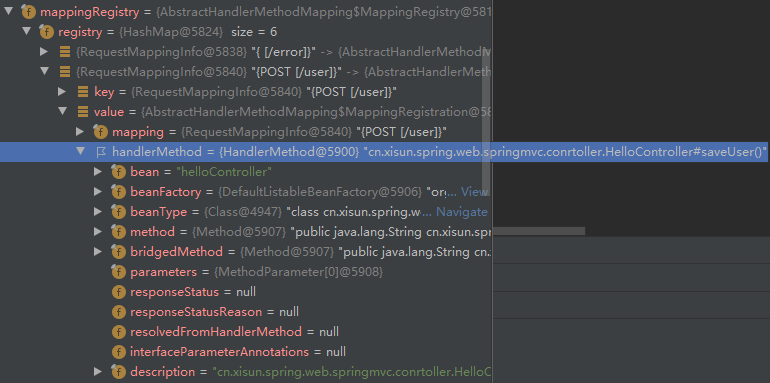
RequestMappingHandlerMapping 的依赖树:
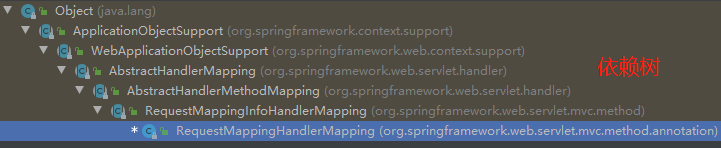
RequestMappingHandlerMapping 的
getHandler():(Debug 模式下,F7 进入方法内部,查看方法的具体执行方,F8 则跳过当前方法,不查看细节)1
2
3
4
5
6
7
8
9
10
11
12
13
14
15
16
17
18
19
20
21
22
23
24
25
26
27
28
29
30
31
32
33
34
35
36
37
38
39
40
41
42
43
44
45
46
47
48
49
50public abstract class AbstractHandlerMapping extends WebApplicationObjectSupport
implements HandlerMapping, Ordered, BeanNameAware {
public final HandlerExecutionChain getHandler(HttpServletRequest request) throws Exception {
// 获取当前请求对应的handler!!!F7进入方法内部
Object handler = getHandlerInternal(request);
// 找到了handler之后,即可进行之后的业务功能、逻辑处理等操作
if (handler == null) {
handler = getDefaultHandler();
}
if (handler == null) {
return null;
}
// Bean name or resolved handler?
if (handler instanceof String) {
String handlerName = (String) handler;
handler = obtainApplicationContext().getBean(handlerName);
}
// Ensure presence of cached lookupPath for interceptors and others
if (!ServletRequestPathUtils.hasCachedPath(request)) {
initLookupPath(request);
}
HandlerExecutionChain executionChain = getHandlerExecutionChain(handler, request);
if (logger.isTraceEnabled()) {
logger.trace("Mapped to " + handler);
}
else if (logger.isDebugEnabled() && !DispatcherType.ASYNC.equals(request.getDispatcherType())) {
logger.debug("Mapped to " + executionChain.getHandler());
}
if (hasCorsConfigurationSource(handler) || CorsUtils.isPreFlightRequest(request)) {
CorsConfiguration config = getCorsConfiguration(handler, request);
if (getCorsConfigurationSource() != null) {
CorsConfiguration globalConfig = getCorsConfigurationSource().getCorsConfiguration(request);
config = (globalConfig != null ? globalConfig.combine(config) : config);
}
if (config != null) {
config.validateAllowCredentials();
}
executionChain = getCorsHandlerExecutionChain(request, executionChain, config);
}
return executionChain;
}
}1
2
3
4
5
6
7
8
9
10
11
12
13
14public abstract class RequestMappingInfoHandlerMapping extends AbstractHandlerMethodMapping<RequestMappingInfo> {
protected HandlerMethod getHandlerInternal(HttpServletRequest request) throws Exception {
request.removeAttribute(PRODUCIBLE_MEDIA_TYPES_ATTRIBUTE);
try {
// 具体调用!!!F7进入方法内部
return super.getHandlerInternal(request);
}
finally {
ProducesRequestCondition.clearMediaTypesAttribute(request);
}
}
}1
2
3
4
5
6
7
8
9
10
11
12
13
14
15
16
17
18
19
20
21
22
23public abstract class AbstractHandlerMethodMapping<T> extends AbstractHandlerMapping implements InitializingBean {
// Handler method lookup
/**
* Look up a handler method for the given request.
*/
protected HandlerMethod getHandlerInternal(HttpServletRequest request) throws Exception {
// 当前请求的路径,例如: /user
String lookupPath = initLookupPath(request);
// 加锁
this.mappingRegistry.acquireReadLock();
try {
// 查找当前请求的lookupPath路径,应该由哪个Handler处理!!!F7进入方法内部
HandlerMethod handlerMethod = lookupHandlerMethod(lookupPath, request);
return (handlerMethod != null ? handlerMethod.createWithResolvedBean() : null);
}
finally {
this.mappingRegistry.releaseReadLock();
}
}
}1
2
3
4
5
6
7
8
9
10
11
12
13
14
15
16
17
18
19
20
21
22
23
24
25
26
27
28
29
30
31
32
33
34
35
36
37
38
39
40
41
42
43
44
45
46
47
48
49
50
51
protected HandlerMethod lookupHandlerMethod(String lookupPath, HttpServletRequest request) throws Exception {
List<Match> matches = new ArrayList<>();
// 查找RequestMappingHandlerMapping中注册的所有能够处理lookupPath请求的Mapping,可能有多个
List<T> directPathMatches = this.mappingRegistry.getMappingsByDirectPath(lookupPath);
if (directPathMatches != null) {
// 找到的Mapping,经过验证,找到最佳匹配的Mapping,然后添加到matches集合中
addMatchingMappings(directPathMatches, matches, request);
}
if (matches.isEmpty()) {
// 如果没找到,做一些空值处理
addMatchingMappings(this.mappingRegistry.getRegistrations().keySet(), matches, request);
}
if (!matches.isEmpty()) {
// 得到的最佳匹配的Mapping,正常情况下只能有一个
Match bestMatch = matches.get(0);
// 同一个请求,如果有多个Mapping,会抛出异常
if (matches.size() > 1) {
Comparator<Match> comparator = new MatchComparator(getMappingComparator(request));
matches.sort(comparator);
bestMatch = matches.get(0);
if (logger.isTraceEnabled()) {
logger.trace(matches.size() + " matching mappings: " + matches);
}
if (CorsUtils.isPreFlightRequest(request)) {
for (Match match : matches) {
if (match.hasCorsConfig()) {
return PREFLIGHT_AMBIGUOUS_MATCH;
}
}
}
else {
Match secondBestMatch = matches.get(1);
if (comparator.compare(bestMatch, secondBestMatch) == 0) {
Method m1 = bestMatch.getHandlerMethod().getMethod();
Method m2 = secondBestMatch.getHandlerMethod().getMethod();
String uri = request.getRequestURI();
throw new IllegalStateException(
"Ambiguous handler methods mapped for '" + uri + "': {" + m1 + ", " + m2 + "}");
}
}
}
request.setAttribute(BEST_MATCHING_HANDLER_ATTRIBUTE, bestMatch.getHandlerMethod());
handleMatch(bestMatch.mapping, lookupPath, request);
// 返回最佳匹配的结果,如下图所示,这个结果就是此次请求所对应的Mapping,以及所在的Controller和方法
return bestMatch.getHandlerMethod();
}
else {
return handleNoMatch(this.mappingRegistry.getRegistrations().keySet(), lookupPath, request);
}
}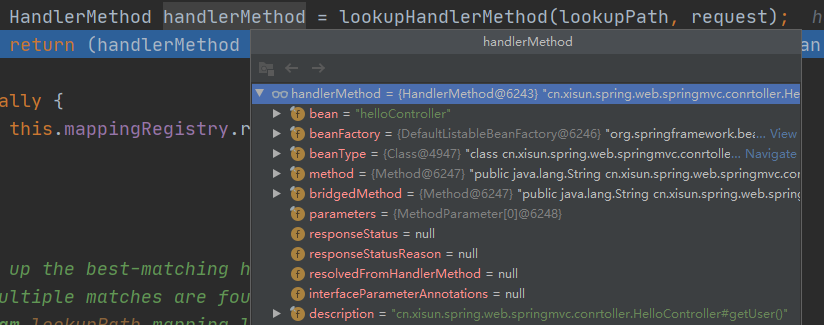
WelcomePageHandlerMapping:处理欢迎页的映射规则,访问
/能访问到 index.html。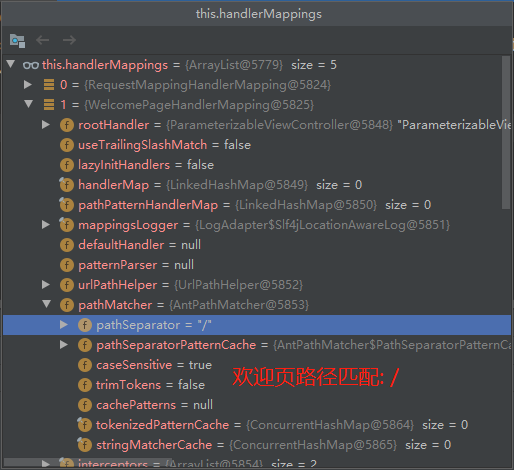
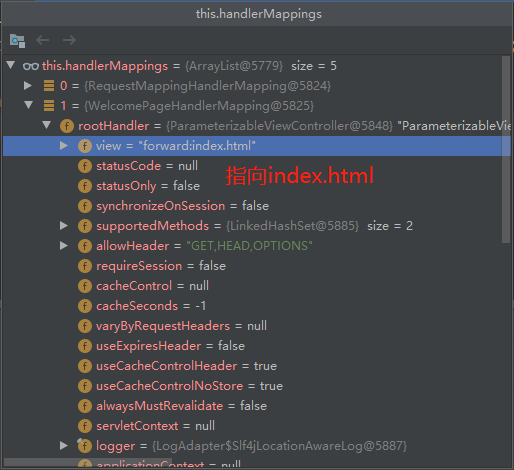
Spring Boot 在启动时,会在 WebMvcAutoConfiguration 配置类中注册 HandlerMapping:
1
2
3
4
5
6
7
8
9
10
11
12
13
14
15
16
17
18
19
20
21
22
23
24
25
26
27
28
29
30
31
32
33
34
35
36
37
public class WebMvcAutoConfiguration {
public static class EnableWebMvcConfiguration extends DelegatingWebMvcConfiguration implements ResourceLoaderAware {
// RequestMappingHandlerMapping!!!
public RequestMappingHandlerMapping requestMappingHandlerMapping(
ContentNegotiationManager contentNegotiationManager,
FormattingConversionService conversionService,
ResourceUrlProvider resourceUrlProvider) {
// Must be @Primary for MvcUriComponentsBuilder to work
return super.requestMappingHandlerMapping(contentNegotiationManager, conversionService,
resourceUrlProvider);
}
// WelcomePageHandlerMapping!!!
public WelcomePageHandlerMapping welcomePageHandlerMapping(ApplicationContext applicationContext,
FormattingConversionService mvcConversionService, ResourceUrlProvider mvcResourceUrlProvider) {
WelcomePageHandlerMapping welcomePageHandlerMapping = new WelcomePageHandlerMapping(
new TemplateAvailabilityProviders(applicationContext), applicationContext, getWelcomePage(),
this.mvcProperties.getStaticPathPattern());
welcomePageHandlerMapping.setInterceptors(getInterceptors(mvcConversionService, mvcResourceUrlProvider));
welcomePageHandlerMapping.setCorsConfigurations(getCorsConfigurations());
return welcomePageHandlerMapping;
}
}
}如果需要一些自定义的映射处理,我们也可以自己向容器中注册 HandlerMapping。
- 自定义 HandlerMapping 的场合,比如:项目内包含一个系统的两个版本,v1 和 v2 版本调用不同的映射。
普通参数与基本注解
注解:
@PathVariable,@RequestHeader,@RequestParam,@CookieValueController:
1
2
3
4
5
6
7
8
9
10
11
12
13
14
15
16
17
18
19
20
21
22
23
24
25
26
27
28
29
30
31
32
33
34
35
36
37
38
39
40
41
42
43
44
45
46
47
48
49
50
51
52
53
54
55
56
57
public class ParameterController {
/**
* 假设访问路径为: localhost:8080/car/3/owner/lisi?age=18&interests=basketball&interests=football
* <p>
* 说明: 3这个位置为id,lisi这个位置为userName,?age=18&interests=basketball&interests=football为请求参数
* <p>
* 使用@PathVariable注解:
* 1.指定变量名时,可以获取访问路径中对应的变量值
* 2.不指定变量名时,可以获取访问路径中所有的变量值,但必须是Map<String, String>格式
* <p>
* 使用@RequestHeader注解:
* 1.指定变量名时,可以获取请求头中指定的变量值
* 2.不指定变量名时,可以获取请求头中所有的变量值,但必须是Map<String, String>格式
* <p>
* 使用@RequestParam注解:
* 1.指定变量名时,可以获取请求参数中指定的变量值
* 2.不指定变量名时,可以获取请求参数中所有的变量值,但必须是Map<String, String>格式
* <p>
* 使用@CookieValue注解:
* 1.指定变量名时,可以获取Cookie中指定的变量值,也可以直接转换为Cookie对象
* 2.注意: 如果请求中没有Cookie,使用@CookieValue注解会报错
*/
public Map<String, Object> getCar( Integer id,
String userName,
Map<String, String> paths,
String userAgent,
Map<String, String> headers,
Integer age,
List<String> interests,
Map<String, String> params
/*@CookieValue("_ga") String ga,
@CookieValue("_ga") Cookie cookie*/) {
Map<String, Object> map = new HashMap<>();
// 存放请求中路径变量的值
map.put("id", id);
map.put("userName", userName);
map.put("paths", paths);
// 存放请求头中的值
map.put("userAgent", userAgent);
map.put("headers", headers);
// 存放请求参数中的值
map.put("age", age);
map.put("interests", interests);
map.put("params", params);
// 存放Cookie中的值
/*map.put("_ga", ga);
System.out.println("打印Cookie对象: " + cookie);
System.out.println(cookie.getName() + " ------> " + cookie.getValue());*/
return map;
}
}测试:

- 细节:
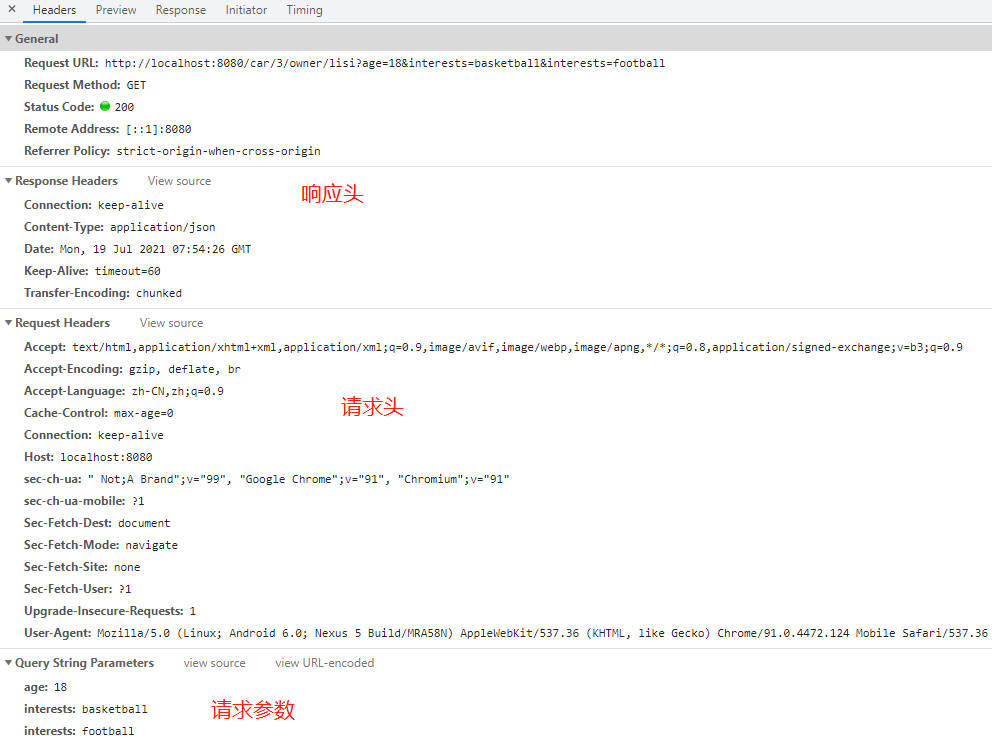
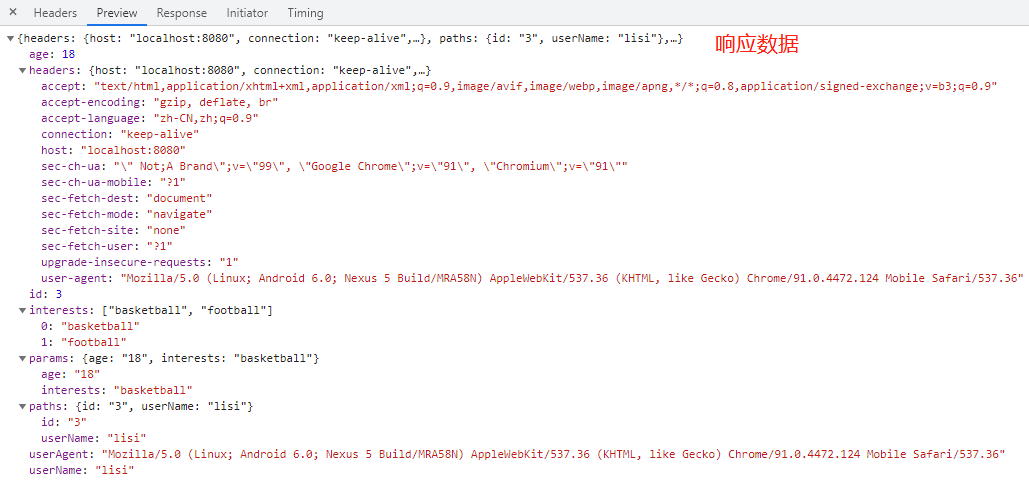
@RequestBodyindex.html:
1
2
3
4
5
6
7
8
9
10
11
12
13
14
15
<html lang="en">
<head>
<meta charset="UTF-8">
<title>Title</title>
</head>
<body>
<h1>Hello, Xisun!</h1>
<form action="/save" method="post">
用户名: <input name="userName">
邮箱:<input name="email">
<input type="submit" value="提交">
</form>
</body>
</html>Controller:
1
2
3
4
5
6
7
8
9
10
11
12
public class ParameterController {
/**
* 对于POST请求,可以使用@RequestBody注解,获取表单提交中的参数
*/
public Map<String, Object> postMethod( String content) {
Map<String, Object> map = new HashMap<>();
map.put("content", content);
return map;
}
}测试:
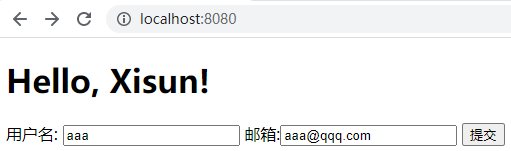
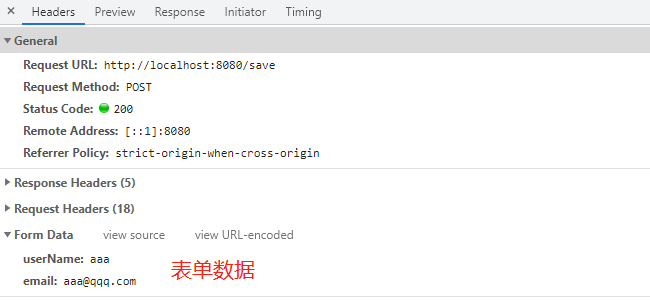

@RequestAttributeController:
1
2
3
4
5
6
7
8
9
10
11
12
13
14
15
16
17
18
19
20
21
22
23
24
25
26
27
28
29
30
31
32
33
34
35
public class RequestController {
public String goToPage(HttpServletRequest request) {
// 收到/goto请求时,在请求中添加一个或多个属性,然后转发到/success请求
request.setAttribute("msg", "go to success");
request.setAttribute("code", 200);
return "forward:/success";// return "/success"; 这种方式也可以正常转发
}
/**
* 有两种方式获得Request中的属性值:
* 方式一: 使用@RequestAttribute注解,并指定需要获取的属性名
* 方式二: 直接从Request对象中获得属性值
* 注意: 直接访问/success请求会出异常,因为该请求中没有msg和code这两个属性
*/
public Map<String, Object> success( String msg,
Integer code,
HttpServletRequest request) {
Map<String, Object> map = new HashMap<>();
// 方式一: 使用@RequestAttribute注解获取的Request中的属性值
map.put("annotationMsg", msg);
map.put("annotationCode", code);
// 方式二: 直接从Request对象中获得属性值
String reqMsg = (String) request.getAttribute("msg");
map.put("requestMsg", reqMsg);
Integer reqCode = (Integer) request.getAttribute("code");
map.put("requestCode", reqCode);
return map;
}
}测试:


@MatrixVariable:矩阵变量注解,此处省略不谈。@ModelAttribute:此处省略不谈。
s
数据访问
单元测试
指标监控
原理解析
本文参考
https://www.bilibili.com/video/BV19K4y1L7MT
https://www.yuque.com/atguigu/springboot
声明:写作本文初衷是个人学习记录,鉴于本人学识有限,如有侵权或不当之处,请联系 wdshfut@163.com。