XiSun的博客

Learning is endless

0%

  • 查看 Kafka topic 列表命令,返回 topic 名字列表
1
$ ~/kafka_2.12-2.6.0/bin/kafka-topics.sh --zookeeper hadoopdatanode1:2181 --list
  • 创建 Kafka topic 命令
1
$ ~/kafka_2.12-2.6.0/bin/kafka-topics.sh --zookeeper hadoopdatanode1:2181,hadoopdatanode2:2181,hadoopdatanode3:2181 --create --partitions 6 --replication-factor 2 --topic patent-grant
  • 查看 Kafka 指定 topic 的详情命令,返回该 topic 的 parition 数量、replica 因子以及每个 partition 的 leader、replica 信息
1
$ ~/kafka_2.12-2.6.0/bin/kafka-topics.sh --zookeeper hadoopdatanode1:2181 --describe --topic patent-grant
  • 查看 Kafka 指定 topic 各 partition 的 offset 信息命令,–time 参数为 -1 时,表示各分区最大的 offset,为 -2 时,表示各分区最小的 offset
1
$ ~/kafka_2.12-2.6.0/bin/kafka-run-class.sh kafka.tools.GetOffsetShell --broker-list hadoopdatanode1:9092 --time -1 --topic patent-grant
  • 删除 Kafka topic 命令
1
$ ~/kafka_2.12-2.6.0/bin/kafka-topics.sh --zookeeper hadoopdatanode1:2181 --delete -topic patent-grant

只有 topic 不再被使用时,才能被删除。

  • 修改 kafka topic 的数据保存时间:
1
$ ~/kafka_2.12-2.6.0/bin/kafka-configs.sh --bootstrap-server hadoopdatanode1:9092 --alter --entity-type topics --entity-name extractor-patent --add-config retention.ms=2592000000

kafka 中默认消息的保留时间是 7 天,若想更改,需在配置文件 server.properties 里更改选项:log.retention.hours=168。

如果需要对某一个主题的消息存留的时间进行变更,但不影响其他主题,并且 kafka 集群不用重启,则使用上面的命令修改,该命令设置的是 30 天。

  • 查看 kafka topic 配置信息:
1
$ ~/kafka_2.12-2.6.0/bin/kafka-configs.sh --bootstrap-server hadoopdatanode1:9092 --describe --entity-type topics --entity-name extractor-patent

如果使用的是默认配置,显示:

1
Dynamic configs for topic extractor-patent are:

如果更改了配置,显示:

1
2
Dynamic configs for topic extractor-patent are:
retention.ms=2592000000 sensitive=false synonyms={DYNAMIC_TOPIC_CONFIG:retention.ms=2592000000}
  • 查看 kafka consumer group 命令,返回 consumer group 名字列表 (新版信息保存在 broker 中,老版信息保存在 zookeeper 中,二者命令不同)
1
$ ~/kafka_2.12-2.6.0/bin/kafka-consumer-groups.sh --bootstrap-server hadoopdatanode1:9092 --list

老版命令:~/kafka_2.12-2.6.0/bin/kafka-consumer-groups.sh --zookeeper hadoopdatanode1:2181 --list

  • 查看 Kafka 指定 consumer group 的详情命令,返回 consumer group 对应的 topic 信息、当前消费的 offset、总 offset、剩余待消费 offset 等信息
1
$ ~/kafka_2.12-2.6.0/bin/kafka-consumer-groups.sh --bootstrap-server hadoopdatanode1:9092 --describe --group log-consumer
  • 重置 Kafka 指定 consumer group 消费的 topic 的 offset 命令
1
$ ~/kafka_2.12-2.6.0/bin/kafka-consumer-groups.sh --bootstrap-server hadoopdatanode1:9092 --reset-offsets -to-offset 0 --execute --topic patent-app --group log-consumer
  • 删除 Kafka 指定 consumer group 命令
1
$ ~/kafka_2.12-2.6.0/bin/kafka-consumer-groups.sh --bootstrap-server hadoopdatanode1:9092 --delete --group log-consumer
  • 消费 Kafka 指定 topic 的内容命令

kafka-console-consumer.sh 脚本是一个简易的消费者控制台。该 shell 脚本的功能通过调用 kafka.tools 包下的 ConsoleConsumer 类,并将提供的命令行参数全部传给该类实现。

参数说明:

1
2
3
4
5
6
7
8
9
10
11
12
13
14
15
16
17
18
19
20
21
22
23
24
25
26
27
28
29
30
31
32
33
34
35
36
37
38
39
40
41
42
43
44
45
46
47
48
49
50
51
52
53
54
55
56
57
58
59
60
61
62
63
64
65
66
67
68
69
70
71
72
73
74
75
76
$ ~/kafka_2.12-2.6.0/bin/kafka-console-consumer.sh
This tool helps to read data from Kafka topics and outputs it to standard output.
Option Description
------ -----------
--bootstrap-server <String: server to REQUIRED: The server(s) to connect to.
connect to>
--consumer-property <String: A mechanism to pass user-defined
consumer_prop> properties in the form key=value to
the consumer.
--consumer.config <String: config file> Consumer config properties file. Note
that [consumer-property] takes
precedence over this config.
--enable-systest-events Log lifecycle events of the consumer
in addition to logging consumed
messages. (This is specific for
system tests.)
--formatter <String: class> The name of a class to use for
formatting kafka messages for
display. (default: kafka.tools.
DefaultMessageFormatter)
--from-beginning If the consumer does not already have
an established offset to consume
from, start with the earliest
message present in the log rather
than the latest message.
--group <String: consumer group id> The consumer group id of the consumer.
--help Print usage information.
--isolation-level <String> Set to read_committed in order to
filter out transactional messages
which are not committed. Set to
read_uncommitted to read all
messages. (default: read_uncommitted)
--key-deserializer <String:
deserializer for key>
--max-messages <Integer: num_messages> The maximum number of messages to
consume before exiting. If not set,
consumption is continual.
--offset <String: consume offset> The offset id to consume from (a non-
negative number), or 'earliest'
which means from beginning, or
'latest' which means from end
(default: latest)
--partition <Integer: partition> The partition to consume from.
Consumption starts from the end of
the partition unless '--offset' is
specified.
--property <String: prop> The properties to initialize the
message formatter. Default
properties include:
print.timestamp=true|false
print.key=true|false
print.value=true|false
key.separator=<key.separator>
line.separator=<line.separator>
key.deserializer=<key.deserializer>
value.deserializer=<value.
deserializer>
Users can also pass in customized
properties for their formatter; more
specifically, users can pass in
properties keyed with 'key.
deserializer.' and 'value.
deserializer.' prefixes to configure
their deserializers.
--skip-message-on-error If there is an error when processing a
message, skip it instead of halt.
--timeout-ms <Integer: timeout_ms> If specified, exit if no message is
available for consumption for the
specified interval.
--topic <String: topic> The topic id to consume on.
--value-deserializer <String:
deserializer for values>
--version Display Kafka version.
--whitelist <String: whitelist> Regular expression specifying
whitelist of topics to include for
consumption.

参数说明参考:https://blog.csdn.net/qq_29116427/article/details/80206125

从头开始消费:

1
$ ~/kafka_2.12-2.6.0/bin/kafka-console-consumer.sh --bootstrap-server hadoopdatanode1:9092 --from-beginning --topic log-collect

从头开始消费前 10 条消息,并显示 key:

1
$ ~/kafka_2.12-2.6.0/bin/kafka-console-consumer.sh --bootstrap-server hadoopdatanode1:9092 --from-beginning --max-messages 10 --property print.key=true --topic log-collect

从指定分区、指定 offset 开始消费:

1
$ ~/kafka_2.12-2.6.0/bin/kafka-console-consumer.sh --bootstrap-server hadoopdatanode1:9092 --partition 0 --offset 219000 --topic log-collect

从尾开始消费,必须指定分区:

1
$ ~/kafka_2.12-2.6.0/bin/kafka-console-consumer.sh --bootstrap-server hadoopdatanode1:9092 --partition 0 --offset latest --topic log-collect

字符串截取

shell 截取字符串通常有两种方式:从指定位置开始截取和从指定字符 (子字符串) 开始截取。

从指定位置开始截取

两个参数:起始位置,截取长度。

从字符串左边开始计数

1
${string: start :length}

其中,string 是要截取的字符串,start 是起始位置 (从左边开始,从 0 开始计数),length 是要截取的长度 (如果省略表示直到字符串的末尾)。

1
2
3
4
url="c.biancheng.net"
echo ${url: 2: 9}

biancheng
1
2
3
4
url="c.biancheng.net"
echo ${url: 2}

biancheng.net

从字符串右边开始计数

1
${string: 0-start :length}

0- 是固定的写法,专门用来表示从字符串右边开始计数。

从左边开始计数时,起始数字是 0;从右边开始计数时,起始数字是 1。计数方向不同,起始数字也不同。

不管从哪边开始计数,截取方向都是从左到右。

1
2
3
4
url="c.biancheng.net"
echo ${url: 0-13: 9}

biancheng
1
2
3
4
url="c.biancheng.net"
echo ${url: 0-13}

biancheng.net

从右边数,b 是第 13 个字符。

从指定字符 (子字符串) 开始截取

这种截取方式无法指定字符串长度,只能从指定字符 (子字符串) 截取到字符串末尾。shell 可以截取指定字符 (子字符串) 右边的所有字符,也可以截取左边的所有字符。

使用 # 截取指定字符 (子字符串)右边字符

1
${string#*chars}

其中,string 表示要截取的字符,chars 是指定的字符 (子字符串),* 是通配符的一种,表示任意长度的字符串。*chars 连起来使用的意思是:忽略左边的所有字符,直到遇见 chars (chars 不会被截取)。

从左往右看。

1
2
3
4
url="http://c.biancheng.net/index.html"
echo ${url#*:}

//c.biancheng.net/index.html

以下写法也可以得到同样的结果:

1
2
echo ${url#*p:}
echo ${url#*ttp:}

如果不需要忽略 chars 左边的字符,那么也可以不写 *,例如:

1
2
3
4
url="http://c.biancheng.net/index.html"
echo ${url#http://}

c.biancheng.net/index.html

注意,以上写法遇到第一个匹配的字符 (子字符串) 就结束了。例如:

1
2
3
4
url="http://c.biancheng.net/index.html"
echo ${url#*/}

/c.biancheng.net/index.html

url 字符串中有三个 /,输出结果表明,shell 遇到第一个 / 就匹配结束了。

如果希望直到最后一个指定字符 (子字符串) 再匹配结束,那么可以使用 ##,具体格式为:

1
${string##*chars}
1
2
3
4
5
6
7
8
9
#!/bin/bash

url="http://c.biancheng.net/index.html"
echo ${url#*/} # 结果为 /c.biancheng.net/index.html
echo ${url##*/} # 结果为 index.html

str="---aa+++aa@@@"
echo ${str#*aa} # 结果为 +++aa@@@
echo ${str##*aa} # 结果为 @@@

使用 % 截取指定字符 (子字符串)左边字符

1
${string%chars*}

注意 * 的位置,因为要截取 chars 左边的字符,而忽略 chars 右边的字符,所以 * 应该位于 chars 的右侧。其他方面 %# 的用法相同。

从右往左看。

1
2
3
4
5
6
7
8
9
#!/bin/bash

url="http://c.biancheng.net/index.html"
echo ${url%/*} # 结果为 http://c.biancheng.net
echo ${url%%/*} # 结果为 http:

str="---aa+++aa@@@"
echo ${str%aa*} # 结果为 ---aa+++
echo ${str%%aa*} # 结果为 ---

汇总

格式 说明
${string: start :length} 从 string 字符串的左边第 start 个字符开始,向右截取 length 个字符。
${string: start} 从 string 字符串的左边第 start 个字符开始截取,直到最后。
${string: 0-start :length} 从 string 字符串的右边第 start 个字符开始,向右截取 length 个字符。
${string: 0-start} 从 string 字符串的右边第 start 个字符开始截取,直到最后。
${string#*chars} 从 string 字符串第一次出现 *chars 的位置开始,截取 *chars 右边的所有字符。
${string##*chars} 从 string 字符串最后一次出现 *chars 的位置开始,截取 *chars 右边的所有字符。
${string%*chars} 从 string 字符串第一次出现 *chars 的位置开始,截取 *chars 左边的所有字符。
${string%%*chars} 从 string 字符串最后一次出现 *chars 的位置开始,截取 *chars 左边的所有字符。

参考:

http://c.biancheng.net/view/1120.html

字符串拼接

1
2
3
4
5
6
7
8
9
10
11
12
13
14
15
16
17
18
19
20
21
22
#!/bin/bash

name="Shell"
url="http://c.biancheng.net/shell/"

str1=$name$url # 中间不能有空格
str2="$name $url" # 如果被双引号包围,那么中间可以有空格
str3=$name": "$url # 中间可以出现别的字符串
str4="$name: $url" # 这样写也可以
str5="${name}Script: ${url}index.html" # 这个时候需要给变量名加上大括号

echo $str1
echo $str2
echo $str3
echo $str4
echo $str5

Shellhttp://c.biancheng.net/shell/
Shell http://c.biancheng.net/shell/
Shell: http://c.biancheng.net/shell/
ShellScript: http://c.biancheng.net/shell/index.html

对于第 7 行代码,$name 和 $url 之间之所以不能出现空格,是因为当字符串不被任何一种引号包围时,遇到空格就认为字符串结束了,空格后边的内容会作为其他变量或者命令解析。

对于第 10 行代码,加 { } 是为了帮助解释器识别变量的边界。

字符串分割

以空格为分隔符

比如有一个变量 “123 456 789”,要求以空格为分隔符把这个变量分隔,并把分隔后的字段分别赋值给变量,即 a=123;b=456;c=789。
共有3中方法:
方法一:先定义一个数组,然后把分隔出来的字段赋值给数组中的每一个元素
方法二:通过 eval+ 赋值的方式
方法三:通过多次 awk 把每个字段赋值

1
2
3
4
5
6
7
8
9
10
11
12
13
14
15
16
17
18
19
20
21
22
23
24
25
26
27
28
29
#!/bin/bash

a="123 456 789"

# 方法一:通过数组的方式
declare -a arr
index=0
for i in $(echo $a | awk '{print $1,$3}')
do
arr[$index]=$i
let "index+=1"
done
echo ${arr[0]} # 结果为 123
echo ${arr[1]} # 结果为 789

# 方法二:通过eval+赋值的方式
b=""
c=""
eval $(echo $a | awk '{ printf("b=%s;c=%s",$2,$1)}')
echo $b # 结果为 456
echo $c # 结果为 123

# 方法三:通过多次awk赋值的方式
m=""
n=""
m=`echo $a | awk '{print $1}'`
n=`echo $a | awk '{print $2}'`
echo $m # 结果为 123
echo $n # 结果为 456

指定分隔符

1
2
3
4
5
6
7
8
9
10
11
12
13
14
15
16
17
18
19
20
21
22
23
24
25
26
27
#!/bin/bash

string="hello,shell,haha"

# 方法一
array=(${string//,/ })
for var in ${array[@]}
do
echo $var
done

# 方法二
IFS=","
OLD_IFS="$IFS"
IFS="$OLD_IFS"
array2=($string)
for var2 in ${array2[@]}
do
echo $var2
done

hello
shell
haha
hello
shell
haha

变量赋值

反引号:

1
var=`command`

$()

1
var=$(command)

例如:

1
2
3
4
5
6
7
$ A=`date`
$ echo $A
Fri Dec 25 20:02:30 CST 2020 # 变量A存放了date命令的执行结果

$ B=$(date)
$ echo $B
Fri Dec 25 20:03:12 CST 2020 # 变量B存放了date命令的执行结果

注意:= 号前后不要有空格。

参考:

https://book.51cto.com/art/201411/457601.htm

判断文件夹是否存在

1
2
3
4
5
6
7
#!/bin/bash

if [ ! -d testgrid ];then
mkdir testgrid
else
echo dir exist
fi

外部传参:

1
2
3
4
5
6
7
8
9
10
11
12
13
14
15
16
#!/bin/bash

# 判断传入的参数的个数是不是一个
if [ ! $# -eq 1 ];then
echo param error!
exit 1
fi

# 判断目录是不是已经存在,如果不存在则创建,存在则输出"dir exist"
dirname=$1
echo "the dir name is $dirname"
if [ ! -d $dirname ];then
mkdir $dirname
else
echo dir exist
fi

循环

类 C 语言:

1
2
3
4
5
6
# !/bin/sh

for ((i=1; i<=100; i ++))
do
echo $i
done

in 使用:

1
2
3
4
5
6
# !/bin/sh

for i in {1..100}
do
echo $i
done

seq 使用:

1
2
3
4
5
6
# !/bin/sh

for i in `seq 1 100`
do
echo $i
done

发送微信消息

https://blog.csdn.net/whatday/article/details/105781861

find

用于在指定目录下查找文件。默认列出当前目录及子目录下所有的文件和文件夹。

语法

1
find   path   -option   [   -print ]   [ -exec   -ok   command ]   {} \;

-print: find 命令将匹配到的文件输出到标准输出。

-exec: find 命令对匹配的文件执行该参数所给出的 Shell 命令。

-ok: 和 -exec 的作用相同,只是更安全,在执行每个命令之前,都会给出提示,让用户来确定是否执行。

参数说明

1
2
3
4
5
6
7
8
9
10
11
12
13
14
15
16
17
18
19
20
21
22
23
24
25
26
27
28
29
30
31
32
33
34
35
36
37
38
39
40
41
42
43
44
-mount, -xdev
只检查和指定目录在同一个文件系统下的文件,避免列出其它文件系统中的文件。

-amin n
在过去n分钟内被读取过。

-anewer file
比文件file更晚被读取过的文件。

-atime n
在过去n天内被读取过的文件。

-cmin n
在过去n分钟内被修改过。

-cnewer file
比文件file更新的文件。

-ctime n
在过去n天内被修改过的文件。

-empty
空的文件。

-gid n
gid是n。

-group name
group名称是name。

-path p | -ipath p
路径名称符合p的文件。ipath忽略大小写。

-name name | -iname name
文件名称符合name的文件。iname忽略大小写。

-size n
文件大小是n单位,b代表512位元组的区块,c表示字元数,k表示kilo bytes,w是二个位元组。

-type d|f
文件类型是d|f的文件。

-pid n
process id是n的文件。

文件类型:d — 目录,f — 一般文件,c — 字型装置文件,b — 区块装置文件,p — 具名贮列,l — 符号连结,s — socket。

实例

  • 查询当前路径下的所有目录|普通文件
1
2
$ find ./ -type d
$ find ./ -type f
  • 查询权限为 777 的普通文件
1
$ find ./ -type f -perm 777
  • 查询 .XML 文件,且权限不为 777
1
$ find ./ -type f -name "*.XML" ! -perm 777
  • 查询 .XML 文件,并统计查询结果的条数
1
$ find ./ -name "*.XML" | wc -l
  • 查询 .XML 文件,并复制查询结果到指定路径
1
2
$ find ./ -name "*.XML" | xargs -i cp {} ../111
$ find ./ -name "*.XML" -exec cp {} ../111 \;

此命令不同于 cp,cp *.XML ../111 命令复制的是当前路径下符合条件的所有文件,子路径的不会被复制。

  • 查询 .XML 文件,并删除
1
2
$ find ./ -name "*.XML" | xargs -i rm {}
$ find ./ -name "*.XML" -exec rm {} \;

此命令不同于 rm,rm *.XML 命令删除的是当前路径下符合条件的所有文件,子路径的不会被删除。

  • 查询 .XML 文件,并将查询结果以 “File: 文件名” 的形式打印出来
1
2
$ find ./ -name "*.XML" | xargs -i printf "File: %s\n" {}
$ find ./ -name "*.XML" -exec printf "File: %s\n" {} \;
  • 将当前路径及子路径下所有 3 天前的 .XML 格式的文件复制一份到指定路径
1
$ find ./ -name "*.XML" -mtime +3 -exec cp {} ../111 \;
  • 查询多个文件后缀类型的文件
1
2
$ find ./ -regextype posix-extended -regex ".*\.(java|xml|XML)"	 # 查找所有的.java、.xml和.XML文件
$ find ./ -name "*.java" -o -name "*.xml" -o -name "*.XML" # -o选项,适用于查询少量文件后缀类型
  • 组合查询,可以多次拼接查询条件
1
2
3
4
$ find ./ -name "file1*" -a -name "*.xml"	# -a:与,查找以file1开头,且以.xml 结尾的文件
$ find ./ -name "file1*" -o -name "*.xml" # -o:或,查找以file1开头,或以.xml 结尾的文件
$ find ./ -name "file1*" -not -name "*.xml" # -not:非,查找以file1开头,且不以.xml 结尾的文件
$ find ./ -name "file1*" ! -name "file2*" # !:同-not
  • 查询当前目录下文件类型为 d 的文件,不包含子目录
1
$ find ./ -maxdepth 1 -type d
  • 和正则表达式的结合使用
1
2
$ find ./ –name "[^abc]*"	# 在当前路径中搜索不以a、b、c开头的所有文件
$ find ./ -name "[A-Z0-9]*" # 在当前路径中搜索以大写字母或数字开头的所有文件

正则表达式符号含义:

* 代表任意字符 (可以没有字符)

? 代表任意单个字符

[] 代表括号内的任意字符,如 [abc] 可以匹配 a\b\c 某个字符

[a-z] 可以匹配 a-z 的某个字母

[A-Z] 可以匹配 A-Z 的某个字符

[0-9] 可以匹配 0-9 的某个数字

^ 用在 [] 内的前缀表示不匹配 [] 中的字符

[^a-z] 表示不匹配a-z的某个字符

参考:

https://www.jianshu.com/p/b30a8aa4d1f1

https://www.oracle.com/cn/technical-resources/articles/linux-calish-find.html

https://www.cnblogs.com/qmfsun/p/3811142.html

https://www.cnblogs.com/ay-a/p/8017419.html

cat

用于连接文件或标准输入并打印。这个命令常用来显示文件内容,或者将几个文件连接起来显示,或者从标准输入读取内容并显示,它常与重定向符号配合使用。

语法

1
cat [-AbeEnstTuv] [--help] [--version] fileName

参数说明

1
2
3
4
5
6
7
8
9
10
11
12
13
14
15
16
17
18
19
20
21
22
23
24
25
26
-n | --number
由1开始对所有输出的行数编号。

-b | --number-nonblank
和-n相似,只不过对于空白行不编号。

-s | --squeeze-blank
当遇到有连续两行以上的空白行,就代换为一行的空白行。

-v | --show-nonprinting
使用^和M-符号,除了LFD和TAB之外。

-E | --show-ends
在每行结束处显示$。

-T | --show-tabs
将TAB字符显示为^I。

-A | --show-all
等价于"-vET"

-e
等价于"-vE"

-t
等价于"-vT"

实例

  • 把 textfile1 的文档内容加上行号后输入 textfile2 这个文档里
1
$ cat -n textfile1 > textfile2
  • 清空 /etc/test.txt 文档内容
1
$ cat /dev/null > /etc/test.txt

/dev/null:在类 Unix 系统中,/dev/null 称空设备,是一个特殊的设备文件,它丢弃一切写入其中的数据 (但报告写入操作成功),读取它则会立即得到一个 EOF。

而使用 cat $filename > /dev/null 则不会得到任何信息,因为我们将本来该通过标准输出显示的文件信息重定向到了 /dev/null 中。

使用 cat $filename 1 > /dev/null 也会得到同样的效果,因为默认重定向的 1 就是标准输出。 如果你对 shell 脚本或者重定向比较熟悉的话,应该会联想到 2 ,也即标准错误输出。

如果我们不想看到错误输出呢?我们可以禁止标准错误 cat $badname 2 > /dev/null

  • 合并多个文件内容
1
2
$ cat b1.sql b2.sql b3.sql > b_all.sql
$ cat *.sql > merge.sql

https://blog.csdn.net/zmx19951103/article/details/78575265

tail

https://blog.csdn.net/luo200618/article/details/52510638

sed

https://www.cnblogs.com/qmfsun/p/6626361.html

jq

https://www.jianshu.com/p/dde911234761

https://blog.csdn.net/whatday/article/details/105781861

https://blog.csdn.net/qq_26502245/article/details/100191694

https://blog.csdn.net/u011641885/article/details/45559031

basename

用于去掉文件名的目录和后缀。

语法

1
2
	basename NAME [SUFFIX]
or: basename OPTION... NAME...

去掉 NAME 中的目录部分和后缀 SUFFIX,如果输出结果没有,则输出 SUFFIX。

参数说明

1
2
3
4
5
6
7
8
9
10
11
12
13
14
-a | --multiple
support multiple arguments and treat each as a NAME

-s | --suffix=SUFFIX
remove a trailing SUFFIX; implies -a

-z | --zero
end each output line with NUL, not newline(默认情况下,每条输出行以换行符结尾)

--help
display this help and exit

--version
output version information and exit

实例

  • 去除目录
1
2
$basename /usr/bin/sort
sort
1
2
$ basename /usr/include/stdio.h    
stdio.h
  • 去除目录和后缀
1
2
$ basename /usr/include/stdio.h .h
stdio
1
2
$ basename -s .h /usr/include/stdio.h
stdio
1
2
$ basename /usr/include/stdio.h stdio.h 
stdio.h
  • 去除多个目录
1
2
3
4
$ basename -a any1/str1 any2/str2 any3/str3
str1
str2
str3

dirname

用于去除文件名中的非目录部分,删除最后一个 “\“ 后面的路径,显示父目录。

语法

1
dirname [OPTION] NAME...

如果 NAME 中不包含 /,则输出 .,即当前目录。

参数说明

1
2
3
4
5
6
7
8
-z | --zero
end each output line with NUL, not newline

--help
display this help and exit

--version
output version information and exit

实例

1
2
3
4
5
6
7
8
9
10
11
$ dirname /usr/bin/
/usr

$ dirname /usr/bin
/usr

$ dirname /etc/
/

$ dirname /etc/httpd/conf/httpd.conf
/etc/httpd/conf
1
2
3
$ dirname dir1/str dir2/str
dir1
dir2
1
2
$ dirname stdio.h
.

xargs

xargs 是给命令传递参数的一个过滤器,也是组合多个命令的一个工具。

xargs 可以将管道或标准输入 (stdin) 数据转换成命令行参数,也能够从文件的输出中读取数据。

xargs 也可以将单行或多行文本输入转换为其他格式,例如多行变单行,单行变多行。

xargs 默认的命令是 echo,这意味着通过管道传递给 xargs 的输入将会包含换行和空白,不过通过 xargs 的处理,换行和空白将被空格取代。

xargs 是一个强有力的命令,它能够捕获一个命令的输出,然后传递给另外一个命令。

之所以能用到这个命令,关键是由于很多命令不支持管道来传递参数,而日常工作中有有这个必要,所以就有了 xargs 命令,例如:

1
2
find /sbin -perm +700 | ls -l       #这个命令是错误的
find /sbin -perm +700 | xargs ls -l #这样才是正确的

xargs 一般是和管道一起使用。

语法

1
some command | xargs -item command

参数说明

1
2
3
4
5
6
7
8
9
10
11
12
13
14
15
16
17
18
19
20
21
22
23
24
25
26
27
28
29
30
31
32
33
34
35
36
37
38
-a file
从文件中读入作为sdtin

-e flag
注意有的时候可能会是-E,flag必须是一个以空格分隔的标志,当xargs分析到含有flag这个标志的时候就停止。

-p
当每次执行一个argument的时候询问一次用户。

-n num
后面加次数,表示命令在执行的时候一次用的argument的个数,默认是用所有的。

-t
表示先打印命令,然后再执行。

-i
或者是-I,这得看linux支持了,将xargs的每项名称,一般是一行一行赋值给{},可以用{}代替。

-r
no-run-if-empty,当xargs的输入为空的时候则停止xargs,不用再去执行了。

-s
num命令行的最大字符数,指的是xargs后面那个命令的最大命令行字符数。

-L num
从标准输入一次读取num行送给command命令。

-l
同 -L。

-d delim
分隔符,默认的xargs分隔符是回车,argument的分隔符是空格,这里修改的是xargs的分隔符。

-x
exit的意思,主要是配合-s使用。

-P
修改最大的进程数,默认是1,为0时候为as many as it can ,这个例子我没有想到,应该平时都用不到的吧。

实例

  • 读取输入数据重新格式化后输出

定义一个测试文件,内有多行文本数据:

1
2
3
4
5
6
$ cat test.txt
a b c d e f g
h i j k l m n
o p q
r s t
u v w x y z

单行输出:

1
2
$ cat test.txt | xargs
a b c d e f g h i j k l m n o p q r s t u v w x y z

-n 选项自定义多行输出:

1
2
3
4
5
6
7
8
9
10
$ cat test.txt | xargs -n3
a b c
d e f
g h i
j k l
m n o
p q r
s t u
v w x
y z

-d 选项自定义一个定界符:

1
2
$ echo "nameXnameXnameXname" | xargs -dX
name name name name

结合 -n 选项使用:

1
2
3
$ echo "nameXnameXnameXname" | xargs -dX -n2
name name
name name
  • 读取 stdin,将格式化后的参数传递给命令

假设一个命令为 sk.sh 和一个保存参数的文件 arg.txt:

sk.sh 命令内容:

1
2
3
4
#!/bin/bash

# 打印出所有参数。
echo $*

arg.txt 文件内容:

1
2
3
4
$ cat arg.txt
aaa
bbb
ccc

xargs 的一个选项 -I,使用 -I 指定一个替换字符串 {},这个字符串在 xargs 扩展时会被替换掉,当 -I 与 xargs 结合使用,每一个参数命令都会被执行一次:

1
2
3
4
$ cat arg.txt | xargs -I {} ./sk.sh -p {} -l
-p aaa -l
-p bbb -l
-p ccc -l

复制所有图片文件到 /data/images 目录下:

1
ls *.jpg | xargs -n1 -I {} cp {} /data/images
  • 结合 find 使用

用 rm 删除太多的文件时候,可能得到一个错误信息:**/bin/rm Argument list too long.**, 用 xargs 去避免这个问题:

1
$ find . -type f -name "*.log" -print0 | xargs -0 rm -f

xargs -0 将 \0 作为定界符。

统计一个源代码目录中所有 php 文件的行数:

1
$ find . -type f -name "*.php" -print0 | xargs -0 wc -l

查找所有的 jpg 文件,并且压缩它们:

1
$ find . -type f -name "*.jpg" -print | xargs tar -zcvf images.tar.gz
  • xargs 其他应用

假如你有一个文件包含了很多你希望下载的 URL,你能够使用 xargs 下载所有链接:

1
$ cat url-list.txt | xargs wget -c

参考:???

https://www.cnblogs.com/wangqiguo/p/6464234.html

crontab

linux 内置的 cron 进程能实现定时任务需求。

crontab 命令是 cron table 的简写,它是 cron 的配置文件,也可以叫它作业列表。我们可以在以下文件夹内找到相关配置文件:

  • **/var/spool/cron/**:该目录下存放的是每个用户包括 root 的 crontab 任务,每个任务以创建者的名字命名。
  • /etc/crontab:该文件负责调度各种管理和维护任务。
  • **/etc/cron.d/**:该目录用来存放任何要执行的crontab文件或脚本。
  • 另外,还可以把脚本放在 /etc/cron.hourly、/etc/cron.daily、/etc/cron.weekly、/etc/cron.monthly 目录中,让它每小时/天/星期/月执行一次。

语法

1
crontab [-u user] [ -e | -l | -r ]

参数说明

1
2
3
4
5
6
7
8
9
10
11
12
13
14
15
16
17
-u user
用来设定某个用户的crontab服务,省略此参数表示操作当前用户的crontab。

file
file是命令文件的名字,表示将file做为crontab的任务列表文件并载入crontab。如果在命令行中没有指定这个文件,crontab命令将接受标准输入(键盘)上键入的命令,并将它们载入crontab。

-e
编辑某个用户的crontab文件内容。如果不指定用户,则表示编辑当前用户的crontab文件。

-l
显示某个用户的crontab文件内容。如果不指定用户,则表示显示当前用户的crontab文件内容。

-r
从/var/spool/cron目录中删除某个用户的crontab文件。如果不指定用户,则默认删除当前用户的crontab文件。

-i
在删除用户的crontab文件时给确认提示。

实例

设置定时任务时,输入 crontab -e 命令,进入当前用户的工作表编辑,是常见的 vim 界面。每行是一条命令。

crontab 的命令格式:

Thumbnail

crontab 的命令构成:

时间 + 命令,其时间有分、时、日、月、周五种,时间的操作符有:

  • *****:取值范围内的所有数字
  • /:每过多少个数字,间隔频率,例如:用在小时段的”*/2”表示每隔两小时
  • -:从X到Z,例如:”2-6”表示”2,3,4,5,6”
  • ,:散列数字,例如:”1,2,5,7”

crontab 的命令实例:

  • 每 2 小时执行一次:0 */2 * * * command

上述命令的含义:能被2整除的整点的0分,执行命令,即 0、2、4、6、…、20、22、24。

crontab 的日志查看:

1
2
$ tail -f /var/log/cron.log
$ tail -f /var/spool/mail/[username]

注意事项:

  1. 环境变量问题

有时我们创建了一个 crontab,但是这个任务却无法自动执行,而手动执行这个任务却没有问题,这种情况一般是由于在 crontab 文件中没有配置环境变量引起的。

在 crontab 文件中定义多个调度任务时,需要特别注环境变量的设置,因为我们手动执行某个任务时,是在当前 shell 环境下进行的,程序当然能找到环境变量,而系统自动执行任务调度时,是不会加载任何环境变量的,因此,就需要在 crontab 文件中指定任务运行所需的所有环境变量,这样,系统执行任务调度时就没有问题了。

不要假定 cron 知道所需要的特殊环境,它其实并不知道。所以你要保证在 shell 脚本中提供所有必要的路径和环境变量,除了一些自动设置的全局变量。所以注意如下 3 点:

  • 脚本中涉及文件路径时写全局路径;

  • 脚本执行要用到 java 或其他环境变量时,通过 source 命令引入环境变量,如:

1
2
3
4
5
$ cat start_cbp.sh
!/bin/sh
source /etc/profile
export RUN_CONF=/home/d139/conf/platform/cbp/cbp_jboss.conf
/usr/local/jboss-4.0.5/bin/run.sh -c mev &
  • 或者通过在 crontab 中直接引入环境变量解决问题。如:
1
0 * * * * . /etc/profile;/bin/sh /var/www/java/audit_no_count/bin/restart_audit.sh
  1. 及时清理系统用户的邮件日志

每条任务调度执行完毕,系统都会将任务输出信息通过电子邮件的形式发送给当前系统用户,这样日积月累,日志信息会非常大,可能会影响系统的正常运行,因此,将每条任务进行重定向处理非常重要。 例如,可以在 crontab 文件中设置如下形式,忽略日志输出:

1
0 */3 * * * /usr/local/apache2/apachectl restart > /dev/null 2>&1

“>/dev/null 2>&1” 表示先将标准输出重定向到 /dev/null,然后将标准错误重定向到标准输出,由于标准输出已经重定向到了 /dev/null,因此标准错误也会重定向到 /dev/null,这样日志输出问题就解决了。

  1. 其他注意事项

新创建的 cron job,不会马上执行,至少要过 2 分钟才执行。如果重启 cron 则马上执行。

当 crontab 失效时,可以尝试 /etc/init.d/crond restart 解决问题。或者查看日志看某个 job 有没有执行/报错 tail -f /var/log/cron

**千万别乱运行 crontab -r**。它从 crontab 目录 (/var/spool/cron) 中删除用户的 crontab 文件,删除了该文件,则用户的所有 crontab 都没了。

在 crontab 中 % 是有特殊含义的,表示换行的意思。如果要用的话必须进行转义 %,如经常用的 date ‘+%Y%m%d’ 在 crontab 里是不会执行的,应该换成 date ‘+%Y%m%d’。

参考:

https://linuxtools-rst.readthedocs.io/zh_CN/latest/tool/crontab.html

https://segmentfault.com/a/1190000021815907

mv

用于为文件或目录改名、或将文件或目录移入其它位置。

语法

1
2
3
	mv [OPTION]... [-T] SOURCE DEST
or: mv [OPTION]... SOURCE... DIRECTORY
or: mv [OPTION]... -t DIRECTORY SOURCE...

参数说明

1
2
3
4
5
6
7
8
9
10
11
12
13
14
-b
当目标文件或目录sh存在时,在执行覆盖前,会为其创建一个备份。

-i
如果指定移动的源目录或文件与目标的目录或文件同名,则会先询问是否覆盖旧文件,输入y表示直接覆盖,输入n表示取消该操作。

-f
如果指定移动的源目录或文件与目标的目录或文件同名,不会询问,直接覆盖旧文件。

-n
不要覆盖任何已存在的文件或目录。

-u
当源文件比目标文件新或者目标文件不存在时,才执行移动操作。

实例

  • 将源文件名 source_file 改为目标文件名 dest_file
1
$ mv source_file(文件) dest_file(文件)
  • 将文件 source_file 移动到目标目录 dest_directory 中
1
$ mv source_file(文件) dest_directory(目录)
  • 将源目录 source_directory 移动到 目标目录 dest_directory中
1
$ mv source_directory(目录) dest_directory(目录)

若目录名 dest_directory 已存在,则 source_directory 移动到目录名 dest_directory 中;

若目录名 dest_directory 不存在,则 source_directory 改名为目录名 dest_directory。

rename

用于实现文件或批量文件重命名。在不同的 linux 版本,命令的语法格式可能不同。

语法

1
rename [ -h|-m|-V ] [ -v ] [ -n ] [ -f ] [ -e|-E *perlexpr*]*|*perlexpr* [ *files* ]

linux 版本:

Linux version 4.4.0-116-generic (buildd@lgw01-amd64-021) (gcc version 5.4.0 20160609 (Ubuntu 5.4.0-6ubuntu1~16.04.9) ) #140-Ubuntu SMP Mon Feb 12 21:23:04 UTC 2018

或者

1
rename [options] expression replacement file...

linux 版本:

Linux version 3.10.0-1062.el7.x86_64 (mockbuild@kbuilder.bsys.centos.org) (gcc version 4.8.5 20150623 (Red Hat 4.8.5-36) (GCC) ) #1 SMP Wed Aug 7 18:08:02 UTC 2019

参数说明

1
2
3
4
5
6
7
8
9
10
11
12
13
14
15
16
17
18
19
20
21
22
23
24
-v, -verbose
Verbose: print names of files successfully renamed.
-n, -nono
No action: print names of files to be renamed, but don't rename.

-f, -force
Over write: allow existing files to be over-written.

-h, -help
Help: print SYNOPSIS and OPTIONS.

-m, -man
Manual: print manual page.

-V, -version
Version: show version number.

-e Expression: code to act on files name.

May be repeated to build up code (like "perl -e"). If no -e, the
first argument is used as code.

-E Statement: code to act on files name, as -e but terminated by
';'.

或者

1
2
3
4
5
-v, --verbose  explain what is being done
-s, --symlink act on symlink target

-h, --help display this help and exit
-V, --version output version information and exit

实例

  • 替换文件名中特定字段
1
$ rename -v "s/20/patent-application/" *.tar.gz
1
2
3
4
5
6
7
8
9
10
11
12
13
14
15
16
17
18
19
20
21
22
23
24
25
26
# lin @ lin in ~/share/storage_server_3/Download/test [14:52:08] 
$ ll
total 76G
-rw-rw-r-- 1 lin lin 4.3G Dec 4 16:54 2005.tar.gz
-rw-rw-r-- 1 lin lin 4.3G Dec 5 21:50 2006.tar.gz
-rw-rw-r-- 1 lin lin 4.4G Dec 5 21:52 2007.tar.gz
-rw-rw-r-- 1 lin lin 4.7G Dec 5 21:53 2008.tar.gz
-rw-rw-r-- 1 lin lin 5.0G Dec 7 22:10 2009.tar.gz

# lin @ lin in ~/share/storage_server_3/Download/test [14:52:08]
$ rename -v "s/20/patent-application/" *.tar.gz
2005.tar.gz renamed as patent-application05.tar.gz
2006.tar.gz renamed as patent-application06.tar.gz
2007.tar.gz renamed as patent-application07.tar.gz
2008.tar.gz renamed as patent-application08.tar.gz
2009.tar.gz renamed as patent-application09.tar.gz

# lin @ lin in ~/share/storage_server_3/Download/test [14:53:55]
$ ll
total 76G
-rw-rw-r-- 1 lin lin 4.3G Dec 4 16:54 patent-application05.tar.gz
-rw-rw-r-- 1 lin lin 4.3G Dec 5 21:50 patent-application06.tar.gz
-rw-rw-r-- 1 lin lin 4.4G Dec 5 21:52 patent-application07.tar.gz
-rw-rw-r-- 1 lin lin 4.7G Dec 5 21:53 patent-application08.tar.gz
-rw-rw-r-- 1 lin lin 5.0G Dec 7 22:10 patent-application09.tar.gz

或者

1
$ rename 20 patent-application-20 *.tar.gz
1
2
3
4
5
6
7
8
9
10
11
12
13
14
15
16
(base) [hadoop@client version-1.0]$ ll
total 79555796
-rw-rw-r-- 1 hadoop hadoop 4527645498 Dec 4 16:54 2005.tar.gz
-rw-rw-r-- 1 hadoop hadoop 4550889304 Dec 5 21:50 2006.tar.gz
-rw-rw-r-- 1 hadoop hadoop 4712276001 Dec 5 21:52 2007.tar.gz
-rw-rw-r-- 1 hadoop hadoop 4986740725 Dec 5 21:53 2008.tar.gz
-rw-rw-r-- 1 hadoop hadoop 5311490484 Dec 7 22:10 2009.tar.gz
(base) [hadoop@client version-1.0]$ rename 20 patent-application-20 *.tar.gz
(base) [hadoop@client version-1.0]$ ll
total 79555796
-rw-rw-r-- 1 hadoop hadoop 1372 Dec 16 09:15 hash_calculate.txt
-rw-rw-r-- 1 hadoop hadoop 4527645498 Dec 4 16:54 patent-application-2005.tar.gz
-rw-rw-r-- 1 hadoop hadoop 4550889304 Dec 5 21:50 patent-application-2006.tar.gz
-rw-rw-r-- 1 hadoop hadoop 4712276001 Dec 5 21:52 patent-application-2007.tar.gz
-rw-rw-r-- 1 hadoop hadoop 4986740725 Dec 5 21:53 patent-application-2008.tar.gz
-rw-rw-r-- 1 hadoop hadoop 5311490484 Dec 7 22:10 patent-application-2009.tar.gz

参考:

http://einverne.github.io/post/2018/01/rename-files-batch.html

unzip

用于解压缩 .zip 文件。

语法

1
2
	unzip [-cflptuvz][-agCjLMnoqsVX][-P <密码>][.zip文件][文件][-d <目录>][-x <文件>]
or: unzip [-Z]

参数说明

1
2
3
4
5
6
7
8
9
10
11
12
13
14
15
16
17
18
19
20
21
22
23
24
25
26
27
28
29
30
31
32
33
34
35
36
37
38
39
40
41
42
43
44
45
46
47
48
49
50
51
52
53
54
55
56
57
58
59
60
61
62
63
64
65
66
67
68
69
70
71
72
73
74
75
76
77
78
-c
将解压缩的结果显示到屏幕上,并对字符做适当的转换。

-f
更新现有的文件。

-l
显示压缩文件内所包含的文件。

-p
与-c参数类似,会将解压缩的结果显示到屏幕上,但不会执行任何的转换。

-t
检查压缩文件是否正确。

-u
与-f参数类似,但是除了更新现有的文件外,也会将压缩文件中的其他文件解压缩到目录中。

-v
查看压缩文件目录信息,但是不解压该文件。

-z
仅显示压缩文件的备注文字。

-a
对文本文件进行必要的字符转换。

-b
不要对文本文件进行字符转换。

-C
压缩文件中的文件名称区分大小写。

-j
不处理压缩文件中原有的目录路径。

-L
将压缩文件中的全部文件名改为小写。

-M
将输出结果送到more程序处理。

-n
解压缩时不要覆盖原有的文件。

-o
不必先询问用户,unzip执行后覆盖原有文件。


-q
执行时不显示任何信息。

-s
将文件名中的空白字符转换为底线字符。

-V
保留VMS的文件版本信息。

-X
解压缩时同时回存文件原来的UID/GID。

-P <密码>
使用zip的密码选项。

[.zip文件]
指定.zip压缩文件。

[文件]
指定要处理.zip压缩文件中的哪些文件。

-d <目录>
指定文件解压缩后所要存储的目录。

-x <文件>
指定不要处理.zip压缩文件中的哪些文件。

-Z
'unzip -Z'等于执行zipinfo指令。

实例

  • 查看压缩文件目录信息,但不解压
1
2
3
4
5
6
7
8
9
10
11
12
13
14
15
$ unzip -v I20090212-SUPP.ZIP 
Archive: I20090212-SUPP.ZIP
Length Method Size Cmpr Date Time CRC-32 Name
-------- ------ ------- ---- ---------- ----- -------- ----
0 Stored 0 0% 2009-01-31 04:56 00000000 project/pdds/ICEApplication/I20090212-SUPP/
0 Stored 0 0% 2009-01-31 04:56 00000000 project/pdds/ICEApplication/I20090212-SUPP/DTDS/
88199 Stored 88199 0% 2007-01-22 00:07 d5e3060f project/pdds/ICEApplication/I20090212-SUPP/DTDS/DTDS.zip
0 Stored 0 0% 2009-01-31 04:56 00000000 project/pdds/ICEApplication/I20090212-SUPP/UTIL0041/
15664 Stored 15664 0% 2009-01-28 22:45 3dfa6c1c project/pdds/ICEApplication/I20090212-SUPP/UTIL0041/US20090041797A1-20090212-SUPP.ZIP
0 Stored 0 0% 2009-01-31 04:56 00000000 project/pdds/ICEApplication/I20090212-SUPP/UTIL0044/
901714 Stored 901714 0% 2009-01-28 22:45 75ce3ca6 project/pdds/ICEApplication/I20090212-SUPP/UTIL0044/US20090044288A1-20090212-SUPP.ZIP
1911858 Stored 1911858 0% 2009-01-28 22:45 cbc1d0bd project/pdds/ICEApplication/I20090212-SUPP/UTIL0044/US20090044297A1-20090212-SUPP.ZIP
-------- ------- --- -------
2917435 2917435 0% 8 files

  • 解压 .zip 文件
1
2
3
4
5
6
7
8
9
10
$ unzip I20090212-SUPP.ZIP 
Archive: I20090212-SUPP.ZIP
creating: project/pdds/ICEApplication/I20090212-SUPP/
creating: project/pdds/ICEApplication/I20090212-SUPP/DTDS/
extracting: project/pdds/ICEApplication/I20090212-SUPP/DTDS/DTDS.zip
creating: project/pdds/ICEApplication/I20090212-SUPP/UTIL0041/
extracting: project/pdds/ICEApplication/I20090212-SUPP/UTIL0041/US20090041797A1-20090212-SUPP.ZIP
creating: project/pdds/ICEApplication/I20090212-SUPP/UTIL0044/
extracting: project/pdds/ICEApplication/I20090212-SUPP/UTIL0044/US20090044288A1-20090212-SUPP.ZIP
extracting: project/pdds/ICEApplication/I20090212-SUPP/UTIL0044/US20090044297A1-20090212-SUPP.ZIP
  • 解压 .zip 文件,但不显示信息
1
$ unzip -q I20090212-SUPP.ZIP

注意:如果压缩文件 .zip 是大于 2G 的,那 unzip 就无法使用,此时可以使用 7zip 解压。

参考:

https://www.bbsmax.com/A/lk5aMEAP51/

zip

用于压缩文件,压缩后的文件后缀名为 .zip。

语法

1
zip [-AcdDfFghjJKlLmoqrSTuvVwXyz$] [-b <工作目录>] [-ll] [-n <字尾字符串>] [-t <日期时间>] [-<压缩效率>] [压缩文件] [文件...] [-i <范本样式>] [-x <范本样式>]

参数说明

1
2
3
4
5
6
7
8
9
10
11
12
13
14
15
16
17
18
19
20
21
22
23
24
25
26
27
28
29
30
31
32
33
34
35
36
37
38
39
40
41
42
43
44
45
46
47
48
49
50
51
52
53
54
55
56
57
58
59
60
61
62
63
64
65
66
67
68
69
70
71
72
73
74
75
76
77
78
79
80
81
82
83
84
85
86
87
88
89
90
91
92
93
94
95
96
97
98
99
100
101
-A
调整可执行的自动解压缩文件。

-c
替每个被压缩的文件加上注释。

-d
从压缩文件内删除指定的文件。

-D
压缩文件内不建立目录名称。

-f
更新现有的文件。

-F
尝试修复已损坏的压缩文件。

-g
将文件压缩后附加在既有的压缩文件之后,而非另行建立新的压缩文件。

-h
在线帮助。

-j
只保存文件名称及其内容,而不存放任何目录名称。

-J
删除压缩文件前面不必要的数据。

-k
使用MS-DOS兼容格式的文件名称。

-l
压缩文件时,把LF字符置换成LF+CR字符。

-L
显示版权信息。

-m
将文件压缩并加入压缩文件后,删除原始文件,即把文件移到压缩文件中。

-o
以压缩文件内拥有最新更改时间的文件为准,将压缩文件的更改时间设成和该文件相同。

-q
不显示指令执行过程。

-r
递归处理,将指定目录下的所有文件和子目录一并处理。

-S
包含系统和隐藏文件。

-T
检查备份文件内的每个文件是否正确无误。

-u
与-f参数类似,但是除了更新现有的文件外,也会将压缩文件中的其他文件解压缩到目录中。

-v
显示指令执行过程或显示版本信息。

-V
保存VMS操作系统的文件属性。

-w
在文件名称里假如版本编号,本参数仅在VMS操作系统下有效。

-X
不保存额外的文件属性。

-y
直接保存符号连接,而非该连接所指向的文件,本参数仅在UNIX之类的系统下有效。

-z
替压缩文件加上注释。

-$
保存第一个被压缩文件所在磁盘的卷册名称。

-b <工作目录>
指定暂时存放文件的目录。

-ll
压缩文件时,把LF+CR字符置换成LF字符。

-n <字尾字符串>
不压缩具有特定字尾字符串的文件。

-t <日期时间>
把压缩文件的日期设成指定的日期。

-<压缩效率>
压缩效率是一个介于1-9的数值。

-i <范本样式>
只压缩符合条件的文件。

-x <范本样式>
压缩时排除符合条件的文件。

实例

  • 将 /home/html/ 目录下所有文件和文件夹打包为当前目录下的 html.zip
1
$ zip -q -r html.zip /home/html
  • 如果当前在 /home/html 目录下,可以执行以下命令
1
$ zip -q -r html.zip *
  • 从压缩文件 cp.zip 中删除文件 a.c
1
zip -dv cp.zip a.c

tar

用于打包、解包文件。

tar 本身不具有压缩功能,可以通过参数调用其他压缩工具实现压缩功能。

语法

1
tar [-ABcdgGhiklmMoOpPrRsStuUvwWxzZ] [-b <区块数目>] [-C <目的目录>] [-f <备份文件>] [-F <Script文件>] [-K <文件>] [-L <媒体容量>] [-N <日期时间>] [-T <范本文件>] [-V <卷册名称>] [-X <范本文件>] [-<设备编号><存储密度>] [--after-date=<日期时间>] [--atime-preserve] [--backuup=<备份方式>] [--checkpoint] [--concatenate] [--confirmation] [--delete] [--exclude=<范本样式>] [--force-local] [--group=<群组名称>] [--help] [--ignore-failed-read] [--new-volume-script=<Script文件>] [--newer-mtime] [--no-recursion] [--null] [--numeric-owner] [--owner=<用户名称>] [--posix] [--erve] [--preserve-order] [--preserve-permissions] [--record-size=<区块数目>] [--recursive-unlink] [--remove-files] [--rsh-command=<执行指令>] [--same-owner] [--suffix=<备份字尾字符串>] [--totals] [--use-compress-program=<执行指令>] [--version] [--volno-file=<编号文件>] [文件或目录...]

语法结构:tar [必要参数] [可选参数] [文件]

参数说明

1
2
3
4
5
6
7
8
9
10
11
12
13
14
15
16
17
18
19
20
21
22
23
24
25
26
27
28
29
30
31
32
33
34
35
36
37
38
39
40
41
42
43
44
45
46
47
48
49
50
51
52
53
54
55
56
57
58
59
60
61
62
63
64
65
66
67
68
69
70
71
72
73
74
75
76
77
78
79
80
81
82
83
84
85
86
87
88
89
90
91
92
93
94
95
96
97
98
99
100
101
102
103
104
105
106
107
108
109
110
111
112
113
114
115
116
117
118
119
120
121
122
123
124
125
126
127
128
129
130
131
132
133
134
135
136
137
138
139
140
141
142
143
144
145
146
147
148
149
150
151
152
153
154
155
156
157
158
159
160
161
162
163
164
165
166
167
168
169
170
171
172
173
174
175
176
177
178
179
180
181
182
183
184
185
186
187
188
189
190
191
192
193
194
195
196
197
198
199
200
201
202
203
204
205
206
207
208
209
210
211
212
-A | --catenate
新增文件到已存在的备份文件。

-B | --read-full-records
读取数据时重设区块大小。

-c | --create
建立新的备份文件。

-d | --diff | --compare
对比备份文件内和文件系统上的文件的差异。

-g | --listed-incremental
处理GNU格式的大量备份。

-G | --incremental
处理旧的GNU格式的大量备份。

-h | --dereference
不建立符号连接,直接复制该连接所指向的原始文件。

-i | --ignore-zeros
忽略备份文件中的0 Byte区块,也就是EOF。

-k | --keep-old-files
解开备份文件时,不覆盖已有的文件。

-l | --one-file-system
复制的文件或目录存放的文件系统,必须与tar指令执行时所处的文件系统相同,否则不予复制。

-m | --modification-time
还原文件时,不变更文件的更改时间。

-M | --multi-volume
在建立,还原备份文件或列出其中的内容时,采用多卷册模式。

-o | --old-archive | --portability
将资料写入备份文件时使用V7格式。

-O | --stdout
把从备份文件里还原的文件输出到标准输出设备。

-p | --same-permissions
用原来的文件权限还原文件。

-P | --absolute-names
文件名使用绝对名称,不移除文件名称前的"/"号。

-r | --append
新增文件到已存在的备份文件的结尾部分。

-R | --block-number
列出每个信息在备份文件中的区块编号。

-s | --same-order
还原文件的顺序和备份文件内的存放顺序相同。

-S | --sparse
倘若一个文件内含大量的连续0字节,则将此文件存成稀疏文件。

-t | --list
列出备份文件的内容。

-u | --update
仅置换较备份文件内的文件更新的文件。

-U | --unlink-first
解开压缩文件还原文件之前,先解除文件的连接。

-v | --verbose
显示指令执行过程。

-w | --interactive
遭遇问题时先询问用户。

-W | --verify
写入备份文件后,确认文件正确无误。

-x | --extract | --get
从备份文件中还原文件。

-z | --gzip | --ungzip
通过gzip指令处理备份文件。

-Z | --compress | --uncompress
通过compress指令处理备份文件。

-b <区块数目> | --blocking-factor=<区块数目>
设置每笔记录的区块数目,每个区块大小为12Bytes。

-C <目的目录> | --directory=<目的目录>
切换到指定的目录。

-f <备份文件> | --file=<备份文件>
指定备份文件。多个命令时需要放在最后面。

-F <Script文件> | --info-script=<Script文件>
每次更换磁带时,就执行指定的Script文件。

-K <文件> | --starting-file=<文件>
从指定的文件开始还原。

-L <媒体容量> | -tape-length=<媒体容量>
设置存放每体的容量,单位以1024Bytes计算。

-N <日期格式> | --newer=<日期时间>
只将较指定日期更新的文件保存到备份文件里。

-T <范本文件> | --files-from=<范本文件>
指定范本文件,其内含有一个或多个范本样式,让tar解开或建立符合设置条件的文件。

-V<卷册名称> | --label=<卷册名称>
建立使用指定的卷册名称的备份文件。

-X <范本文件> | --exclude-from=<范本文件>
指定范本文件,其内含有一个或多个范本样式,让tar排除符合设置条件的文件。

-<设备编号><存储密度>
设置备份用的外围设备编号及存放数据的密度。

--after-date=<日期时间>
此参数的效果和指定"-N"参数相同。

--atime-preserve
不变更文件的存取时间。

--backup=<备份方式> | --backup
移除文件前先进行备份。

--checkpoint
读取备份文件时列出目录名称。

--concatenate
此参数的效果和指定"-A"参数相同。

--confirmation
此参数的效果和指定"-w"参数相同。

--delete
从备份文件中删除指定的文件。

--exclude=<范本样式>
排除符合范本样式的文件。

--group=<群组名称>
把加入设备文件中的文件的所属群组设成指定的群组。

--help
在线帮助。

--ignore-failed-read
忽略数据读取错误,不中断程序的执行。

--new-volume-script=<Script文件>
此参数的效果和指定"-F"参数相同。

--newer-mtime
只保存更改过的文件。

--no-recursion
不做递归处理,也就是指定目录下的所有文件及子目录不予处理。

--null
从null设备读取文件名称。

--numeric-owner
以用户识别码及群组识别码取代用户名称和群组名称。

--owner=<用户名称>
把加入备份文件中的文件的拥有者设成指定的用户。

--posix
将数据写入备份文件时使用POSIX格式。

--preserve
此参数的效果和指定"-ps"参数相同。

--preserve-order
此参数的效果和指定"-A"参数相同。

--preserve-permissions
此参数的效果和指定"-p"参数相同。

--record-size=<区块数目>
此参数的效果和指定"-b"参数相同。

--recursive-unlink
解开压缩文件还原目录之前,先解除整个目录下所有文件的连接。

--remove-files
文件加入备份文件后,就将其删除。

--rsh-command=<执行指令>
设置要在远端主机上执行的指令,以取代rsh指令。

--same-owner
尝试以相同的文件拥有者还原文件。

--suffix=<备份字尾字符串>
移除文件前先行备份。

--totals
备份文件建立后,列出文件大小。

--use-compress-program=<执行指令>
通过指定的指令处理备份文件。

--version
显示版本信息。

--volno-file=<编号文件>
使用指定文件内的编号取代预设的卷册编号。

实例

  • 打包,不压缩
1
2
3
4
5
6
7
$ tar -cvf test.tar test
test/
test/3
test/1
test/2
test/5
test/4
  • 解包
1
2
3
4
5
6
7
$ tar -xvf test.tar 
test/
test/3
test/1
test/2
test/5
test/4
  • 打包,并以 gzip 压缩
1
2
3
4
5
6
7
$ tar -zcvf test.tar.gz test
test/
test/3
test/1
test/2
test/5
test/4

在参数 f 之后的文件档名是自己取的,我们习惯上都用 .tar 来作为辨识。 如果加 z 参数,则以 .tar.gz 或 .tgz 来代表 gzip 压缩过的 tar 包。

  • 解压 .tar.gz
1
2
3
4
5
6
7
$ tar -zxvf test.tar.gz 
test/
test/3
test/1
test/2
test/5
test/4
  • 打包,以 bzip2 压缩
1
2
3
4
5
6
7
$ tar -zcvf test.tar.bz2 test
test/
test/3
test/1
test/2
test/5
test/4
  • 解压 .tar.bz2
1
2
3
4
5
6
7
$ tar -zxvf test.tar.bz2 
test/
test/3
test/1
test/2
test/5
test/4
  • 查看 .tar.gz 或 .tar.bz2 压缩包内的文件,但不解压
1
2
3
4
5
6
7
8
9
10
11
12
13
14
15
$ tar -ztvf test.tar.gz 
drwxrwxr-x lin/lin 0 2020-12-21 11:38 test/
-rw-rw-r-- lin/lin 0 2020-12-21 11:38 test/3
-rw-rw-r-- lin/lin 0 2020-12-21 11:38 test/1
-rw-rw-r-- lin/lin 0 2020-12-21 11:38 test/2
-rw-rw-r-- lin/lin 0 2020-12-21 11:38 test/5
-rw-rw-r-- lin/lin 0 2020-12-21 11:38 test/4

$ tar -ztvf test.tar.bz2
drwxrwxr-x lin/lin 0 2020-12-21 11:38 test/
-rw-rw-r-- lin/lin 0 2020-12-21 11:38 test/3
-rw-rw-r-- lin/lin 0 2020-12-21 11:38 test/1
-rw-rw-r-- lin/lin 0 2020-12-21 11:38 test/2
-rw-rw-r-- lin/lin 0 2020-12-21 11:38 test/5
-rw-rw-r-- lin/lin 0 2020-12-21 11:38 test/4
  • 解压 .tar.gz 压缩包内的部分文件
1
2
3
$ tar -zxvf test.tar.gz test/2 test/3
test/3
test/2
  • 解压 .tar.gz 到指定目录
1
2
3
4
5
6
7
$ tar -zxvf test.tar.gz -C ../Download 
test/
test/3
test/1
test/2
test/5
test/4
  • 使用绝对路径打包压缩和解压
1
2
3
4
5
# 压缩
$ tar -zcPf /home/lin/share/storage_server_3/patent/grant-patent/patent_version-1.0/patent-grant-2019.tar.gz /home/lin/share/storage_server_3/patent/grant-patent/patent_version-1.0/2019

# 解压
$ tar -zxPf patent-grant-2019.tar.gz

tar 对文件打包时,一般不建议使用绝对路径。

如果使用绝对路径,需要加 -P 参数。如果不添加,会发出警告:tar: Removing leading '/' from member names

对于使用绝对路径打包压缩的文件,解压时 tar 会在当前目录下创建压缩时的绝对路径所对应的目录,在上面例子中,即为在当前目录下创建一个子目录 home/lin/share/storage_server_3/patent/grant-patent/patent_version-1.0

如果在解压时使用 -P 参数,需要保证系统存在压缩时的绝对路径。

  • 使用 pigz 并发压缩和解压

安装 pigz:

1
$ sudo apt install pigz

打包:

1
$ tar --use-compress-program=pigz -cvpf package.tgz ./package

解包:

1
$ tar --use-compress-program=pigz -xvpf package.tgz -C ./package

pigz 是支持并行的 gzip,默认用当前逻辑 cpu 个数来并发压缩,无法检测个数的话,则并发 8 个线程。

另一种方式:

1
2
3
4
5
# 语法
$ tar -cvpf - $Dir | pigz -9 -p 6 $target-name

# 实例
$ tar -cvpf - /usr/bin | pigz -9 -p 6 bin.tgz

-9:代表压缩率
-p :代表 cpu 数量

time

用于检测特定指令执行时所需消耗的时间及系统资源 (内存和 I/O) 等资讯。

语法

1
time [options] COMMAND [arguments]

参数说明

1
2
3
4
5
6
7
8
-o | --output=FILE
设定结果输出档。这个选项会将time的输出写入所指定的档案中。如果档案已经存在,系统将覆写其内容。

-a | --append
配合-o使用,会将结果写到档案的末端,而不会覆盖掉原来的内容。

-f FORMAT | --format=FORMAT
以FORMAT字串设定显示方式。当这个选项没有被设定的时候,会用系统预设的格式。不过你可以用环境变数time来设定这个格式,如此一来就不必每次登入系统都要设定一次。

实例

  • date 命令的运行时间
1
2
3
$ time date
Tue Dec 22 12:01:50 CST 2020
date 0.00s user 0.01s system 8% cpu 0.092 total
  • 查找文件并复制的运行时间
1
2
3
$ time find /home/lin/share/storage_server_3/patent/application/unzip_version-1.0/2019 -iname "*.xml" | xargs -P 6 -i cp {} /home/lin/share/storage_server_3/patent/application-patent/patent_version-1.0/2019 
find -iname "*.xml" 24.00s user 114.39s system 1% cpu 2:08:02.95 total
xargs -P 6 -i cp {} 4.35s user 28.35s system 0% cpu 2:08:02.99 total

参考:

http://c.biancheng.net/linux/time.html

mkdir

语法

参数说明

实例

  • 创建多级目录
1
$ mkdir -p Project/a/src
  • 创建多层次、多维度的目录树
1
$ mkdir -p Project/{a,b,c,d}/src

sh -c

sh -c 命令,可以让 bash 将一个字串作为完整的命令来执行。

比如,向 test.asc 文件中随便写入点内容,可以:

1
$ echo "信息" > test.asc

或者

1
$ echo "信息" >> test.asc

下面,如果将 test.asc 权限设置为只有 root 用户才有权限进行写操作:

1
$ sudo chown root.root test.asc

然后,我们使用 sudo 并配合 echo 命令再次向修改权限之后的 test.asc 文件中写入信息:

1
2
$ sudo echo "又一行信息" >> test.asc
-bash: test.asc: Permission denied

这时,可以看到 bash 拒绝这么做,说是权限不够。这是因为重定向符号 > 和 >> 也是 bash 的命令。我们使用 sudo 只是让 echo 命令具有了 root 权限,但是没有让 > 和 >> 命令也具有 root 权限,所以 bash 会认为这两个命令都没有向 test.asc 文件写入信息的权限。解决这一问题的途径有两种。

第一种是利用 sh -c 命令,它可以让 bash 将一个字串作为完整的命令来执行,这样就可以将 sudo 的影响范围扩展到整条命令。具体用法如下:

1
$ sudo sh -c 'echo "又一行信息" >> test.asc'

另一种方法是利用管道和 tee 命令,该命令可以从标准输入中读入信息并将其写入标准输出或文件中,具体用法如下:

1
$ echo "第三条信息" | sudo tee -a test.asc

注意,tee 命令的 -a 选项的作用等同于 >> 命令,如果去除该选项,那么 tee 命令的作用就等同于 > 命令。

1>/dev/null 2>&1

https://blog.csdn.net/ithomer/article/details/9288353

top

https://www.jianshu.com/p/e9e0ce23a152

PID:进程的ID

USER:进程所有者

​ PR:进程的优先级别,越小越优先被执行

​ NI:进程Nice值,代表这个进程的优先值

​ VIRT:进程占用的虚拟内存

​ RES:进程占用的物理内存

​ SHR:进程使用的共享内存

S:进程的状态。S表示休眠,R表示正在运行,Z表示僵死状态

​ %CPU:进程占用CPU的使用

​ %MEM:进程使用的物理内存和总内存的百分

​ TIME+:该进程启动后占用的总的CPU时间,即占用CPU使用时间的累加值

​ COMMAND:启动该进程的命令名称

free

free 用KB为单位展示数据

free -m 用MB为单位展示数据

free -h 用GB为单位展示数据

total : 总计屋里内存的大小

used : 已使用内存的大小

free : 可用内存的大小

shared : 多个进程共享的内存总额

buff/cache : 磁盘缓存大小

available : 可用内存大小 , 从应用程序的角度来说:available = free + buff/cache .

ps

md5sum

sha1sum

用来为给定的文件或文件夹计算单个哈希,以校验文件或文件夹的完整性。

给文件:

1
2
$ sha1sum patent-grant-2005.tar.gz 
77b6416501d34b904bd25f9aa32ca60d3e14659a patent-grant-2005.tar.gz

https://www.itranslater.com/qa/details/2326085750774825984

parallel

https://linux.cn/article-9718-1.html

https://www.myfreax.com/gnu-parallel/

https://www.hi-linux.com/posts/32794.html

https://www.jianshu.com/p/c5a2369fa613

https://www.aqee.net/post/use-multiple-cpu-cores-with-your-linux-commands.html

https://blog.csdn.net/orangefly0214/article/details/103701600

在操作 java 流对象后要将流关闭,但实际编写代码时,可能会出现一些误区,导致不能正确关闭流。

在 try 中关流,而没在 finally 中关流

错误:

1
2
3
4
5
6
7
try {
OutputStream out = new FileOutputStream("");
// ...操作流代码
out.close();
} catch (Exception e) {
e.printStackTrace();
}

修正:

1
2
3
4
5
6
7
8
9
10
11
12
13
14
15
16

OutputStream out = null;
try {
out = new FileOutputStream("");
// ...操作流代码
} catch (Exception e) {
e.printStackTrace();
} finally {
try {
if (out != null) {
out.close();
}
} catch (Exception e) {
e.printStackTrace();
}
}

在一个 try 中关闭多个流

错误:

1
2
3
4
5
6
7
8
9
10
11
12
13
14
15
16
17
18
19
20
OutputStream out = null;
OutputStream out2 = null;
try {
out = new FileOutputStream("");
out2 = new FileOutputStream("");
// ...操作流代码
} catch (Exception e) {
e.printStackTrace();
} finally {
try {
if (out != null) {
out.close();// 如果此处出现异常,则out2流没有被关闭
}
if (out2 != null) {
out2.close();
}
} catch (Exception e) {
e.printStackTrace();
}
}

修正:

1
2
3
4
5
6
7
8
9
10
11
12
13
14
15
16
17
18
19
20
21
22
23
24
OutputStream out = null;
OutputStream out2 = null;
try {
out = new FileOutputStream("");
out2 = new FileOutputStream("");
// ...操作流代码
} catch (Exception e) {
e.printStackTrace();
} finally {
try {
if (out != null) {
out.close();// 如果此处出现异常,则out2流也会被关闭
}
} catch (Exception e) {
e.printStackTrace();
}
try {
if (out2 != null) {
out2.close();
}
} catch (Exception e) {
e.printStackTrace();
}
}

在循环中创建流,在循环外关闭,导致关闭的是最后一个流

错误:

1
2
3
4
5
6
7
8
9
10
11
12
13
14
15
16
17
OutputStream out = null;
try {
for (int i = 0; i < 10; i++) {
out = new FileOutputStream("");
// ...操作流代码
}
} catch (Exception e) {
e.printStackTrace();
} finally {
try {
if (out != null) {
out.close();
}
} catch (Exception e) {
e.printStackTrace();
}
}

修正:

1
2
3
4
5
6
7
8
9
10
11
12
13
14
15
16
17
for (int i = 0; i < 10; i++) {
OutputStream out = null;
try {
out = new FileOutputStream("");
// ...操作流代码
} catch (Exception e) {
e.printStackTrace();
} finally {
try {
if (out != null) {
out.close();
}
} catch (Exception e) {
e.printStackTrace();
}
}
}

在 java 7 中,关闭流的方式得到很大的简化

1
2
3
4
5
try (OutputStream out = new FileOutputStream("")){
// ...操作流代码
} catch (Exception e) {
e.printStackTrace();
}

只要实现的自动关闭接口 (Closeable) 的类都可以在 try 结构体上定义,java 会自动帮我们关闭,即使在发生异常的情况下也会。

可以在 try 结构体上定义多个,用分号隔开即可,如:

1
2
3
4
5
6
try (OutputStream out = new FileOutputStream("");
OutputStream out2 = new FileOutputStream("")){
// ...操作流代码
} catch (Exception e) {
throw e;
}

Android SDK 20 版本对应 java 7,低于 20 版本无法使用 try-catch-resources 自动关流。

内存流的关闭

内存流可以不用关闭。

ByteArrayOutputStream 和 ByteArrayInputStream 其实是伪装成流的字节数组 (把它们当成字节数据来看就好了),他们不会锁定任何文件句柄和端口,如果不再被使用,字节数组会被垃圾回收掉,所以不需要关闭。

装饰流的关闭

装饰流是指通过装饰模式实现的 java 流,又称为包装流,装饰流只是为原生流附加额外的功能或效果,java 中的缓冲流、桥接流也是属于装饰流。

例如:

1
2
3
4
5
6
7
8
9
10
11
12
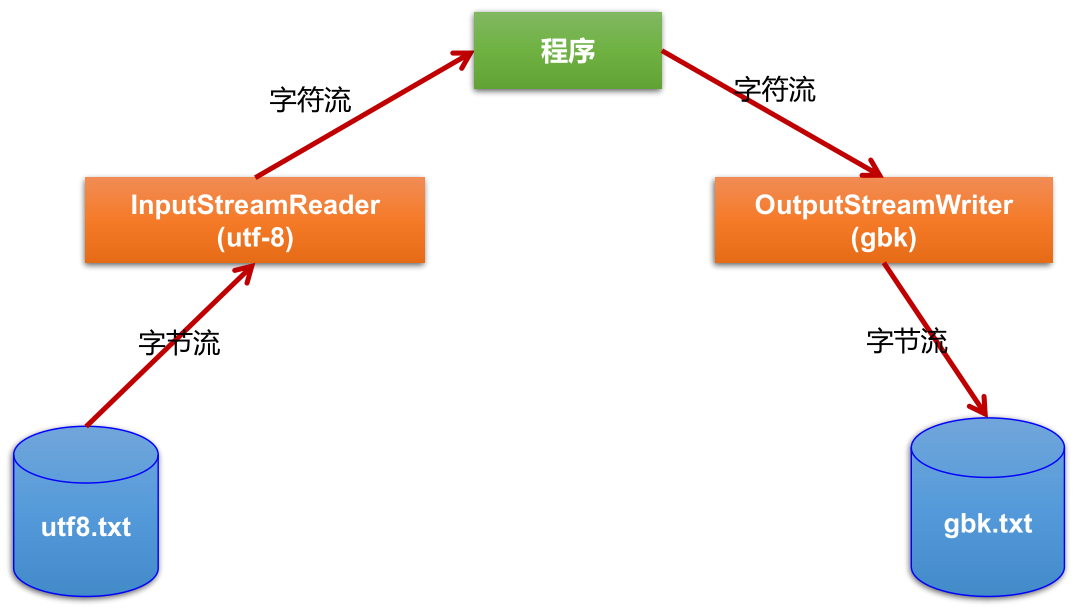
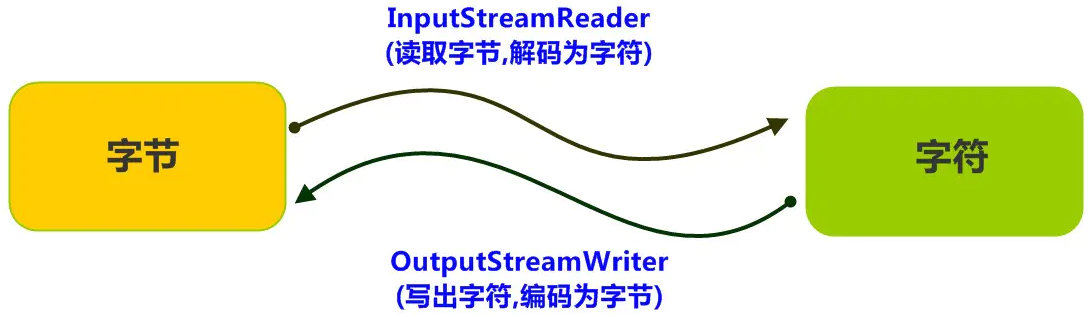
InputStream is = new FileInputStream("C:\\Users\\tang\\Desktop\\test.txt");
InputStreamReader isr = new InputStreamReader(is);
BufferedReader br = new BufferedReader(isr);
String string = br.readLine();
System.out.println(string);

// 只需要关闭最后的br即可
try {
br.close();
} catch (Exception e) {
e.printStackTrace();
}

装饰流关闭时会调用原生流关闭。

BufferedReader.java 源码如下:

1
2
3
4
5
6
7
8
9
10
11
12
13
public void close() throws IOException {
synchronized (lock) {
if (in == null)
return;
try {
// 这里的in就是原生流
in.close();
} finally {
in = null;
cb = null;
}
}
}

InputStreamReader.java 源码如下:

1
2
3
4
public void close() throws IOException {
// 这里的sd就是原生流的解码器(StreamDecoder),解码器的close会调用原生流的close
sd.close();
}

如上所示,有这样层层关闭的机制,我们就只需要关闭最外层的流就行了。

关闭流的顺序问题

两个不相干的流的关闭顺序没有任何影响,如:

1
2
3
// 这里的out1和out2谁先关谁后关都一样,没有任何影响
out1 = new FileOutputStream("");
out2 = new FileOutputStream("");

如果两个流有依赖关系,那么可以像上面说的,只关闭最外层的即可。

如果不嫌麻烦,非得一个个关闭,那么需要先关闭最里层,从里往外一层层进行关闭。

为什么不能从外层往里层逐步关闭?原因上面讲装饰流已经讲的很清楚了,关闭外层时,内层的流其实已经同时关闭了,你再去关内层的流,就会报错。

至于网上说的先声明先关闭,就是这个道理,先声明的是内层,最先申明的是最内层,最后声明的是最外层。

一定要关闭流的原因

一个流绑定了一个文件句柄 (或网络端口),如果流不关闭,该文件 (或端口) 将始终处于被锁定 (不能读取、写入、删除和重命名) 状态,占用大量系统资源却没有释放。

本文参考

https://blog.csdn.net/u012643122/article/details/38540721

声明:写作本文初衷是个人学习记录,鉴于本人学识有限,如有侵权或不当之处,请联系 wdshfut@163.com

File 类

  • java.io.File 类:文件和文件目录路径的抽象表示形式,与平台无关。

    • File 主要表示类似 D:\\文件目录1D:\\文件目录1\\文件.txt,前者是文件夹 (directory),后者则是文件 (file),而 File 类就是操作这两者的类。
  • File 能新建、删除、重命名文件和目录,但 File 不能访问文件内容本身。如果需要访问文件内容本身,则需要使用输入/输出流。

    • File 跟流无关,File 类不能对文件进行读和写也就是输入和输出。
  • 想要在 Java 程序中表示一个真实存在的文件或目录,那么必须有一个 File 对象,但是 Java 程序中的一个 File 对象,可能不对应一个真实存在的文件或目录。

    image-20210330104549637
  • File 对象可以作为参数传递给流的构造器,指明读取或写入的 “终点”。

  • 在 Java 中,一切皆是对象,File 类也不例外,不论是哪个对象都应该从该对象的构造方法说起:

    image-20210409152135199

  • public File(String pathname) :以 pathname 为路径创建 File 对象,可以是绝对路径或者相对路径,如果 pathname 是相对路径,则默认的当前路径在系统属性 user.dir 中存储。

    • 绝对路径:是一个固定的路径,从盘符开始。

    • 相对路径:是相对于某个位置开始。

    • IDEA 中的路径说明,main() 和 Test 中,相对路径不一样:

      1
      2
      3
      4
      5
      6
      7
      8
      9
      10
      11
      12
      public class Test {
      public static void main(String[] args) {
      File file = new File("hello.txt");// 相较于当前工程
      System.out.println(file.getAbsolutePath());// D:\JetBrainsWorkSpace\IDEAProjects\xisun-projects\hello.txt
      }

      @Test
      public void testFileReader() {
      File file = new File("hello.txt");// 相较于当前Module
      System.out.println(file.getAbsolutePath());// D:\JetBrainsWorkSpace\IDEAProjects\xisun-projects\xisun-java_base\hello.txt
      }
      }
  • public File(String parent, String child) :以 parent 为父路径,child 为子路径创建 File 对象。

  • public File(File parent, String child) :根据一个父 File 对象和子文件路径创建 File 对象。

  • 实例:

    1
    2
    3
    4
    5
    6
    7
    8
    9
    10
    11
    12
    13
    14
    15
    16
    17
    // 通过文件路径名 
    String path1 = "D:\\123.txt";
    File file1 = new File(path1);

    // 通过文件路径名
    String path2 = "D:\\1\\2.txt";
    File file2 = new File(path2); -------------相当于d:\\1\\2.txt

    // 通过父路径和子路径字符串
    String parent = "F:\\aaa";
    String child = "bbb.txt";
    File file3 = new File(parent, child); --------相当于f:\\aaa\\bbb.txt

    // 通过父级File对象和子路径字符串
    File parentDir = new File("F:\\aaa");
    String child = "bbb.txt";
    File file4 = new File(parentDir, child); --------相当于f:\\aaa\\bbb.txt
  • 路径分隔符:

    • 路径中的每级目录之间用一个路径分隔符隔开。

    • 路径分隔符和系统有关:

      • windows 和 DOS 系统默认使用 “\“ 来表示。
      • UNIX 和 URL 使用 “/“ 来表示。
    • Java 程序支持跨平台运行,因此路径分隔符要慎用。为了解决这个隐患,File 类提供了一个常量 public static final String separator,能够根据操作系统,动态的提供分隔符。

    • 实例:

      1
      2
      3
      File file1 = new File("d:\\test\\info.txt");
      File file2 = new File("d:/test/info.txt");
      File file3 = new File("d:" + File.separator + "test" + File.separator + "info.txt");
  • 获取功能的方法:

    • public String getAbsolutePath():获取绝对路径。

    • public String getPath():获取路径。

    • public String getName():获取名称。

    • public String getParent():获取上层文件目录路径。若无,返回 null。

    • public long length():获取文件长度,即:字节数。不能获取目录的长度。

    • public long lastModified():获取最后一次的修改时间,毫秒值。

    • 实例:

      1
      2
      3
      4
      5
      6
      7
      8
      9
      10
      11
      12
      13
      14
      15
      16
      17
      18
      19
      20
      21
      22
      public class Test {
      public static void main(String[] args) {
      File file1 = new File("hello.txt");
      File file2 = new File("d:\\io\\hi.txt");

      System.out.println(file1.getAbsolutePath());
      System.out.println(file1.getPath());
      System.out.println(file1.getName());
      System.out.println(file1.getParent());
      System.out.println(file1.length());
      System.out.println(new Date(file1.lastModified()));

      System.out.println();

      System.out.println(file2.getAbsolutePath());
      System.out.println(file2.getPath());
      System.out.println(file2.getName());
      System.out.println(file2.getParent());
      System.out.println(file2.length());
      System.out.println(file2.lastModified());
      }
      }
    • public String[] list():获取指定目录下的所有文件或者文件目录的名称数组,如果指定目录不存在,返回 null。

    • public File[] listFiles():获取指定目录下的所有文件或者文件目录的 File 数组,如果指定目录不存在,返回 null。

    • 实例:

      1
      2
      3
      4
      5
      6
      7
      8
      9
      10
      11
      12
      13
      14
      15
      16
      17
      18
      19
      20
      21
      22
      23
      public class Test {
      public static void main(String[] args) {
      File file = new File("D:\\workspace_idea1\\JavaSenior");

      String[] list = file.list();
      System.out.println(list);
      if (list != null) {
      for (String s : list) {
      System.out.println(s);
      }
      }

      System.out.println();

      File[] files = file.listFiles();
      System.out.println(files);
      if (files != null) {
      for (File f : files) {
      System.out.println(f);
      }
      }
      }
      }
    • public String[] list(FilenameFilter filter):指定文件过滤器。

    • public File[] listFiles(FilenameFilter filter):指定文件过滤器。

    • public File[] listFiles(FileFilter filter):指定文件过滤器。

    • 实例:

      1
      2
      3
      4
      5
      6
      7
      8
      9
      10
      11
      12
      13
      14
      15
      16
      17
      18
      19
      20
      21
      22
      23
      24
      25
      26
      27
      28
      29
      30
      31
      32
      33
      34
      35
      36
      37
      38
      39
      40
      41
      public class Test {
      public static void main(String[] args) {
      File srcFile = new File("d:\\code");

      String[] subFiles1 = srcFile.list(new FilenameFilter() {
      @Override
      public boolean accept(File dir, String name) {
      return name.endsWith(".jpg");
      }
      });
      if (subFiles1 != null) {
      for (String fileName : subFiles1) {
      System.out.println(fileName);
      }
      }

      File[] subFiles2 = srcFile.listFiles(new FilenameFilter() {
      @Override
      public boolean accept(File dir, String name) {
      return name.endsWith(".jpg");
      }
      });
      if (subFiles2 != null) {
      for (File file : subFiles2) {
      System.out.println(file.getAbsolutePath());
      }
      }

      File[] subFiles3 = srcFile.listFiles(new FileFilter() {
      @Override
      public boolean accept(File pathname) {
      return pathname.getName().endsWith(".jpg");
      }
      });
      if (subFiles3 != null) {
      for (File file : subFiles3) {
      System.out.println(file.getAbsolutePath());
      }
      }
      }
      }
  • 重命名功能的方法

    • public boolean renameTo(File dest):把文件重命名为指定的文件路径。以 file1.renameTo(file2) 为例:要想保证返回 true,需要 file1 在硬盘中是存在的,且 file2 在硬盘中不能存在。

    • 实例:

      1
      2
      3
      4
      5
      6
      7
      8
      9
      public class Test {
      public static void main(String[] args) {
      File file1 = new File("hello.txt");
      File file2 = new File("D:\\io\\hi.txt");

      boolean renameTo = file2.renameTo(file1);
      System.out.println(renameTo);
      }
      }
  • 判断功能的方法

    • public boolean exists():判断是否存在。

    • public boolean isDirectory():判断是否是文件目录。

    • public boolean isFile():判断是否是文件。

    • public boolean canRead():判断是否可读。

    • public boolean canWrite():判断是否可写。

    • public boolean isHidden():判断是否隐藏。

    • 实例:

      1
      2
      3
      4
      5
      6
      7
      8
      9
      10
      11
      12
      13
      14
      15
      16
      17
      18
      19
      20
      21
      22
      23
      24
      public class Test {
      public static void main(String[] args) {
      File file1 = new File("hello.txt");
      file1 = new File("hello1.txt");

      System.out.println(file1.isDirectory());
      System.out.println(file1.isFile());
      System.out.println(file1.exists());
      System.out.println(file1.canRead());
      System.out.println(file1.canWrite());
      System.out.println(file1.isHidden());

      System.out.println();

      File file2 = new File("d:\\io");
      file2 = new File("d:\\io1");
      System.out.println(file2.isDirectory());
      System.out.println(file2.isFile());
      System.out.println(file2.exists());
      System.out.println(file2.canRead());
      System.out.println(file2.canWrite());
      System.out.println(file2.isHidden());
      }
      }
  • 创建功能的方法

    • public boolean createNewFile():创建文件。若文件不存在,则创建一个新的空文件并返回 true;若文件存在,则不创建文件并返回 false。

    • public boolean mkdir():创建文件目录。如果此文件目录存在,则不创建;如果此文件目录的上层目录不存在,也不创建。

    • public boolean mkdirs():创建文件目录。如果上层文件目录不存在,也一并创建。

    • 如果创建文件或者文件目录时,没有写盘符路径,那么,默认在项目路径下。

    • 实例:

      1
      2
      3
      4
      5
      6
      7
      8
      9
      10
      11
      12
      13
      14
      15
      16
      17
      18
      public class Test {
      public static void main(String[] args) {
      File file1 = new File("hi.txt");
      if (!file1.exists()) {
      // 文件不存在
      try {
      boolean newFile = file1.createNewFile();
      System.out.println("创建成功?" + newFile);
      } catch (IOException exception) {
      exception.printStackTrace();
      }
      } else {
      // 文件存在
      boolean delete = file1.delete();
      System.out.println("删除成功?" + delete);
      }
      }
      }
  • 删除功能的方法

    • public boolean delete():删除文件或者文件夹。

    • Java 中的删除不走回收站。要删除一个文件目录,请注意该文件目录内不能包含文件或者文件目录,即只能删除空的文件目录。

    • 实例:

      1
      2
      3
      4
      5
      6
      7
      8
      9
      10
      11
      12
      13
      14
      15
      16
      17
      18
      19
      20
      21
      public class Test {
      public static void main(String[] args) {
      // 文件目录的创建
      File file1 = new File("d:\\io\\io1\\io3");
      boolean mkdir = file1.mkdir();
      if (mkdir) {
      System.out.println("创建成功1");
      }

      File file2 = new File("d:\\io\\io1\\io4");
      boolean mkdir1 = file2.mkdirs();
      if (mkdir1) {
      System.out.println("创建成功2");
      }

      // 要想删除成功,io4文件目录下不能有子目录或文件
      File file3 = new File("D:\\io\\io1\\io4");
      file3 = new File("D:\\io\\io1");
      System.out.println(file3.delete());
      }
      }
  • 递归遍历文件夹下所有文件以及子文件

    1
    2
    3
    4
    5
    6
    7
    8
    9
    10
    11
    12
    13
    14
    15
    16
    17
    18
    19
    20
    21
    22
    23
    24
    25
    26
    27
    28
    29
    30
    31
    32
    33
    34
    35
    36
    37
    38
    39
    40
    41
    42
    43
    44
    45
    46
    47
    48
    49
    50
    51
    52
    53
    54
    55
    56
    57
    58
    59
    60
    61
    62
    63
    64
    65
    66
    67
    68
    69
    70
    71
    72
    73
    74
    75
    76
    77
    78
    79
    80
    81
    82
    83
    84
    85
    86
    87
    88
    89
    90
    91
    92
    93
    94
    95
    96
    97
    98
    99
    100
    101
    102
    103
    104
    105
    106
    107
    108
    public class Test {
    public static void main(String[] args) {
    // 递归:文件目录
    /** 打印出指定目录所有文件名称,包括子文件目录中的文件 */

    // 1.创建目录对象
    File dir = new File("E:\\teach\\01_javaSE\\_尚硅谷Java编程语言\\3_软件");

    // 2.打印目录的子文件
    printSubFile(dir);
    }

    // 方式一:
    public static void printSubFile(File dir) {
    // 判断传入的是否是目录
    if (!dir.isDirectory()) {
    // 不是目录直接退出
    return;
    }

    // 打印目录的子文件
    File[] subfiles = dir.listFiles();
    if (subfiles != null) {
    for (File f : subfiles) {
    if (f.isDirectory()) {
    // 文件目录
    printSubFile(f);
    } else {
    // 文件
    System.out.println(f.getAbsolutePath());
    }
    }
    }
    }

    // 方式二:循环实现
    // 列出file目录的下级内容,仅列出一级的话,使用File类的String[] list()比较简单
    public void listSubFiles(File file) {
    if (file.isDirectory()) {
    String[] all = file.list();
    if (all != null) {
    for (String s : all) {
    System.out.println(s);
    }
    }
    } else {
    System.out.println(file + "是文件!");
    }
    }

    // 方式三:列出file目录的下级,如果它的下级还是目录,接着列出下级的下级,依次类推
    // 建议使用File类的File[] listFiles()
    public void listAllSubFiles(File file) {
    if (file.isFile()) {
    System.out.println(file);
    } else {
    File[] all = file.listFiles();
    // 如果all[i]是文件,直接打印
    // 如果all[i]是目录,接着再获取它的下一级
    if (all != null) {
    for (File f : all) {
    // 递归调用:自己调用自己就叫递归
    listAllSubFiles(f);
    }
    }
    }
    }

    // 拓展1:计算指定目录所在空间的大小
    // 求任意一个目录的总大小
    public long getDirectorySize(File file) {
    // file是文件,那么直接返回file.length()
    // file是目录,把它的下一级的所有大小加起来就是它的总大小
    long size = 0;
    if (file.isFile()) {
    size += file.length();
    } else {
    // 获取file的下一级
    File[] all = file.listFiles();
    if (all != null) {
    // 累加all[i]的大小
    for (File f : all) {
    // f的大小
    size += getDirectorySize(f);
    }
    }
    }
    return size;
    }

    // 拓展2:删除指定文件目录及其下的所有文件
    public void deleteDirectory(File file) {
    // 如果file是文件,直接delete
    // 如果file是目录,先把它的下一级干掉,然后删除自己
    if (file.isDirectory()) {
    File[] all = file.listFiles();
    // 循环删除的是file的下一级
    if (all != null) {
    // f代表file的每一个下级
    for (File f : all) {
    deleteDirectory(f);
    }
    }
    }
    // 删除自己
    file.delete();
    }
    }

字符编码

  • 字符集 Charset:也叫编码表。是一个系统支持的所有字符的集合,包括各国家文字、标点符号、图形符号、数字等。

  • 编码表的由来:计算机只能识别二进制数据,早期由来是电信号。为了方便应用计算机,让它可以识别各个国家的文字。就将各个国家的文字用数字来表示,并一一对应,形成一张表。这就是编码表。

    image-20210401173432112
  • 常见的编码表:

    • ASCII:美国标准信息交换码。用一个字节的 7 位可以表示。

    • ISO8859-1:拉丁码表,欧洲码表。用一个字节的 8 位表示。

    • GB2312:中国的中文编码表。最多两个字节编码所有字符。

    • GBK:中国的中文编码表升级,融合了更多的中文文字符号。最多两个字节编码。

    • Unicode:国际标准码,融合了目前人类使用的所有字符。为每个字符分配唯一的字符码。所有的文字都用两个字节来表示。

    • UTF-8:变长的编码方式,可用 1 ~ 4 个字节来表示一个字符。

      image-20210404191338053
  • 在 Unicode 出现之前,所有的字符集都是和具体编码方案绑定在一起的,即字符集 ≈ 编码方式,都是直接将字符和最终字节流绑定死了。

  • GBK 等双字节编码方式,用最高位是 1 或 0 表示两个字节和一个字节。

  • Unicode 不完美,这里就有三个问题,一个是,我们已经知道,英文字母只用一个字节表示就够了,第二个问题是如何才能区别 Unicode 和 ASCII,计算机怎么知道是两个字节表示一个符号,而不是分别表示两个符号呢?第三个,如果和 GBK 等双字节编码方式一样,用最高位是 1 或 0 表示两个字节和一个字节,就少了很多值无法用于表示字符,不够表示所有字符。Unicode 在很长一段时间内无法推广,直到互联网的出现。

  • 面向传输的众多 UTF (UCS Transfer Format) 标准出现了,顾名思义,UTF-8 就是每次 8 个位传输数据,而 UTF-16 就是每次 16 个位。这是为传输而设计的编码,并使编码无国界,这样就可以显示全世界上所有文化的字符了。

  • Unicode 只是定义了一个庞大的、全球通用的字符集,并为每个字符规定了唯一确定的编号,具体存储成什么样的字节流,取决于字符编码方案。推荐的 Unicode 编码是 UTF-8 和 UTF-16。

    image-20210401205524825 image-20210401210058680
  • 计算机中储存的信息都是用二进制数表示的,而能在屏幕上看到的数字、英文、标点符号、汉字等字符是二进制数转换之后的结果。按照某种规则,将字符存储到计算机中,称为编码 。反之,将存储在计算机中的二进制数按照某种规则解析显示出来,称为解码

    • 编码规则和解码规则要对应,否则会导致乱码。比如说,按照 A 规则存储,同样按照 A 规则解析,那么就能显示正确的文本符号。反之,按照 A 规则存储,再按照 B 规则解析,就会导致乱码现象。
  • 编码: 字符串 —> 字节数组。(能看懂的 —> 看不懂的)

  • 解码: 字节数组 —> 字符串。(看不懂的 —> 能看懂的)

  • 启示:客户端/浏览器端 <——> 后台 (Java,GO,Python,Node.js,php…) <——> 数据库,要求前前后后使用的字符集要统一,都使用 UTF-8,这样才不会乱码。

IO 流原理

  • I/O 是 Input/Output 的缩写, I/O 技术是非常实用的技术,用于处理设备之间的数据传输。如读/写文件,网络通讯等。

  • Java 程序中,对于数据的输入/输出操作以 “流 (stream)” 的方式进行。

  • java.io 包下提供了各种 “流” 类和接口,用以获取不同种类的数据,并通过标准的方法输入或输出数据。

  • 输入 input:读取外部数据 (磁盘、光盘等存储设备的数据) 到程序 (内存) 中。

  • 输出 output:将程序 (内存) 数据输出到磁盘、光盘等外部存储设备中。

    image-20210330203154529

IO 流的分类

image-20210330213653653
  • 按操作数据单位不同分为:字节流 (8 bit),字符流 (16 bit)。

    • 字节流:以字节为单位,读写数据的流。
    • 字符流:以字符为单位,读写数据的流。
  • 按数据流的流向不同分为:输入流,输出流。

    • 输入流:把数据从其他设备上读取到内存中的流。
    • 输出流:把数据从内存中写出到其他设备上的流。
  • 按流的角色的不同分为:节点流,处理流。

    • 节点流:直接从数据源或目的地读写数据。也叫文件流。

      image-20210330215602183
    • 处理流:不直接连接到数据源或目的地,而是连接在已存在的流 (节点流或处理流) 之上,通过对数据的处理为程序提供更为强大的读写功能。

      image-20210330220211998
  • Java 的 IO 流共涉及 40 多个类,实际上非常规则,都是从如下四个抽象基类派生的。同时,由这四个类派生出来的子类名称都是以其父类名作为子类名后缀:

    image-20210330213507408
  • IO 流体系:

    image-20210330214731163

四个抽象基类

InputStream & Reader:

  • InputStream 和 Reader 是所有输入流的基类。
  • InputStream 的典型实现:FileInputStream。
    • int read()
    • int read(byte[] b)
    • int read(byte[] b, int off, int len)
  • Reader 的典型实现:FileReader。
    • int read()
    • int read(char [] c)
    • int read(char [] c, int off, int len)
  • 程序中打开的文件 IO 资源不属于内存里的资源,垃圾回收机制无法回收该资源,所以应该显式关闭文件 IO 资源。
  • FileInputStream 从文件系统中的某个文件中获得输入字节。FileInputStream 用于读取非文本数据之类的原始字节流。如果要读取文本数据的字符流,需要使用 FileReader。

InputStream:

  • int read():从输入流中读取数据的下一个字节。返回 0 到 255 范围内的 int 字节值。如果因为已经到达流末尾而没有可用的字节,则返回值 -1。
  • int read(byte[] b):从输入流中将最多 b.length() 个字节的数据读入一个 byte 数组中。以整数形式返回实际读取的字节数。如果因为已经到达流末尾而没有可用的字节,则返回值 -1。
  • int read(byte[] b, int off,int len):将输入流中最多 len 个数据字节读入 byte 数组。尝试读取 len 个字节,但读取的字节也可能小于该值。以整数形式返回实际读取的字节数。如果因为已经到达流末尾而没有可用的字节,则返回值 -1。
  • public void close() throws IOException:关闭输入流并释放与该流关联的所有系统资源。

Reader:

  • int read():读取单个字符。作为整数读取的字符,范围在 0 到 65535 之间 (0x00-0xffff) (2 个字节的 Unicode 码),如果已到达流的末尾,则返回 -1。
  • int read(char[] cbuf):将字符读入数组。如果已到达流的末尾,则返回 -1。否则返回本次读取的字符数。
  • int read(char[] cbuf,int off,int len):将字符读入数组的某一部分。存到数组 cbuf 中,从 off 处开始存储,最多读 len 个字符。如果已到达流的末尾,则返回 -1。否则返回本次读取的字符数。
  • public void close() throws IOException:关闭此输入流并释放与该流关联的所有系统资源。

OutputStream & Writer:

  • OutputStream 和 Writer 是所有输入流的基类。
  • OutputStream 的典型实现:FileOutStream。
    • void write(int b)
    • void write(byte[] b)
    • void write(byte[] b, int off, int len)
    • public void flush() throws IOException
    • public void close() throws IOException
  • Writer 的典型实现:FileWriter。
    • void write(int c)
    • void write(char[] cbuf)
    • void write(char[] buff, int off, int len)
    • public void flush() throws IOException
    • public void close() throws IOException
  • 因为字符流直接以字符作为操作单位,所以 Writer 还可以用字符串来替换字符数组,即以 String 对象作为参数。
    • void write(String str)
    • void write(String str, int off, int len)
  • FileOutputStream 从文件系统中的某个文件中获得输出字节。FileOutputStream 用于写出非文本数据之类的原始字节流。如果要要写出文本数据的字符流,需要使用 FileWriter。

OutputStream:

  • void write(int b):将指定的字节写入此输出流。write 的常规协定是:向输出流写入一个字节。要写入的字节是参数 b 的八个低位。b 的 24 个高位将被忽略,即写入 0 ~ 255 范围的。
  • void write(byte[] b):将 b.length() 个字节从指定的 byte 数组写入此输出流。write(b) 的常规协定是:应该与调用 write(b, 0, b.length) 的效果完全相同。
  • void write(byte[] b,int off,int len):将指定 byte 数组中从偏移量 off 开始的 len 个字节写入此输出流。
  • public void flush() throws IOException:刷新此输出流并强制写出所有缓冲的输出字节,调用此方法指示应将这些字节立即写入它们预期的目标。
  • public void close() throws IOException:关闭此输出流并释放与该流关联的所有系统资源。

Writer:

  • void write(int c):写入单个字符。要写入的字符包含在给定整数值的 16 个低位中,16 高位被忽略。 即写入0 到 65535 之间的 Unicode 码。
  • void write(char[] cbuf):写入字符数组。
  • void write(char[] cbuf,int off,int len):写入字符数组的某一部分。从 off 开始,写入 len 个字符。
  • void write(String str):写入字符串。
  • void write(String str,int off,int len):写入字符串的某一部分。
  • public void flush() throws IOException:刷新该流的缓冲,则立即将它们写入预期目标。
  • public void close() throws IOException:关闭此输出流并释放与该流关联的所有系统资源。

节点流 (或文件流)

  • 读取文件流程:

    • 实例化 File 类的对象,指明要操作的文件。
    • 提供具体的流对象。
    • 数据的读入。
    • 流的关闭操作。
  • 写入文件流程:

    • 实例化 File 类的对象,指明写出到的文件。
    • 提供具体的流对象。
    • 数据的写入。
    • 流的关闭操作。
  • 定义文件路径时,可以用 / 或者 \。

  • 在写入一个文件时,如果使用构造器 FileOutputStream(file),则目录下有同名文件将被覆盖。

  • 如果使用构造器 FileOutputStream(file,true),则目录下的同名文件不会被覆盖,而是在文件内容末尾追加内容。

  • 在读取文件时,必须保证该文件已存在,否则报异常。

  • 对于非文本文件 (.jpg,.mp3,.mp4,.avi,.rmvb,.doc,.ppt 等),使用字节流处理。如果使用字节流操作文本文件,在输出到控制台时,可能会出现乱码。

    • 如果只是将文本文件复制到其他地方,也可以使用字节流。
  • 对于文本文件 (.txt,.java,.c,.cpp 等),使用字符流处理。

  • FileReader 和 FileWriter 操作的实例:

    1
    2
    3
    4
    5
    6
    7
    8
    9
    10
    11
    12
    13
    14
    15
    16
    17
    18
    19
    20
    21
    22
    23
    24
    25
    26
    27
    28
    29
    30
    31
    32
    33
    34
    35
    36
    37
    38
    39
    40
    41
    42
    43
    44
    45
    46
    47
    48
    49
    50
    51
    52
    53
    54
    55
    56
    57
    58
    59
    60
    61
    62
    63
    64
    65
    66
    67
    68
    69
    70
    71
    72
    73
    74
    75
    76
    77
    78
    79
    80
    81
    82
    83
    84
    85
    86
    87
    88
    89
    90
    91
    92
    93
    94
    95
    96
    97
    98
    99
    100
    101
    102
    103
    104
    105
    106
    107
    108
    109
    110
    111
    112
    113
    114
    115
    116
    117
    118
    119
    120
    121
    122
    123
    124
    125
    126
    127
    128
    129
    130
    131
    132
    133
    134
    135
    136
    137
    138
    139
    140
    141
    142
    143
    144
    145
    146
    147
    148
    149
    150
    151
    152
    153
    154
    155
    156
    157
    158
    159
    160
    161
    162
    163
    164
    165
    166
    167
    168
    169
    170
    171
    172
    173
    174
    175
    176
    177
    178
    179
    180
    181
    182
    183
    184
    185
    186
    187
    188
    189
    190
    191
    192
    193
    194
    195
    196
    197
    198
    199
    200
    201
    202
    203
    204
    205
    206
    207
    208
    209
    210
    211
    212
    213
    214
    215
    216
    /**
    * 一、流的分类:
    * 1.操作数据单位:字节流、字符流
    * 2.数据的流向:输入流、输出流
    * 3.流的角色:节点流、处理流
    *
    * 二、流的体系结构
    * 抽象基类 节点流(或文件流) 缓冲流(处理流的一种)
    * InputStream FileInputStream (read(byte[] buffer)) BufferedInputStream (read(byte[] buffer))
    * OutputStream FileOutputStream (write(byte[] buffer,0,len) BufferedOutputStream (write(byte[] buffer,0,len)/flush()
    * Reader FileReader (read(char[] cbuf)) BufferedReader (read(char[] cbuf)/readLine())
    * Writer FileWriter (write(char[] cbuf,0,len) BufferedWriter (write(char[] cbuf,0,len)/flush()
    */
    public class FileReaderWriterTest {
    /*
    将当前Module下的hello.txt文件内容读入程序中,并输出到控制台

    说明点:
    1. read()的理解:返回读入的一个字符。如果达到文件末尾,返回-1
    2. 异常的处理:为了保证流资源一定可以执行关闭操作。需要使用try-catch-finally处理
    3. 读入的文件一定要存在,否则就会报FileNotFoundException。
    */

    // read(): 返回读入的一个字符。如果达到文件末尾,返回-1
    @Test
    public void testFileReader() {
    FileReader fr = null;
    try {
    // 1.实例化File类的对象,指明要操作的文件
    File file = new File("hello.txt");// 相较于当前Module

    // 2.提供具体的流
    fr = new FileReader(file);

    // 3.数据的读入
    // 方式一:
    /*int data = fr.read();
    while (data != -1) {
    System.out.print((char) data);
    data = fr.read();
    }*/
    // 方式二:语法上针对于方式一的修改
    int data;
    while ((data = fr.read()) != -1) {
    System.out.print((char) data);
    }
    } catch (IOException e) {
    e.printStackTrace();
    } finally {
    // 4.流的关闭操作
    // 方式一:
    /*try {
    if (fr != null)
    fr.close();
    } catch (IOException e) {
    e.printStackTrace();
    }*/
    // 方式二:
    if (fr != null) {
    try {
    fr.close();
    } catch (IOException e) {
    e.printStackTrace();
    }
    }
    }
    }

    // 对read()操作升级:使用read的重载方法read(char[] cbuf)
    @Test
    public void testFileReader1() {
    FileReader fr = null;
    try {
    // 1.File类的实例化
    File file = new File("hello.txt");

    // 2.FileReader流的实例化
    fr = new FileReader(file);

    // 3.读入的操作
    // read(char[] cbuf):返回每次读入cbuf数组中的字符的个数。如果达到文件末尾,返回-1
    char[] cbuf = new char[5];
    int len;
    while ((len = fr.read(cbuf)) != -1) {
    // 方式一:
    // 错误的写法,如果以cubf的length为基准,可能会造成多输出内容
    /*for (int i = 0; i < cbuf.length; i++) {
    System.out.print(cbuf[i]);
    }*/
    // 正确的写法
    /*for (int i = 0; i < len; i++) {
    System.out.print(cbuf[i]);
    }*/
    //方式二:
    // 错误的写法,对应着方式一的错误的写法
    /*String str = new String(cbuf);
    System.out.print(str);*/
    // 正确的写法,对应着方式一的正确的写法
    String str = new String(cbuf, 0, len);
    System.out.print(str);
    }
    } catch (IOException e) {
    e.printStackTrace();
    } finally {
    if (fr != null) {
    // 4.资源的关闭
    try {
    fr.close();
    } catch (IOException e) {
    e.printStackTrace();
    }
    }
    }
    }

    /*
    从内存中写出数据到硬盘的文件里。

    说明:
    1. 输出操作,对应的File可以不存在的。并不会报异常
    2.
    File对应的硬盘中的文件如果不存在,在输出的过程中,会自动创建此文件。
    File对应的硬盘中的文件如果存在:
    如果流使用的构造器是:FileWriter(file,false) / FileWriter(file)--->对原有文件的覆盖
    如果流使用的构造器是:FileWriter(file,true)--->不会对原有文件覆盖,而是在原有文件基础上追加内容
    */
    @Test
    public void testFileWriter() {
    FileWriter fw = null;
    try {
    // 1.提供File类的对象,指明写出到的文件
    File file = new File("hello1.txt");

    // 2.提供FileWriter的对象,用于数据的写出
    fw = new FileWriter(file, false);

    // 3.写出的操作
    fw.write("I have a dream!\n");
    fw.write("you need to have a dream!");
    } catch (IOException e) {
    e.printStackTrace();
    } finally {
    // 4.流资源的关闭
    if (fw != null) {
    try {
    fw.close();
    } catch (IOException e) {
    e.printStackTrace();
    }
    }
    }
    }

    /*
    实现对已存在文件的复制
    */
    @Test
    public void testFileReaderFileWriter() {
    FileReader fr = null;
    FileWriter fw = null;
    try {
    // 1.创建File类的对象,指明读入和写出的文件
    File srcFile = new File("hello.txt");
    File destFile = new File("hello2.txt");

    // 不能使用字符流来处理图片等字节数据
    /*File srcFile = new File("爱情与友情.jpg");
    File destFile = new File("爱情与友情1.jpg");*/

    // 2.创建输入流和输出流的对象
    fr = new FileReader(srcFile);
    fw = new FileWriter(destFile);

    // 3.数据的读入和写出操作
    char[] cbuf = new char[5];
    // 记录每次读入到cbuf数组中的字符的个数
    int len;
    while ((len = fr.read(cbuf)) != -1) {
    // 每次写出len个字符
    fw.write(cbuf, 0, len);
    }
    } catch (IOException e) {
    e.printStackTrace();
    } finally {
    // 4.关闭流资源
    // 方式一:
    /*try {
    if (fw != null)
    fw.close();
    } catch (IOException e) {
    e.printStackTrace();
    } finally {
    try {
    if (fr != null)
    fr.close();
    } catch (IOException e) {
    e.printStackTrace();
    }
    }*/
    // 方式二:
    try {
    if (fw != null)
    fw.close();
    } catch (IOException e) {
    e.printStackTrace();
    }

    try {
    if (fr != null)
    fr.close();
    } catch (IOException e) {
    e.printStackTrace();
    }
    }
    }
    }
  • FileInputStream 和 FileOutputStream 操作的实例:

    1
    2
    3
    4
    5
    6
    7
    8
    9
    10
    11
    12
    13
    14
    15
    16
    17
    18
    19
    20
    21
    22
    23
    24
    25
    26
    27
    28
    29
    30
    31
    32
    33
    34
    35
    36
    37
    38
    39
    40
    41
    42
    43
    44
    45
    46
    47
    48
    49
    50
    51
    52
    53
    54
    55
    56
    57
    58
    59
    60
    61
    62
    63
    64
    65
    66
    67
    68
    69
    70
    71
    72
    73
    74
    75
    76
    77
    78
    79
    80
    81
    82
    83
    84
    85
    86
    87
    88
    89
    90
    91
    92
    93
    94
    95
    96
    97
    98
    99
    100
    101
    102
    103
    104
    105
    106
    107
    108
    109
    110
    111
    112
    113
    114
    115
    116
    117
    118
    119
    120
    121
    122
    123
    124
    125
    126
    127
    128
    129
    130
    131
    132
    133
    134
    135
    136
    137
    138
    139
    140
    141
    142
    143
    144
    145
    146
    147
    /**
    * 测试FileInputStream和FileOutputStream的使用
    *
    * 结论:
    * 1. 对于文本文件(.txt,.java,.c,.cpp),使用字符流处理
    * 2. 对于非文本文件(.jpg,.mp3,.mp4,.avi,.doc,.ppt,...),使用字节流处理
    */
    public class FileInputOutputStreamTest {
    /*
    使用字节流FileInputStream处理文本文件,可能出现乱码。
    */
    @Test
    public void testFileInputStream() {
    FileInputStream fis = null;
    try {
    // 1. 造文件
    File file = new File("hello.txt");

    // 2.造流
    fis = new FileInputStream(file);

    // 3.读数据
    byte[] buffer = new byte[5];
    // 记录每次读取的字节的个数
    int len;
    while ((len = fis.read(buffer)) != -1) {
    String str = new String(buffer, 0, len);
    System.out.print(str);
    }
    } catch (IOException e) {
    e.printStackTrace();
    } finally {
    if (fis != null) {
    // 4.关闭资源
    try {
    fis.close();
    } catch (IOException e) {
    e.printStackTrace();
    }
    }
    }
    }

    /*
    实现对图片的复制操作
    */
    @Test
    public void testFileInputOutputStream() {
    FileInputStream fis = null;
    FileOutputStream fos = null;
    try {
    // 1.获取文件
    File srcFile = new File("爱情与友情.jpg");
    File destFile = new File("爱情与友情2.jpg");

    // 2.获取流
    fis = new FileInputStream(srcFile);
    fos = new FileOutputStream(destFile);

    // 3.复制的过程
    byte[] buffer = new byte[5];
    int len;
    while ((len = fis.read(buffer)) != -1) {
    fos.write(buffer, 0, len);
    }
    } catch (IOException e) {
    e.printStackTrace();
    } finally {
    // 4.关闭流
    if (fos != null) {
    try {
    fos.close();
    } catch (IOException e) {
    e.printStackTrace();
    }
    }

    if (fis != null) {
    try {
    fis.close();
    } catch (IOException e) {
    e.printStackTrace();
    }
    }
    }
    }

    /*
    指定路径下文件的复制
    */
    public void copyFile(String srcPath, String destPath) {
    FileInputStream fis = null;
    FileOutputStream fos = null;
    try {
    // 1.获取文件
    File srcFile = new File(srcPath);
    File destFile = new File(destPath);

    // 2.获取流
    fis = new FileInputStream(srcFile);
    fos = new FileOutputStream(destFile);

    // 3.复制的过程
    byte[] buffer = new byte[1024];
    int len;
    while ((len = fis.read(buffer)) != -1) {
    fos.write(buffer, 0, len);
    }
    } catch (IOException e) {
    e.printStackTrace();
    } finally {
    // 4.关闭流
    if (fos != null) {
    try {
    fos.close();
    } catch (IOException e) {
    e.printStackTrace();
    }
    }

    if (fis != null) {
    try {
    fis.close();
    } catch (IOException e) {
    e.printStackTrace();
    }
    }
    }
    }

    @Test
    public void testCopyFile() {
    long start = System.currentTimeMillis();

    String srcPath = "C:\\Users\\Administrator\\Desktop\\01-视频.avi";
    String destPath = "C:\\Users\\Administrator\\Desktop\\02-视频.avi";

    /*String srcPath = "hello.txt";
    String destPath = "hello3.txt";*/

    copyFile(srcPath, destPath);

    long end = System.currentTimeMillis();

    System.out.println("复制操作花费的时间为:" + (end - start));// 618
    }
    }

处理流之一:缓冲流

  • 为了提高数据读写的速度,Java API 提供了带缓冲功能的流类,在使用这些流类时,会创建一个内部缓冲区数组,缺省使用 8192 个字节 (8Kb) 的缓冲区。

    1
    2
    3
    public class BufferedInputStream extends FilterInputStream {
    private static int DEFAULT_BUFFER_SIZE = 8192;
    }
    1
    2
    3
    public class BufferedReader extends Reader {
    private static int defaultCharBufferSize = 8192;
    }
    1
    2
    3
    public class BufferedWriter extends Writer {
    private static int defaultCharBufferSize = 8192;
    }
  • 缓冲流要 “套接” 在相应的节点流之上,根据数据操作单位可以把缓冲流分为:

    • BufferedInputStream 和 和 BufferedOutputStream
      • public BufferedInputStream(InputStream in) :创建一个新的缓冲输入流,注意参数类型为 InputStream
      • public BufferedOutputStream(OutputStream out): 创建一个新的缓冲输出流,注意参数类型为 OutputStream
    • BufferedReader 和 BufferedWriter
      • public BufferedReader(Reader in) :创建一个新的缓冲输入流,注意参数类型为 Reader
      • public BufferedWriter(Writer out): 创建一个新的缓冲输出流,注意参数类型为 Writer
  • 当读取数据时,数据按块读入缓冲区,其后的读操作则直接访问缓冲区。

  • 当使用 BufferedInputStream 读取字节文件时,BufferedInputStream 会一次性从文件中读取 8192 个字节 (8Kb) 存在缓冲区中,直到缓冲区装满了,才重新从文件中读取下一个 8192 个字节数组。

  • 向流中写入字节时,不会直接写到文件,先写到缓冲区中直到缓冲区写满,BufferedOutputStream 才会把缓冲区中的数据一次性写到文件里。使用 flush() 可以强制将缓冲区的内容全部写入输出流。

    • flush() 的使用:手动将 buffer 中内容写入文件。
    • 如果使用带缓冲区的流对象的 close(),不但会关闭流,还会在关闭流之前刷新缓冲区,但关闭流后不能再写出。
  • 关闭流的顺序和打开流的顺序相反。一般只需关闭最外层流即可,关闭最外层流也会相应关闭内层节点流。

  • 流程示意图:

    image-20210401141017522
  • 实现非文本文件及文本文件的复制:

    1
    2
    3
    4
    5
    6
    7
    8
    9
    10
    11
    12
    13
    14
    15
    16
    17
    18
    19
    20
    21
    22
    23
    24
    25
    26
    27
    28
    29
    30
    31
    32
    33
    34
    35
    36
    37
    38
    39
    40
    41
    42
    43
    44
    45
    46
    47
    48
    49
    50
    51
    52
    53
    54
    55
    56
    57
    58
    59
    60
    61
    62
    63
    64
    65
    66
    67
    68
    69
    70
    71
    72
    73
    74
    75
    76
    77
    78
    79
    80
    81
    82
    83
    84
    85
    86
    87
    88
    89
    90
    91
    92
    93
    94
    95
    96
    97
    98
    99
    100
    101
    102
    103
    104
    105
    106
    107
    108
    109
    110
    111
    112
    113
    114
    115
    116
    117
    118
    119
    120
    121
    122
    123
    124
    125
    126
    127
    128
    129
    130
    131
    132
    133
    134
    135
    136
    137
    138
    139
    140
    141
    142
    143
    144
    145
    146
    147
    148
    149
    150
    151
    152
    153
    154
    155
    156
    157
    158
    159
    160
    161
    162
    163
    164
    165
    166
    167
    168
    169
    170
    171
    172
    173
    174
    175
    176
    177
    178
    179
    180
    181
    182
    183
    /**
    * 处理流之一:缓冲流的使用
    *
    * 1.缓冲流:
    * BufferedInputStream
    * BufferedOutputStream
    * BufferedReader
    * BufferedWriter
    *
    * 2.作用:提高流的读取、写入的速度
    * 提高读写速度的原因:内部提供了一个缓冲区
    *
    * 3. 处理流,就是"套接"在已有的流的基础上。(不一定必须是套接在节点流之上)
    */
    public class BufferedStreamTest {
    /*
    使用BufferedInputStream和BufferedOutputStream实现非文本文件的复制
    */
    @Test
    public void BufferedStreamTest() throws FileNotFoundException {
    BufferedInputStream bis = null;
    BufferedOutputStream bos = null;
    try {
    // 1.造文件
    File srcFile = new File("爱情与友情.jpg");
    File destFile = new File("爱情与友情3.jpg");

    // 2.造流
    // 2.1 造节点流
    FileInputStream fis = new FileInputStream((srcFile));
    FileOutputStream fos = new FileOutputStream(destFile);
    // 2.2 造缓冲流
    bis = new BufferedInputStream(fis);
    bos = new BufferedOutputStream(fos);

    // 3.复制的细节:读取、写入
    byte[] buffer = new byte[10];
    int len;
    while ((len = bis.read(buffer)) != -1) {
    bos.write(buffer, 0, len);
    // bos.flush();// 显示的刷新缓冲区,一般不需要
    }
    } catch (IOException e) {
    e.printStackTrace();
    } finally {
    // 4.资源关闭
    // 要求:先关闭外层的流,再关闭内层的流
    if (bos != null) {
    try {
    bos.close();
    } catch (IOException e) {
    e.printStackTrace();
    }
    }
    if (bis != null) {
    try {
    bis.close();
    } catch (IOException e) {
    e.printStackTrace();
    }
    }
    // 说明:关闭外层流的同时,内层流也会自动的进行关闭。关于内层流的关闭,我们可以省略.
    // fos.close();
    // fis.close();
    }
    }

    /*
    使用BufferedInputStream和BufferedOutputStream实现文件复制的方法
    */
    public void copyFileWithBuffered(String srcPath, String destPath) {
    BufferedInputStream bis = null;
    BufferedOutputStream bos = null;

    try {
    // 1.造文件
    File srcFile = new File(srcPath);
    File destFile = new File(destPath);

    // 2.造流
    // 2.1 造节点流
    FileInputStream fis = new FileInputStream((srcFile));
    FileOutputStream fos = new FileOutputStream(destFile);
    // 2.2 造缓冲流
    bis = new BufferedInputStream(fis);
    bos = new BufferedOutputStream(fos);

    // 3.复制的细节:读取、写入
    byte[] buffer = new byte[1024];
    int len;
    while ((len = bis.read(buffer)) != -1) {
    bos.write(buffer, 0, len);
    }
    } catch (IOException e) {
    e.printStackTrace();
    } finally {
    // 4.资源关闭
    // 要求:先关闭外层的流,再关闭内层的流
    if (bos != null) {
    try {
    bos.close();
    } catch (IOException e) {
    e.printStackTrace();
    }
    }
    if (bis != null) {
    try {
    bis.close();
    } catch (IOException e) {
    e.printStackTrace();
    }
    }
    // 说明:关闭外层流的同时,内层流也会自动的进行关闭。关于内层流的关闭,我们可以省略.
    // fos.close();
    // fis.close();
    }
    }

    @Test
    public void testCopyFileWithBuffered() {
    long start = System.currentTimeMillis();

    String srcPath = "C:\\Users\\Administrator\\Desktop\\01-视频.avi";
    String destPath = "C:\\Users\\Administrator\\Desktop\\03-视频.avi";

    copyFileWithBuffered(srcPath, destPath);

    long end = System.currentTimeMillis();

    System.out.println("复制操作花费的时间为:" + (end - start));//618 - 176
    }

    /*
    使用BufferedReader和BufferedWriter实现文本文件的复制
    */
    @Test
    public void testBufferedReaderBufferedWriter() {
    BufferedReader br = null;
    BufferedWriter bw = null;
    try {
    // 1.创建文件和相应的流
    br = new BufferedReader(new FileReader(new File("dbcp.txt")));
    bw = new BufferedWriter(new FileWriter(new File("dbcp1.txt")));

    // 2.读写操作
    // 方式一:使用char[]数组
    /*char[] cbuf = new char[1024];
    int len;
    while ((len = br.read(cbuf)) != -1) {// 读到文件末尾时返回-1
    bw.write(cbuf, 0, len);
    // bw.flush();
    }*/

    // 方式二:使用String
    String data;
    while ((data = br.readLine()) != null) {// 读到文件末尾时返回null
    // 方法一:
    // bw.write(data + "\n");// data中不包含换行符
    // 方法二:
    bw.write(data);// data中不包含换行符
    bw.newLine();// 提供换行的操作
    }
    } catch (IOException e) {
    e.printStackTrace();
    } finally {
    // 3.关闭资源
    if (bw != null) {
    try {
    bw.close();
    } catch (IOException e) {
    e.printStackTrace();
    }
    }
    if (br != null) {
    try {
    br.close();
    } catch (IOException e) {
    e.printStackTrace();
    }
    }
    }
    }
    }
  • 实现图片加密:

    1
    2
    3
    4
    5
    6
    7
    8
    9
    10
    11
    12
    13
    14
    15
    16
    17
    18
    19
    20
    21
    22
    23
    24
    25
    26
    27
    28
    29
    30
    31
    32
    33
    34
    35
    36
    37
    38
    39
    40
    41
    42
    43
    44
    45
    46
    47
    48
    49
    50
    51
    52
    53
    54
    55
    56
    57
    58
    59
    60
    61
    62
    63
    64
    65
    66
    67
    68
    69
    70
    71
    72
    73
    74
    75
    76
    77
    78
    79
    80
    81
    82
    83
    84
    85
    86
    87
    88
    89
    90
    91
    92
    public class ImageEncryption {
    /*
    图片的加密
    */
    @Test
    public void test1() {
    FileInputStream fis = null;
    FileOutputStream fos = null;
    try {
    fis = new FileInputStream("爱情与友情.jpg");
    fos = new FileOutputStream("爱情与友情secret.jpg");

    byte[] buffer = new byte[20];
    int len;
    while ((len = fis.read(buffer)) != -1) {
    // 加密:对字节数组进行修改,异或操作
    // 错误的写法,buffer数组中的数据没有改变,只是重新复制给了变量b
    /*for (byte b : buffer) {
    b = (byte) (b ^ 5);
    }*/
    // 正确的写法
    for (int i = 0; i < len; i++) {
    buffer[i] = (byte) (buffer[i] ^ 5);
    }
    fos.write(buffer, 0, len);
    }
    } catch (IOException e) {
    e.printStackTrace();
    } finally {
    if (fos != null) {
    try {
    fos.close();
    } catch (IOException e) {
    e.printStackTrace();
    }
    }
    if (fis != null) {
    try {
    fis.close();
    } catch (IOException e) {
    e.printStackTrace();
    }
    }
    }
    }


    /*
    图片的解密
    */
    @Test
    public void test2() {
    FileInputStream fis = null;
    FileOutputStream fos = null;
    try {
    fis = new FileInputStream("爱情与友情secret.jpg");
    fos = new FileOutputStream("爱情与友情4.jpg");

    byte[] buffer = new byte[20];
    int len;
    while ((len = fis.read(buffer)) != -1) {
    // 解密:对字节数组进行修改,异或操作之后再异或,返回的是自己本身
    // 错误的写法
    /*for (byte b : buffer) {
    b = (byte) (b ^ 5);
    }*/
    // 正确的写法
    for (int i = 0; i < len; i++) {
    buffer[i] = (byte) (buffer[i] ^ 5);
    }
    fos.write(buffer, 0, len);
    }
    } catch (IOException e) {
    e.printStackTrace();
    } finally {
    if (fos != null) {
    try {
    fos.close();
    } catch (IOException e) {
    e.printStackTrace();
    }
    }
    if (fis != null) {
    try {
    fis.close();
    } catch (IOException e) {
    e.printStackTrace();
    }
    }
    }
    }
    }
  • 获取文本上每个字符出现的次数:

    1
    2
    3
    4
    5
    6
    7
    8
    9
    10
    11
    12
    13
    14
    15
    16
    17
    18
    19
    20
    21
    22
    23
    24
    25
    26
    27
    28
    29
    30
    31
    32
    33
    34
    35
    36
    37
    38
    39
    40
    41
    42
    43
    44
    45
    46
    47
    48
    49
    50
    51
    52
    53
    54
    55
    56
    57
    58
    59
    60
    61
    62
    63
    64
    65
    66
    67
    68
    69
    70
    71
    72
    73
    74
    public class WordCount {
    /*
    说明:如果使用单元测试,文件相对路径为当前module
    如果使用main()测试,文件相对路径为当前工程
    */
    @Test
    public void testWordCount() {
    FileReader fr = null;
    BufferedWriter bw = null;
    try {
    // 1.创建Map集合
    Map<Character, Integer> map = new HashMap<Character, Integer>();

    // 2.遍历每一个字符,每一个字符出现的次数放到map中
    fr = new FileReader("dbcp.txt");
    int c;
    while ((c = fr.read()) != -1) {
    // int 还原 char
    char ch = (char) c;
    // 判断char是否在map中第一次出现
    if (map.get(ch) == null) {
    map.put(ch, 1);
    } else {
    map.put(ch, map.get(ch) + 1);
    }
    }

    // 3.把map中数据存在文件count.txt
    // 3.1 创建Writer
    bw = new BufferedWriter(new FileWriter("wordcount.txt"));

    // 3.2 遍历map,再写入数据
    Set<Map.Entry<Character, Integer>> entrySet = map.entrySet();
    for (Map.Entry<Character, Integer> entry : entrySet) {
    switch (entry.getKey()) {
    case ' ':
    bw.write("空格 = " + entry.getValue());
    break;
    case '\t'://\t表示tab 键字符
    bw.write("tab键 = " + entry.getValue());
    break;
    case '\r'://
    bw.write("回车 = " + entry.getValue());
    break;
    case '\n'://
    bw.write("换行 = " + entry.getValue());
    break;
    default:
    bw.write(entry.getKey() + " = " + entry.getValue());
    break;
    }
    bw.newLine();
    }
    } catch (IOException e) {
    e.printStackTrace();
    } finally {
    // 4.关闭流
    if (fr != null) {
    try {
    fr.close();
    } catch (IOException e) {
    e.printStackTrace();
    }
    }
    if (bw != null) {
    try {
    bw.close();
    } catch (IOException e) {
    e.printStackTrace();
    }
    }
    }
    }
    }

处理流之二:转换流

  • 转换流提供了在字节流和字符流之间的转换。

  • Java API 提供了两个转换流:

    • InputStreamReader:将 InputStream 转换为 Reader。
      • InputStreamReader(InputStream in):创建一个使用默认字符集的字符流。
      • InputStreamReader(InputStream in, String charsetName):创建一个指定字符集的字符流。
    • OutputStreamWriter:将 Writer 转换为 OutputStream。
      • OutputStreamWriter(OutputStream in):创建一个使用默认字符集的字符流。
      • OutputStreamWriter(OutputStream in, String charsetName):创建一个指定字符集的字符流。
  • 字节流中的数据都是字符时,转成字符流操作更高效。

  • 很多时候我们使用转换流来处理文件乱码问题,实现编码和解码的功能。

  • InputStreamReader:

    • 实现将字节的输入流按指定字符集转换为字符的输入流。
    • 需要和 InputStream 套接。
    • 构造器
      • public InputStreamReader(InputStream in)
      • public InputSreamReader(InputStream in,String charsetName)
        • 比如:Reader isr = new InputStreamReader(System.in,"gbk");,指定字符集为 gbk。
  • OutputStreamWriter:

    • 实现将字符的输出流按指定字符集转换为字节的输出流。
    • 需要和 OutputStream 套接。
    • 构造器
      • public OutputStreamWriter(OutputStream out)
      • public OutputSreamWriter(OutputStream out,String charsetName)
  • 使用 InputStreamReader 解码时,使用的字符集取决于 OutputStreamWriter 编码时使用的字符集。

  • 流程示意图:

    image-20210401155051887 image-20210403214550709
  • 转换流的编码应用:

    • 可以将字符按指定编码格式存储。
    • 可以对文本数据按指定编码格式来解读。
    • 指定编码表的动作由构造器完成。
  • 为了达到最高效率,可以考虑在 BufferedReader 内包装 InputStreamReader:

    1
    BufferedReader in = new BufferedReader(new InputStreamReader(System.in));
  • 实例:

    1
    2
    3
    4
    5
    6
    7
    8
    9
    10
    11
    12
    13
    14
    15
    16
    17
    18
    19
    20
    21
    22
    23
    24
    25
    26
    27
    28
    29
    30
    31
    32
    33
    34
    35
    36
    37
    38
    39
    40
    41
    42
    43
    44
    45
    46
    47
    48
    49
    50
    51
    52
    53
    54
    55
    56
    57
    58
    59
    60
    61
    62
    63
    64
    65
    66
    67
    68
    69
    70
    71
    72
    73
    74
    75
    76
    77
    78
    79
    80
    81
    82
    83
    84
    85
    86
    87
    88
    89
    90
    91
    92
    93
    94
    95
    96
    97
    98
    99
    100
    101
    /**
    * 处理流之二:转换流的使用
    * 1.转换流:属于字符流
    * InputStreamReader:将一个字节的输入流转换为字符的输入流
    * OutputStreamWriter:将一个字符的输出流转换为字节的输出流
    *
    * 2.作用:提供字节流与字符流之间的转换
    *
    * 3. 解码:字节、字节数组 --->字符数组、字符串
    * 编码:字符数组、字符串 ---> 字节、字节数组
    *
    *
    * 4.字符集
    * ASCII:美国标准信息交换码。
    * 用一个字节的7位可以表示。
    * ISO8859-1:拉丁码表。欧洲码表
    * 用一个字节的8位表示。
    * GB2312:中国的中文编码表。最多两个字节编码所有字符
    * GBK:中国的中文编码表升级,融合了更多的中文文字符号。最多两个字节编码
    * Unicode:国际标准码,融合了目前人类使用的所有字符。为每个字符分配唯一的字符码。所有的文字都用两个字节来表示。
    * UTF-8:变长的编码方式,可用1-4个字节来表示一个字符。
    */
    public class InputStreamReaderTest {
    /*
    此时处理异常的话,仍然应该使用try-catch-finally
    InputStreamReader的使用,实现字节的输入流到字符的输入流的转换
    */
    @Test
    public void test1() {
    InputStreamReader isr = null;
    try {
    FileInputStream fis = new FileInputStream("dbcp.txt");
    // InputStreamReader isr = new InputStreamReader(fis);// 使用系统默认的字符集,如果在IDEA中,就是看IDEA设置的默认字符集
    // 参数2指明了字符集,具体使用哪个字符集,取决于文件dbcp.txt保存时使用的字符集
    isr = new InputStreamReader(fis, StandardCharsets.UTF_8);// 指定字符集

    char[] cbuf = new char[20];
    int len;
    while ((len = isr.read(cbuf)) != -1) {
    String str = new String(cbuf, 0, len);
    System.out.print(str);
    }
    } catch (IOException exception) {
    exception.printStackTrace();
    } finally {
    if (isr != null) {
    try {
    isr.close();
    } catch (IOException exception) {
    exception.printStackTrace();
    }
    }
    }
    }

    /*
    此时处理异常的话,仍然应该使用try-catch-finally
    综合使用InputStreamReader和OutputStreamWriter
    */
    @Test
    public void test2() {
    InputStreamReader isr = null;
    OutputStreamWriter osw = null;
    try {
    // 1.造文件、造流
    File file1 = new File("dbcp.txt");
    File file2 = new File("dbcp_gbk.txt");

    FileInputStream fis = new FileInputStream(file1);
    FileOutputStream fos = new FileOutputStream(file2);

    isr = new InputStreamReader(fis, StandardCharsets.UTF_8);
    osw = new OutputStreamWriter(fos, "gbk");

    // 2.读写过程
    char[] cbuf = new char[20];
    int len;
    while ((len = isr.read(cbuf)) != -1) {
    osw.write(cbuf, 0, len);
    }
    } catch (IOException exception) {
    exception.printStackTrace();
    } finally {
    // 3.关闭资源
    if (isr != null) {
    try {
    isr.close();
    } catch (IOException exception) {
    exception.printStackTrace();
    }
    }
    if (osw != null) {
    try {
    osw.close();
    } catch (IOException exception) {
    exception.printStackTrace();
    }
    }
    }
    }
    }

处理流之三:标准输入、输出流

  • System.inSystem.out 分别代表了系统标准的输入和输出设备。

  • 默认输入设备是:键盘,输出设备是:显示器。

  • System.in 的类型是 InputStream。

  • System.out 的类型是 PrintStream,其是 OutputStream 的子类 FilterOutputStream 的子类。

  • 重定向:通过 System 类的 setIn()setOut() 对默认设备进行改变。

    • public static void setIn(InputStream in)
    • public static void setOut(PrintStream out)
  • 实例:

    1
    2
    3
    4
    5
    6
    7
    8
    9
    10
    11
    12
    13
    14
    15
    16
    17
    18
    19
    20
    21
    22
    23
    24
    25
    26
    27
    28
    29
    30
    31
    32
    33
    34
    35
    36
    37
    38
    39
    40
    41
    42
    43
    44
    45
    46
    47
    public class OtherStreamTest {
    /*
    1.标准的输入、输出流
    1.1
    System.in: 标准的输入流,默认从键盘输入
    System.out: 标准的输出流,默认从控制台输出
    1.2
    System类的setIn(InputStream is) / setOut(PrintStream ps)方式重新指定输入和输出的流。

    1.3练习:
    从键盘输入字符串,要求将读取到的整行字符串转成大写输出。然后继续进行输入操作,
    直至当输入“e”或者“exit”时,退出程序。

    方法一:使用Scanner实现,调用next()返回一个字符串
    方法二:使用System.in实现。System.in ---> 转换流 ---> BufferedReader的readLine()
    */
    // IDEA的单元测试不支持从键盘输入,更改为main()
    public static void main(String[] args) {
    BufferedReader br = null;
    try {
    InputStreamReader isr = new InputStreamReader(System.in);
    br = new BufferedReader(isr);

    while (true) {
    System.out.println("请输入字符串:");
    String data = br.readLine();
    if ("e".equalsIgnoreCase(data) || "exit".equalsIgnoreCase(data)) {
    System.out.println("程序结束");
    break;
    }

    String upperCase = data.toUpperCase();
    System.out.println(upperCase);
    }
    } catch (IOException e) {
    e.printStackTrace();
    } finally {
    if (br != null) {
    try {
    br.close();
    } catch (IOException e) {
    e.printStackTrace();
    }
    }
    }
    }
    }
  • 模拟 Scanner:

    1
    2
    3
    4
    5
    6
    7
    8
    9
    10
    11
    12
    13
    14
    15
    16
    17
    18
    19
    20
    21
    22
    23
    24
    25
    26
    27
    28
    29
    30
    31
    32
    33
    34
    35
    36
    37
    38
    39
    40
    41
    42
    43
    44
    45
    46
    47
    48
    49
    50
    51
    52
    53
    54
    55
    56
    57
    58
    /**
    * MyInput.java: Contain the methods for reading int, double, float, boolean, short, byte and
    * string values from the keyboard
    */
    public class MyInput {
    // Read a string from the keyboard
    public static String readString() {
    BufferedReader br = new BufferedReader(new InputStreamReader(System.in));

    // Declare and initialize the string
    String string = "";

    // Get the string from the keyboard
    try {
    string = br.readLine();
    } catch (IOException ex) {
    System.out.println(ex);
    }

    // Return the string obtained from the keyboard
    return string;
    }

    // Read an int value from the keyboard
    public static int readInt() {
    return Integer.parseInt(readString());
    }

    // Read a double value from the keyboard
    public static double readDouble() {
    return Double.parseDouble(readString());
    }

    // Read a byte value from the keyboard
    public static double readByte() {
    return Byte.parseByte(readString());
    }

    // Read a short value from the keyboard
    public static double readShort() {
    return Short.parseShort(readString());
    }

    // Read a long value from the keyboard
    public static double readLong() {
    return Long.parseLong(readString());
    }

    // Read a float value from the keyboard
    public static double readFloat() {
    return Float.parseFloat(readString());
    }

    public static void main(String[] args) {
    int i = readInt();
    System.out.println("输出的数为:" + i);
    }
    }

处理流之四:打印流

  • 实现将基本数据类型的数据格式转化为字符串输出。

  • 打印流:PrintStream 和 PrintWriter。

    • 提供了一系列重载的 print()println(),用于多种数据类型的输出。
    • PrintStream 和 PrintWriter 的输出不会抛出 IOException 异常。
    • PrintStream 和 PrintWriter 有自动 flush 功能。
    • PrintStream 打印的所有字符都使用平台的默认字符编码转换为字节。在需要写入字符而不是写入字节的情况下,应该使用 PrintWriter 类。
    • System.out 返回的是 PrintStream 的实例。
  • 把标准输出流 (控制台输出) 改成文件:

    1
    2
    3
    4
    5
    6
    7
    8
    9
    10
    11
    12
    13
    14
    15
    16
    17
    18
    19
    20
    21
    22
    23
    24
    25
    26
    27
    28
    29
    30
    31
    32
    33
    34
    35
    36
    public class OtherStreamTest {
    /*
    2. 打印流:PrintStream 和PrintWriter
    2.1 提供了一系列重载的print()和println()
    2.2 练习:将ASCII字符输出到自定义的外部文件
    */
    @Test
    public void test2() {
    PrintStream ps = null;
    try {
    FileOutputStream fos = new FileOutputStream(new File("D:\\text.txt"));
    // 创建打印输出流,设置为自动刷新模式(写入换行符或字节 '\n' 时都会刷新输出缓冲区)
    ps = new PrintStream(fos, true);
    // 把标准输出流(控制台输出)改成输出到本地文件
    if (ps != null) {
    // 如果不设置,下面的循环输出是在控制台
    // 设置之后,控制台不再输出,而是输出到D:\text.txt
    System.setOut(ps);
    }

    // 开始输出ASCII字符
    for (int i = 0; i <= 255; i++) {
    System.out.print((char) i);
    if (i % 50 == 0) {// 每50个数据一行
    System.out.println();// 换行
    }
    }
    } catch (FileNotFoundException e) {
    e.printStackTrace();
    } finally {
    if (ps != null) {
    ps.close();
    }
    }
    }
    }

处理流之五:数据流

  • 为了方便地操作 Java 语言的基本数据类型和 String 类型的数据,可以使用数据流。(不能操作内存中的对象)

  • 数据流有两个类:分别用于读取和写出基本数据类型、String类的数据。

    • DataInputStream 和 DataOutputStream。
    • 分别套接在 InputStream 和 和 OutputStream 子类的流上。
    • 用 DataOutputStream 输出的文件需要用 DataInputStream 来读取。
    • DataInputStream 读取不同类型的数据的顺序,要与当初 DataOutputStream 写入文件时,保存的数据的顺序一致。
  • DataInputStream 中的方法:

    • boolean readBoolean()byte readByte()
    • char readChar()float readFloat()
    • double readDouble()short readShort()
    • long readLong()int readInt()
    • String readUTF()void readFully(byte[] b)
  • DataOutputStream 中的方法:

    • 将上述的方法的 read 改为相应的 write 即可。
  • 将内存中的字符串、基本数据类型的变量写出到文件中,再读取到内存中:

    1
    2
    3
    4
    5
    6
    7
    8
    9
    10
    11
    12
    13
    14
    15
    16
    17
    18
    19
    20
    21
    22
    23
    24
    25
    26
    27
    28
    29
    30
    31
    32
    33
    34
    35
    36
    37
    38
    39
    40
    41
    42
    43
    44
    45
    46
    47
    48
    49
    50
    51
    52
    53
    54
    55
    56
    57
    58
    59
    60
    61
    62
    63
    64
    65
    66
    67
    68
    public class OtherStreamTest {
    /*
    3. 数据流
    3.1 DataInputStream 和 DataOutputStream
    3.2 作用:用于读取或写出基本数据类型的变量或字符串
    练习:将内存中的字符串、基本数据类型的变量写出到文件中。
    注意:处理异常的话,仍然应该使用try-catch-finally。
    */
    @Test
    public void test3() {
    DataOutputStream dos = null;
    try {
    // 1.造流
    dos = new DataOutputStream(new FileOutputStream("data.txt"));

    // 2.写入操作
    dos.writeUTF("刘建辰");// 写入String
    dos.flush();// 刷新操作,将内存中的数据立即写入文件,也可以在关闭流时自动刷新
    dos.writeInt(23);// 写入int
    dos.flush();
    dos.writeBoolean(true);// 写入boolean
    dos.flush();
    } catch (IOException exception) {
    exception.printStackTrace();
    } finally {
    // 3.关闭流
    if (dos != null) {
    try {
    dos.close();
    } catch (IOException exception) {
    exception.printStackTrace();
    }
    }
    }
    }

    /*
    将文件中存储的基本数据类型变量和字符串读取到内存中,保存在变量中。
    注意点:读取不同类型的数据的顺序要与当初写入文件时,保存的数据的顺序一致!
    */
    @Test
    public void test4() {
    DataInputStream dis = null;
    try {
    // 1.造流
    dis = new DataInputStream(new FileInputStream("data.txt"));

    // 2.读取操作
    String name = dis.readUTF();// 读取String
    int age = dis.readInt();// 读取int
    boolean isMale = dis.readBoolean();// 读取boolean
    System.out.println("name = " + name);
    System.out.println("age = " + age);
    System.out.println("isMale = " + isMale);
    } catch (IOException exception) {
    exception.printStackTrace();
    } finally {
    // 3.关闭流
    if (dis!=null) {
    try {
    dis.close();
    } catch (IOException exception) {
    exception.printStackTrace();
    }
    }
    }
    }
    }

处理流之六:对象流

  • ObjectInputStream 和 OjbectOutputSteam:用于存储和读取基本数据类型数据或对象的处理流。它的强大之处就是可以把 Java 中的对象写入到数据源中,也能把对象从数据源中还原回来。

    • 一般情况下,会把对象转换为 Json 字符串,然后进行序列化和反序列化操作,而不是直接操作对象。
  • 序列化:用 ObjectOutputStream 类保存基本类型数据或对象的机制。

  • 反序列化:用 ObjectInputStream 类读取基本类型数据或对象的机制。

  • ObjectOutputStream 和 ObjectInputStream 不能序列化 static 和 transient 修饰的成员变量

    • 在序列化一个类的对象时,如果类中含有 static 和 transient 修饰的成员变量,则在反序列化时,这些成员变量的值会变成默认值,而不是序列化时这个对象赋予的值。比如,Person 类含有一个 static 修饰的 String name 属性,序列化时,对象把 name 赋值为张三,在反序列化时,name 会变为 null

      image-20210402151454756
  • 对象序列化机制允许把内存中的 Java 对象转换成平台无关的二进制流 (序列化操作),从而允许把这种二进制流持久地保存在磁盘上,或通过网络将这种二进制流传输到另一个网络节点。当其它程序获取了这种二进制流,就可以恢复成原来的 Java 对象 (反序列化操作)。

  • 序列化的好处在于可将任何实现了 Serializable 接口的对象转化为字节数据,使其在保存和传输时可被还原。

  • 序列化是 RMI (Remote Method Invoke – 远程方法调用) 过程的参数和返回值都必须实现的机制,而 RMI 是 JavaEE 的基础,因此序列化机制是 JavaEE 平台的基础。

  • 如果需要让某个对象支持序列化机制,则必须让对象所属的类及其属性是可序列化的,为了让某个类是可序列化的,该类必须实现如下两个接口之一。否则,会抛出 NotSerializableException 异常。

    • Serializable
    • Externalizable
  • 凡是实现 Serializable 接口的类都有一个表示序列化版本标识符的静态变量:

    • private static final long serialVersionUID;
    • serialVersionUID 用来表明类的不同版本间的兼容性。 简言之,其目的是以序列化对象进行版本控制,有关各版本反序列化时是否兼容。
    • 如果类没有显示定义这个静态常量,它的值是 Java 运行时环境根据类的内部细节自动生成的。此时,若类的实例变量做了修改,serialVersionUID 可能发生变化,则再对修改之前被序列化的类进行反序列化操作时,会操作失败。因此,建议显式声明 serialVersionUID。
      • 在某些场合,希望类的不同版本对序列化兼容,因此需要确保类的不同版本具有相同的 serialVersionUID;在某些场合,不希望类的不同版本对序列化兼容,因此需要确保类的不同版本具有不同的 serialVersionUID。
      • 当序列化了一个类实例后,后续可能更改一个字段或添加一个字段。如果不设置 serialVersionUID,所做的任何更改都将导致无法反序化旧有实例,并在反序列化时抛出一个异常;如果你添加了 serialVersionUID,在反序列旧有实例时,新添加或更改的字段值将设为初始化值 (对象为 null,基本类型为相应的初始默认值),字段被删除将不设置。
  • 简单来说,Java 的序列化机制是通过在运行时判断类的 serialVersionUID 来验证版本一致性的。在进行反序列化时,JVM 会把传来的字节流中的 serialVersionUID 与本地相应实体类的 serialVersionUID 进行比较,如果相同就认为是一致的,可以进行反序列化,否则就会出现序列化版本不一致的异常,即 InvalidCastException。

  • 若某个类实现了 Serializable 接口,该类的对象就是可序列化的:

    • 创建一个 ObjectOutputStream。
      • public ObjectOutputStream(OutputStream out): 创建一个指定 OutputStream 的 ObjectOutputStream。
    • 调用 ObjectOutputStream 对象的 writeObject(Object obj) 输出可序列化对象。
    • 注意写出一次,操作 flush() 一次。
  • 反序列化:

    • 创建一个 ObjectInputStream。
      • public ObjectInputStream(InputStream in): 创建一个指定 InputStream 的 ObjectInputStream。
    • 调用 readObject() 读取流中的对象。
  • 强调:如果某个类的属性不是基本数据类型或 String 类型,而是另一个引用类型,那么这个引用类型必须是可序列化的,否则拥有该类型的 Field 的类也不能序列化。

    • 默认情况下,基本数据类型是可序列化的。String 实现了 Serializable 接口。
  • 流程示意图:

    image-20210403215448069
  • 实例:

    1
    2
    3
    4
    5
    6
    7
    8
    9
    10
    11
    12
    13
    14
    15
    16
    17
    18
    19
    20
    21
    22
    23
    24
    25
    26
    27
    28
    29
    30
    31
    32
    33
    34
    35
    36
    37
    38
    39
    40
    41
    42
    43
    44
    45
    46
    47
    48
    49
    50
    51
    52
    53
    54
    55
    56
    57
    58
    59
    60
    61
    62
    63
    64
    65
    66
    67
    68
    69
    70
    71
    72
    73
    74
    75
    76
    77
    78
    79
    80
    81
    82
    83
    84
    85
    86
    87
    88
    89
    90
    91
    92
    93
    94
    95
    96
    97
    98
    99
    /**
    * Person需要满足如下的要求,方可序列化
    * 1.需要实现接口:Serializable
    * 2.当前类提供一个全局常量:serialVersionUID
    * 3.除了当前Person类需要实现Serializable接口之外,还必须保证其内部所有属性
    * 也必须是可序列化的。(默认情况下,基本数据类型可序列化)
    *
    * 补充:ObjectOutputStream和ObjectInputStream不能序列化static和transient修饰的成员变量
    */
    public class Person implements Serializable {

    public static final long serialVersionUID = 475463534532L;

    private String name;
    private int age;
    private int id;
    private Account acct;

    public Person() {

    }

    public Person(String name, int age) {
    this.name = name;
    this.age = age;
    }

    public Person(String name, int age, int id) {
    this.name = name;
    this.age = age;
    this.id = id;
    }

    public Person(String name, int age, int id, Account acct) {
    this.name = name;
    this.age = age;
    this.id = id;
    this.acct = acct;
    }

    @Override
    public String toString() {
    return "Person{" +
    "name='" + name + '\'' +
    ", age=" + age +
    ", id=" + id +
    ", acct=" + acct +
    '}';
    }

    public int getId() {
    return id;
    }

    public void setId(int id) {
    this.id = id;
    }

    public String getName() {
    return name;
    }

    public void setName(String name) {
    this.name = name;
    }

    public int getAge() {
    return age;
    }

    public void setAge(int age) {
    this.age = age;
    }
    }

    class Account implements Serializable {
    public static final long serialVersionUID = 4754534532L;

    private double balance;

    public Account(double balance) {
    this.balance = balance;
    }

    @Override
    public String toString() {
    return "Account{" +
    "balance=" + balance +
    '}';
    }

    public double getBalance() {
    return balance;
    }

    public void setBalance(double balance) {
    this.balance = balance;
    }
    }
    1
    2
    3
    4
    5
    6
    7
    8
    9
    10
    11
    12
    13
    14
    15
    16
    17
    18
    19
    20
    21
    22
    23
    24
    25
    26
    27
    28
    29
    30
    31
    32
    33
    34
    35
    36
    37
    38
    39
    40
    41
    42
    43
    44
    45
    46
    47
    48
    49
    50
    51
    52
    53
    54
    55
    56
    57
    58
    59
    60
    61
    62
    63
    64
    65
    66
    67
    68
    69
    70
    71
    72
    73
    74
    75
    76
    77
    78
    79
    80
    81
    82
    83
    84
    85
    /**
    * 对象流的使用
    * 1.ObjectInputStream 和 ObjectOutputStream
    * 2.作用:用于存储和读取基本数据类型数据或对象的处理流。它的强大之处就是可以把Java中的对象写入到数据源中,也能把对象从数据源中还原回来。
    *
    * 3.要想一个java对象是可序列化的,需要满足相应的要求。见Person.java
    *
    * 4.序列化机制:
    * 对象序列化机制允许把内存中的Java对象转换成平台无关的二进制流,从而允许把这种
    * 二进制流持久地保存在磁盘上,或通过网络将这种二进制流传输到另一个网络节点。
    * 当其它程序获取了这种二进制流,就可以恢复成原来的Java对象。
    */
    public class ObjectInputOutputStreamTest {
    /*
    序列化过程:将内存中的java对象保存到磁盘中或通过网络传输出去
    使用ObjectOutputStream实现
    */
    @Test
    public void testObjectOutputStream() {
    ObjectOutputStream oos = null;

    try {
    // 1.造流
    oos = new ObjectOutputStream(new FileOutputStream("object.dat"));

    // 2.序列化:写操作
    oos.writeObject(new String("我爱北京天安门"));
    oos.flush();// 刷新操作

    oos.writeObject(new Person("王铭", 23));
    oos.flush();

    oos.writeObject(new Person("张学", 23, 1001, new Account(5000)));
    oos.flush();
    } catch (IOException e) {
    e.printStackTrace();
    } finally {
    if (oos != null) {
    // 3.关闭流
    try {
    oos.close();
    } catch (IOException e) {
    e.printStackTrace();
    }
    }
    }
    }

    /*
    反序列化:将磁盘文件中的对象还原为内存中的一个java对象
    使用ObjectInputStream来实现
    */
    @Test
    public void testObjectInputStream() {
    ObjectInputStream ois = null;
    try {
    // 1.造流
    ois = new ObjectInputStream(new FileInputStream("object.dat"));

    // 2.反序列化:读操作
    // 文件中保存的是不同类型的对象,反序列化时,需要与序列化时的顺序一致
    Object obj = ois.readObject();
    String str = (String) obj;
    System.out.println(str);

    Person p = (Person) ois.readObject();
    System.out.println(p);

    Person p1 = (Person) ois.readObject();
    System.out.println(p1);
    } catch (IOException e) {
    e.printStackTrace();
    } catch (ClassNotFoundException e) {
    e.printStackTrace();
    } finally {
    if (ois != null) {
    try {
    ois.close();
    } catch (IOException e) {
    e.printStackTrace();
    }
    }
    }
    }
    }
  • 面试题:谈谈你对 java.io.Serializable 接口的理解,我们知道它用于序列化,是空方法接口,还有其它认识吗?

    • 实现了 Serializable 接口的对象,可将它们转换成一系列字节,并可在以后完全恢复回原来的样子。 这一过程亦可通过网络进行。这意味着序列化机制能自动补偿操作系统间的差异。换句话说,可以先在 Windows 机器上创台 建一个对象,对其序列化,然后通过网络发给一台 Unix 机器,然后在那里准确无误地重新“装配”。不必关心数据在不同机器上如何表示,也不必关心字节的顺序或者其他任何细节。
    • 由于大部分作为参数的类如 String 、Integer 等都实现了 java.io.Serializable 接口,也可以利用多态的性质,作为参数使接口更灵活。

随机存取文件流

  • RandomAccessFile 声明在 java.io 包下,但直接继承于 java.lang.Object 类。并且它实现了 DataInput、DataOutput 这两个接口,也就意味着这个类既可以读也可以写。

  • RandomAccessFile 类支持 “随机访问” 的方式,程序可以直接跳到文件的任意地方来读、写文件。

    • 支持只访问文件的部分内容。
    • 可以向已存在的文件后追加内容。
  • RandomAccessFile 对象包含一个记录指针,用以标示当前读写处的位置。RandomAccessFile 类对象可以自由移动记录指针:

    • long getFilePointer():获取文件记录指针的当前位置。
    • void seek(long pos):将文件记录指针定位到 pos 位置。
  • 构造器

    • public RandomAccessFile(File file, String mode)
    • public RandomAccessFile(String name, String mode)
  • 创建 RandomAccessFile 类实例需要指定一个 mode 参数,该参数指定 RandomAccessFile 的访问模式:

    • r:以只读方式打开。
    • rw:打开以便读取和写入。
    • rwd:打开以便读取和写入;同步文件内容的更新。
    • rws:打开以便读取和写入;同步文件内容和元数据的更新。
    • JDK 1.6 上面写的每次 write 数据时,rw 模式,数据不会立即写到硬盘中,而 rwd 模式,数据会被立即写入硬盘。如果写数据过程发生异常,rwd 模式中已被 write 的数据会被保存到硬盘,而 rw 模式的数据会全部丢失。
  • 如果模式为只读 r,则不会创建文件,而是会去读取一个已经存在的文件,如果读取的文件不存在则会出现异常。 如果模式为读写 rw,如果文件不存在则会去创建文件,如果存在则不会创建。

  • RandomAccessFile 的应用:我们可以用 RandomAccessFile 这个类,来实现一个多线程断点下载的功能,用过下载工具的朋友们都知道,下载前都会建立两个临时文件,一个是与被下载文件大小相同的空文件,另一个是记录文件指针的位置文件,每次暂停的时候,都会保存上一次的指针,然后断点下载的时候,会继续从上一次的地方下载,从而实现断点下载或上传的功能,有兴趣的朋友们可以自己实现下。

  • 实例:

    1
    2
    3
    4
    5
    6
    7
    8
    9
    10
    11
    12
    13
    14
    15
    16
    17
    18
    19
    20
    21
    22
    23
    24
    25
    26
    27
    28
    29
    30
    31
    32
    33
    34
    35
    36
    37
    38
    39
    40
    41
    42
    43
    44
    45
    46
    47
    48
    49
    50
    51
    52
    53
    54
    55
    56
    57
    58
    59
    60
    61
    62
    63
    64
    65
    66
    67
    68
    69
    70
    71
    72
    73
    74
    75
    76
    77
    78
    79
    80
    81
    82
    83
    84
    85
    86
    87
    88
    89
    90
    91
    92
    93
    94
    95
    96
    97
    98
    99
    100
    101
    102
    103
    104
    105
    106
    107
    108
    109
    110
    111
    112
    113
    114
    115
    116
    117
    118
    119
    120
    121
    122
    123
    124
    125
    126
    127
    128
    129
    130
    131
    132
    /**
    * RandomAccessFile的使用
    * 1.RandomAccessFile直接继承于java.lang.Object类,实现了DataInput和DataOutput接口
    * 2.RandomAccessFile既可以作为一个输入流,又可以作为一个输出流
    *
    * 3.如果RandomAccessFile作为输出流时,写出到的文件如果不存在,则在执行过程中自动创建。
    * 如果写出到的文件存在,则会对原有文件内容进行覆盖。(默认情况下,从头覆盖)
    *
    * 4. 可以通过相关的操作,实现RandomAccessFile“插入”数据的效果
    */
    public class RandomAccessFileTest {
    /*
    使用RandomAccessFile实现文件的复制
    */
    @Test
    public void test1() {
    RandomAccessFile raf1 = null;
    RandomAccessFile raf2 = null;
    try {
    // 1.造流
    raf1 = new RandomAccessFile(new File("爱情与友情.jpg"), "r");
    raf2 = new RandomAccessFile(new File("爱情与友情1.jpg"), "rw");

    // 2.读写操作
    byte[] buffer = new byte[1024];
    int len;
    while ((len = raf1.read(buffer)) != -1) {
    raf2.write(buffer, 0, len);
    }
    } catch (IOException e) {
    e.printStackTrace();
    } finally {
    // 3.关闭流
    if (raf1 != null) {
    try {
    raf1.close();
    } catch (IOException e) {
    e.printStackTrace();
    }
    }
    if (raf2 != null) {
    try {
    raf2.close();
    } catch (IOException e) {
    e.printStackTrace();
    }
    }
    }
    }

    /*
    使用RandomAccessFile实现文件内容的覆盖和追加
    */
    @Test
    public void test2() {
    RandomAccessFile raf1 = null;
    try {
    // hello.txt内容为:abcdefghijklmn
    File file = new File("hello.txt");
    raf1 = new RandomAccessFile(file, "rw");

    raf1.write("123".getBytes());// 从头开始覆盖:123defghijklmn
    raf1.seek(5);// 将指针调到角标为5的位置,角标从0开始
    raf1.write("456".getBytes());// 从角标为5处开始覆盖:123de456ijklmn
    raf1.seek(file.length());// 将指针调到文件末尾
    raf1.write("789".getBytes());// 在文件末尾追加:123de456ijklmn789
    } catch (IOException exception) {
    exception.printStackTrace();
    } finally {
    if (raf1 != null) {
    try {
    raf1.close();
    } catch (IOException exception) {
    exception.printStackTrace();
    }
    }
    }
    }

    /*
    使用RandomAccessFile实现数据的插入效果
    */
    @Test
    public void test3() {
    RandomAccessFile raf1 = null;
    try {
    // hello.txt内容为:abcdefghijklmn
    File file = new File("hello.txt");
    raf1 = new RandomAccessFile(file, "rw");

    // 将指针调到角标为3的位置,从此处开始读入文件的数据
    raf1.seek(3);

    // 方法一:保存指针3后面的所有数据到StringBuilder中
    /*StringBuilder builder = new StringBuilder((int) file.length());
    byte[] buffer = new byte[20];
    int len;
    while ((len = raf1.read(buffer)) != -1) {
    builder.append(new String(buffer, 0, len));
    }*/

    // 方法二:保存指针3后面的所有数据到ByteArrayOutputStream中
    ByteArrayOutputStream baos = new ByteArrayOutputStream();
    byte[] buffer = new byte[10];
    int len;
    while ((len = raf1.read(buffer)) != -1) {
    baos.write(buffer, 0, len);
    }

    // 经过上面的读操作后,指针位置移到了文件的末尾处
    // 调回指针,写入"123",实际上是覆盖原文件内容
    raf1.seek(3);
    raf1.write("123".getBytes());// abc123ghijklmn

    // 经过上面的写入操作,指针位置已到了123后,紧接着:
    // 方法一:将StringBuilder中的数据写入到文件中,实际上是覆盖123后的内容
    // raf1.write(builder.toString().getBytes());// abc123defghijklmn
    // 方法二:将ByteArrayOutputStream中的数据写入到文件中
    raf1.write(baos.toString().getBytes());// abc123defghijklmn
    } catch (IOException exception) {
    exception.printStackTrace();
    } finally {
    if (raf1 != null) {
    try {
    raf1.close();
    } catch (IOException exception) {
    exception.printStackTrace();
    }
    }
    }
    }
    }

流的基本应用小结

  • 流是用来处理数据的。
  • 处理数据时,一定要先明确数据源,与数据目的地:
    • 数据源可以是文件,可以是键盘。
    • 数据目的地可以是文件、显示器或者其他设备。
  • 流只是在帮助数据进行传输,并对传输的数据进行处理,比如过滤处理、转换处理等。

NIO.2 中 Path 、Paths 、Files

  • Java NIO (New IO 或 Non-Blocking IO) 是从 Java 1.4 版本开始引入的一套新的 IO API,可以替代标准的 Java IO API。NIO 与原来的 IO 有同样的作用和目的,但是使用的方式完全不同,NIO 支持面向缓冲区的 (IO是面向流的)、基于通道的 IO 操作,NIO 也会以更加高效的方式进行文件的读写操作。

  • Java API 中提供了两套 NIO,一套是针对标准输入输出 NIO,另一套就是网络编程 NIO。

    • |—– java.nio.channels.Channel
      • |—– FileChannel:处理本地文件。
        • |—– SocketChannel:TCP 网络编程的客户端的 Channel。
        • |—– ServerSocketChannel:TCP 网络编程的服务器端的 Channel。
        • |—– DatagramChannel:UDP 网络编程中发送端和接收端的 Channel。
  • 随着 JDK 7 的发布,Java 对 NIO 进行了极大的扩展,增强了对文件处理和文件系统特性的支持,以至于我们称他们为 NIO.2。因为 NIO 提供的一些功能,NIO 已经成为文件处理中越来越重要的部分。

  • 早期的 Java 只提供了一个 File 类来访问文件系统,但 File 类的功能比较有限,所提供的方法性能也不高。而且,大多数方法在出错时仅返回失败,并不会提供异常信息。

  • NIO. 2 为了弥补这种不足,引入了 Path 接口,代表一个平台无关的平台路径,描述了目录结构中文件的位置。Path 可以看成是 File 类的升级版本,实际引用的资源也可以不存在。

  • 在以前 IO 操作是类似如下写法的:

    1
    2
    3
    import java.io.File;

    File file = new File("index.html");
  • 但在 Java 7 中,我们可以这样写:

    1
    2
    3
    4
    import java.nio.file.Path;
    import java.nio.file.Paths;

    Path path = Paths.get("index.html");
  • 同时,NIO.2 在 java.nio.file 包下还提供了 Files、Paths 工具类,Files 包含了大量静态的工具方法来操作文件;Paths 则包含了两个返回 Path 的静态工厂方法。

  • Paths 类提供的获取 Path 对象的方法:

    • static Path get(String first, String … more):用于将多个字符串串连成路径。

    • static Path get(URI uri):返回指定 uri 对应的 Path 路径。

      1
      2
      3
      4
      5
      6
      7
      8
      9
      10
      11
      12
      13
      14
      15
      16
      public class PathTest {
      /*
      如何使用Paths实例化Path
      */
      @Test
      public void test1() {
      Path path1 = Paths.get("d:\\nio\\hello.txt");// = new File(String filepath)
      System.out.println(path1);

      Path path2 = Paths.get("d:\\", "nio\\hello.txt");// = new File(String parent,String filename);
      System.out.println(path2);

      Path path3 = Paths.get("d:\\", "nio");
      System.out.println(path3);
      }
      }
  • Path 类常用方法:

    • String toString():返回调用 Path 对象的字符串表示形式。

    • boolean startsWith(String path):判断是否以 path 路径开始。

    • boolean endsWith(String path):判断是否以 path 路径结束。

    • boolean isAbsolute():判断是否是绝对路径。

    • Path getParent():返回 Path 对象包含整个路径,不包含 Path 对象指定的文件路径。

    • Path getRoot():返回调用 Path 对象的根路径。

    • Path getFileName():返回与调用 Path 对象关联的文件名。

    • int getNameCount():返回 Path 根目录后面元素的数量。

    • Path getName(int idx):返回指定索引位置 idx 的路径名称。

    • Path toAbsolutePath():作为绝对路径返回调用 Path 对象。

    • Path resolve(Path p):合并两个路径,返回合并后的路径对应的 Path 对象。

    • File toFile():将 Path 转化为 File 类的对象。File 类转化为 Path 对象的方法是:Path toPath()

      1
      2
      3
      4
      5
      6
      7
      8
      9
      10
      11
      12
      13
      14
      15
      16
      17
      18
      19
      20
      21
      22
      23
      24
      25
      26
      27
      28
      29
      30
      31
      32
      33
      34
      35
      36
      37
      38
      39
      40
      41
      42
      43
      44
      45
      46
      47
      48
      49
      50
      public class PathTest {
      /*
      Path中的常用方法
      */
      @Test
      public void test2() {
      Path path1 = Paths.get("d:\\", "nio\\nio1\\nio2\\hello.txt");
      Path path2 = Paths.get("hello1.txt");// 相对当前Module的路径

      // String toString():返回调用Path对象的字符串表示形式
      System.out.println(path1);// d:\nio\nio1\nio2\hello.txt
      // boolean startsWith(String path): 判断是否以path路径开始
      System.out.println(path1.startsWith("d:\\nio"));// true
      // boolean endsWith(String path): 判断是否以path路径结束
      System.out.println(path1.endsWith("hello.txt"));// true
      // boolean isAbsolute(): 判断是否是绝对路径
      System.out.println(path1.isAbsolute() + "~");// true~
      System.out.println(path2.isAbsolute() + "~");// false~
      // Path getParent():返回Path对象包含整个路径,不包含Path对象指定的文件路径
      System.out.println(path1.getParent());// d:\nio\nio1\nio2
      System.out.println(path2.getParent());// null
      // Path getRoot():返回调用Path对象的根路径
      System.out.println(path1.getRoot());// d:\
      System.out.println(path2.getRoot());// null
      // Path getFileName(): 返回与调用Path对象关联的文件名
      System.out.println(path1.getFileName() + "~");// hello.txt~
      System.out.println(path2.getFileName() + "~");// hello1.txt~
      // int getNameCount(): 返回Path根目录后面元素的数量
      // Path getName(int idx): 返回指定索引位置idx的路径名称
      for (int i = 0; i < path1.getNameCount(); i++) {
      // nio*****nio1*****nio2*****hello.txt*****
      System.out.print(path1.getName(i) + "*****");
      }
      System.out.println();

      // Path toAbsolutePath(): 作为绝对路径返回调用Path对象
      System.out.println(path1.toAbsolutePath());// d:\nio\nio1\nio2\hello.txt
      System.out.println(path2.toAbsolutePath());// D:\xisun-projects\java_base\hello1.txt
      // Path resolve(Path p): 合并两个路径,返回合并后的路径对应的Path对象
      Path path3 = Paths.get("d:\\", "nio");
      Path path4 = Paths.get("nioo\\hi.txt");
      path3 = path3.resolve(path4);
      System.out.println(path3);// d:\nio\nioo\hi.txt

      // File toFile(): 将Path转化为File类的对象
      File file = path1.toFile();// Path--->File的转换
      // Path toPath(): 将File转化为Path类的对象
      Path newPath = file.toPath();// File--->Path的转换
      }
      }
  • java.nio.file.Files:用于操作文件或目录的工具类。

  • Files 常用方法:

    • Path copy(Path src, Path dest, CopyOption … how):文件的复制。

    • Path createDirectory(Path path, FileAttribute<?> … attr):创建一个目录。

    • Path createFile(Path path, FileAttribute<?> … arr):创建一个文件。

    • void delete(Path path):删除一个文件/目录,如果不存在,执行报错。

    • void deleteIfExists(Path path):Path 对应的文件/目录如果存在,执行删除。

    • Path move(Path src, Path dest, CopyOption…how):将 src 移动到 dest 位置。

    • long size(Path path):返回 path 指定文件的大小。

    • boolean exists(Path path, LinkOption … opts):判断文件是否存在。

    • boolean isDirectory(Path path, LinkOption … opts):判断是否是目录。

    • boolean isRegularFile(Path path, LinkOption … opts):判断是否是文件。

    • boolean isHidden(Path path):判断是否是隐藏文件。

    • boolean isReadable(Path path):判断文件是否可读。

    • boolean isWritable(Path path):判断文件是否可写。

    • boolean notExists(Path path, LinkOption … opts):判断文件是否不存在。

    • SeekableByteChannel newByteChannel(Path path, OpenOption…how):获取与指定文件的连接,how 指定打开方式。

    • DirectoryStream\<Path> newDirectoryStream(Path path):打开 path 指定的目录。

    • InputStream newInputStream(Path path, OpenOption…how):获取 InputStream 对象。

    • OutputStream newOutputStream(Path path, OpenOption…how):获取 OutputStream 对象。

      1
      2
      3
      4
      5
      6
      7
      8
      9
      10
      11
      12
      13
      14
      15
      16
      17
      18
      19
      20
      21
      22
      23
      24
      25
      26
      27
      28
      29
      30
      31
      32
      33
      34
      35
      36
      37
      38
      39
      40
      41
      42
      43
      44
      45
      46
      47
      48
      49
      50
      51
      52
      53
      54
      55
      56
      57
      58
      59
      60
      61
      62
      63
      64
      65
      66
      67
      68
      69
      70
      71
      72
      73
      74
      75
      76
      77
      78
      79
      80
      81
      82
      83
      84
      85
      86
      87
      88
      89
      90
      91
      92
      public class FilesTest {
      @Test
      public void test1() throws IOException {
      Path path1 = Paths.get("d:\\nio", "hello.txt");
      Path path2 = Paths.get("atguigu.txt");

      // Path copy(Path src, Path dest, CopyOption … how): 文件的复制
      // 要想复制成功,要求path1对应的物理上的文件存在。path2 对应的文件没有要求。
      // Files.copy(path1, path2, StandardCopyOption.REPLACE_EXISTING);

      // Path createDirectory(Path path, FileAttribute<?> … attr): 创建一个目录
      // 要想执行成功,要求path对应的物理上的文件目录不存在。一旦存在,抛出异常。
      Path path3 = Paths.get("d:\\nio\\nio1");
      // Files.createDirectory(path3);

      // Path createFile(Path path, FileAttribute<?> … arr): 创建一个文件
      // 要想执行成功,要求path对应的物理上的文件不存在。一旦存在,抛出异常。
      Path path4 = Paths.get("d:\\nio\\hi.txt");
      // Files.createFile(path4);

      // void delete(Path path): 删除一个文件/目录,如果不存在,执行报错
      // Files.delete(path4);

      // void deleteIfExists(Path path): Path对应的文件/目录如果存在,执行删除。如果不存在,正常执行结束
      Files.deleteIfExists(path3);

      // Path move(Path src, Path dest, CopyOption…how): 将src移动到dest位置
      // 要想执行成功,src对应的物理上的文件需要存在,dest对应的文件没有要求。
      // Files.move(path1, path2, StandardCopyOption.ATOMIC_MOVE);

      // long size(Path path): 返回path指定文件的大小
      long size = Files.size(path2);
      System.out.println(size);
      }

      @Test
      public void test2() throws IOException {
      Path path1 = Paths.get("d:\\nio", "hello.txt");
      Path path2 = Paths.get("atguigu.txt");

      // boolean exists(Path path, LinkOption … opts): 判断文件是否存在
      System.out.println(Files.exists(path2, LinkOption.NOFOLLOW_LINKS));

      // boolean isDirectory(Path path, LinkOption … opts): 判断是否是目录
      // 不要求此path对应的物理文件存在。
      System.out.println(Files.isDirectory(path1, LinkOption.NOFOLLOW_LINKS));

      // boolean isRegularFile(Path path, LinkOption … opts): 判断是否是文件

      // /boolean isHidden(Path path): 判断是否是隐藏文件
      // 要求此path对应的物理上的文件需要存在。才可判断是否隐藏。否则,抛异常。
      System.out.println(Files.isHidden(path1));

      // /boolean isReadable(Path path): 判断文件是否可读
      System.out.println(Files.isReadable(path1));
      // boolean isWritable(Path path): 判断文件是否可写
      System.out.println(Files.isWritable(path1));
      // boolean notExists(Path path, LinkOption … opts): 判断文件是否不存在
      System.out.println(Files.notExists(path1, LinkOption.NOFOLLOW_LINKS));
      }

      /**
      * StandardOpenOption.READ: 表示对应的Channel是可读的。
      * StandardOpenOption.WRITE:表示对应的Channel是可写的。
      * StandardOpenOption.CREATE:如果要写出的文件不存在,则创建。如果存在,忽略
      * StandardOpenOption.CREATE_NEW:如果要写出的文件不存在,则创建。如果存在,抛异常
      *
      * @throws IOException
      */
      @Test
      public void test3() throws IOException {
      Path path1 = Paths.get("d:\\nio", "hello.txt");

      // InputStream newInputStream(Path path, OpenOption…how): 获取InputStream对象
      InputStream inputStream = Files.newInputStream(path1, StandardOpenOption.READ);

      // OutputStream newOutputStream(Path path, OpenOption…how): 获取OutputStream对象
      OutputStream outputStream = Files.newOutputStream(path1, StandardOpenOption.WRITE, StandardOpenOption.CREATE);

      // SeekableByteChannel newByteChannel(Path path, OpenOption…how): 获取与指定文件的连接,how指定打开方式
      SeekableByteChannel channel = Files.newByteChannel(path1, StandardOpenOption.READ,
      StandardOpenOption.WRITE, StandardOpenOption.CREATE);

      // DirectoryStream<Path> newDirectoryStream(Path path): 打开path指定的目录
      Path path2 = Paths.get("e:\\teach");
      DirectoryStream<Path> directoryStream = Files.newDirectoryStream(path2);
      Iterator<Path> iterator = directoryStream.iterator();
      while (iterator.hasNext()) {
      System.out.println(iterator.next());
      }
      }
      }

FileUtils 工具类

  • Maven 引入依赖:

    1
    2
    3
    4
    5
    <dependency>
    <groupId>commons-io</groupId>
    <artifactId>commons-io</artifactId>
    <version>2.7</version>
    </dependency>
  • 复制功能:

    1
    2
    3
    4
    5
    6
    7
    8
    9
    10
    11
    12
    public class FileUtilsTest {
    public static void main(String[] args) {
    File srcFile = new File("day10\\爱情与友情.jpg");
    File destFile = new File("day10\\爱情与友情2.jpg");

    try {
    FileUtils.copyFile(srcFile, destFile);
    } catch (IOException e) {
    e.printStackTrace();
    }
    }
    }
  • 遍历文件夹和文件的每一行:

    1
    2
    3
    4
    5
    6
    7
    8
    9
    10
    11
    12
    13
    14
    15
    16
    17
    18
    19
    20
    21
    22
    23
    24
    25
    26
    27
    28
    29
    30
    31
    32
    33
    34
    35
    36
    37
    38
    39
    40
    41
    42
    43
    44
    45
    46
    47
    48
    49
    50
    51
    52
    53
    54
    55
    56
    57
    58
    59
    60
    61
    62
    63
    64
    65
    66
    67
    68
    69
    70
    71
    72
    73
    74
    75
    76
    77
    78
    79
    80
    81
    82
    83
    84
    85
    86
    87
    public class FileUtilsMethod {
    /**
    * 常规方法:若文件路径内的文件比较少,可以采用此方法
    *
    * @param filePath 文件路径
    */
    public static void common(String filePath) {
    File file = new File(filePath);
    if (file.exists()) {
    // 获取子文件夹内所有文件,放到文件数组里,如果含有大量文件,会创建一个很大的数组,占用空间
    File[] fileList = file.listFiles();
    for (File currentFile : fileList) {
    // 当前文件是普通文件(排除文件夹),且不是隐藏文件
    if (currentFile.isFile() && !currentFile.isHidden()) {
    // 当前文件的完整路径,含文件名
    String currentFilePath = currentFile.getPath();
    if (currentFilePath.endsWith("xml") || currentFilePath.endsWith("XML")) {
    // 当前文件的文件名,含后缀
    String fileName = currentFile.getName();
    System.out.println("文件名:" + fileName);
    }
    }
    }
    System.out.println("=======================================");
    // list方法返回的是文件名的String数组
    String[] fileNameList = file.list();
    for (String fileName : fileNameList) {
    System.out.println("文件名:" + fileName);
    }
    }
    }

    /**
    * 根据文件路径,迭代获取该路径下指定文件后缀类型的文件:若文件路径内含有大量文件,建议采用此方法
    *
    * @param filePath 文件路径
    */
    public static void iterateFiles(String filePath) {
    File file = FileUtils.getFile(filePath);

    if (file.isDirectory()) {
    Iterator<File> fileIterator = FileUtils.iterateFiles(file, new String[]{"xml", "XML"}, false);

    while (fileIterator.hasNext()) {
    File currentFile = fileIterator.next();

    if (currentFile.isFile() && !currentFile.isHidden()) {
    // 绝对路径
    String currentFilePath = currentFile.getAbsolutePath();
    System.out.println("绝对路径:" + currentFilePath);
    // 文件名,含文件后缀
    String fileName = currentFilePath.substring(currentFilePath.lastIndexOf("\\") + 1);
    System.out.println("含后缀文件名:" + fileName);
    // 文件名,不含文件后缀
    fileName = fileName.substring(0, fileName.lastIndexOf("."));
    System.out.println("不含后缀文件名:" + fileName);
    }
    }
    }
    }

    /**
    * 读取目标文件每一行数据,返回List:若文件内容较少,可以采用此方法
    *
    * @param filePath 文件路径
    * @throws IOException
    */
    public static void readLinesForList(String filePath) throws IOException {
    List<String> linesList = FileUtils.readLines(new File(filePath), "utf-8");
    for (String line : linesList) {
    System.out.println(line);
    }
    }

    /**
    * 读取目标文件每一行数据,返回迭代器:若文件内容较多,建议采用此方法
    *
    * @param filePath 文件路径
    * @throws IOException
    */
    public static void readLinesForIterator(String filePath) throws IOException {
    LineIterator lineIterator = FileUtils.lineIterator(new File(filePath), "utf-8");
    while (lineIterator.hasNext()) {
    System.out.println(lineIterator.next());
    }
    }
    }

本文参考

https://www.gulixueyuan.com/goods/show/203?targetId=309&preview=0

https://juejin.cn/post/6844903985078337550#heading-55

声明:写作本文初衷是个人学习记录,鉴于本人学识有限,如有侵权或不当之处,请联系 wdshfut@163.com

紧接着上篇文章,这篇文章讲述 consumer 提供的 offset commit 机制和 partition 分配机制,具体如何使用是需要用户结合具体的场景进行选择,本文讲述一下其底层实现。

自动 offset commit 机制

1
2
3
4
// 自动提交,默认true
props.put("enable.auto.commit", "true");
// 设置自动每1s提交一次,默认为5s
props.put("auto.commit.interval.ms", "1000");

通过上面设置,启动自动提交 offset 以及设置自动提交间隔时间。

手动 offset commit 机制

先看下两种不同的手动 offset commit 机制,一种是同步 commit,一种是异步 commit,既然其作用都是 offset commit,应该不难猜到它们底层使用接口都是一样的,其调用流程如下图所示:

image-20201124154403249

同步 commit

1
2
3
4
5
6
7
// 对poll()中返回的所有topics和partition列表进行commit
// 这个方法只能将offset提交Kafka中,Kafka将会在每次rebalance之后的第一次拉取或启动时使用同步commit
// 这是同步commit,它将会阻塞进程,直到commit成功或者遇到一些错误
public void commitSync() {}

// 只对指定的topic-partition列表进行commit
public void commitSync(final Map<TopicPartition, OffsetAndMetadata> offsets) {}

其实,从上图中,就已经可以看出,同步 commit 的实现方式,client.poll () 方法会阻塞直到这个 request 完成或超时才会返回。

异步 commit

1
2
3
4
5
public void commitAsync() {}

public void commitAsync(OffsetCommitCallback callback) {}

public void commitAsync(final Map<TopicPartition, OffsetAndMetadata> offsets, OffsetCommitCallback callback) {}

对于异步的 commit,最后调用的都是 doCommitOffsetsAsync () 方法,其具体实现如下:

1
2
3
4
5
6
7
8
9
10
11
12
13
14
15
16
17
18
19
20
21
22
23
24
25
26
27
28
private void doCommitOffsetsAsync(final Map<TopicPartition, OffsetAndMetadata> offsets, final OffsetCommitCallback callback) {
// 发送offset-commit请求
RequestFuture<Void> future = sendOffsetCommitRequest(offsets);
final OffsetCommitCallback cb = callback == null ? defaultOffsetCommitCallback : callback;
future.addListener(new RequestFutureListener<Void>() {
@Override
public void onSuccess(Void value) {
if (interceptors != null)
interceptors.onCommit(offsets);
// 添加成功的请求,以唤醒相应的回调函数
completedOffsetCommits.add(new OffsetCommitCompletion(cb, offsets, null));
}

@Override
public void onFailure(RuntimeException e) {
Exception commitException = e;

if (e instanceof RetriableException) {
commitException = new RetriableCommitFailedException(e);
}
// 添加失败的请求,以唤醒相应的回调函数
completedOffsetCommits.add(new OffsetCommitCompletion(cb, offsets, commitException));
if (commitException instanceof FencedInstanceIdException) {
asyncCommitFenced.set(true);
}
}
});
}

在异步 commit 中,可以添加相应的回调函数,如果 request 处理成功或处理失败,ConsumerCoordinator 会通过 invokeCompletedOffsetCommitCallbacks () 方法唤醒相应的回调函数。

上面简单的介绍了同步 commit 和异步 commit,更详细的分析参考:Kafka consumer 的 offset 的提交方式

注意:手动 commit 时,提交的是下一次要读取的 offset。举例如下:

1
2
3
4
5
6
7
8
9
10
11
12
13
14
15
16
17
18
19
20
try {
while(running) {
// 取得消息
ConsumerRecords<String, String> records = consumer.poll(Long.MAX_VALUE);
// 根据分区来遍历数据
for (TopicPartition partition : records.partitions()) {
List<ConsumerRecord<String, String>> partitionRecords = records.records(partition);
// 数据处理
for (ConsumerRecord<String, String> record : partitionRecords) {
System.out.println(record.offset() + ": " + record.value());
}
// 取得当前读取到的最后一条记录的offset
long lastOffset = partitionRecords.get(partitionRecords.size() - 1).offset();
// 提交offset,记得要 + 1
consumer.commitSync(Collections.singletonMap(partition, new OffsetAndMetadata(lastOffset + 1)));
}
}
} finally {
consumer.close();
}

commit offset 请求的处理

当 Kafka Server 端接收到来自 client 端的 offset commit 请求时,对于提交的 offset,GroupCoordinator 会记录在 GroupMetadata 对象中,至于其实现的逻辑细节,此处不再赘述。

partition 分配机制

consumer 提供了三种不同的 partition 分配策略,可以通过 partition.assignment.strategy 参数进行配置,默认情况下使用的是 org.apache.kafka.clients.consumer.RangeAssignor,Kafka 中提供了另外两种 partition 的分配策略 org.apache.kafka.clients.consumer.RoundRobinAssignororg.apache.kafka.clients.consumer.StickyAssignor,它们关系如下图所示:

image-20201124162306959

通过上图可以看出,用户可以自定义相应的 partition 分配机制,只需要继承这个 AbstractPartitionAssignor 抽象类即可。

partition 分配策略,其实也就是 reblance 策略。

AbstractPartitionAssignor

AbstractPartitionAssignor 有一个抽象方法,如下所示:

1
2
3
4
5
6
7
8
9
10
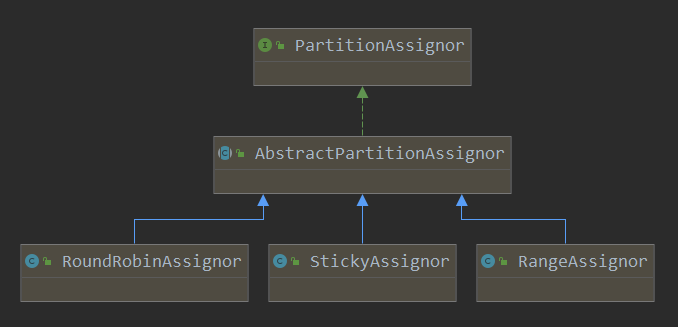
/**
* Perform the group assignment given the partition counts and member subscriptions
* @param partitionsPerTopic The number of partitions for each subscribed topic. Topics not in metadata will be excluded
* from this map.
* @param subscriptions Map from the memberId to their respective topic subscription
* @return Map from each member to the list of partitions assigned to them.
*/
// 根据partitionsPerTopic和subscriptions进行分配,具体的实现会在子类中实现(不同的子类,其实现方法不相同)
public abstract Map<String, List<TopicPartition>> assign(Map<String, Integer> partitionsPerTopic,
Map<String, Subscription> subscriptions);

assign () 这个方法,有两个参数:

  • partitionsPerTopic:所订阅的每个 topic 与其 partition 数的对应关系,metadata 没有的 topic 将会被移除;
  • subscriptions:每个 consumerId 与其所订阅的 topic 列表的关系。

继承 AbstractPartitionAssignor 的子类,通过实现 assign () 方法,来进行相应的 partition 分配。

RangeAssignor 分配模式

assign () 方法的实现如下:

1
2
3
4
5
6
7
8
9
10
11
12
13
14
15
16
17
18
19
20
21
22
23
24
25
26
27
28
29
30
31
32
33
34
35
36
37
38
39
40
41
42
@Override
public Map<String, List<TopicPartition>> assign(Map<String, Integer> partitionsPerTopic,
Map<String, Subscription> subscriptions) {
// 1.参数含义:(topic, List<consumerId>),获取每个topic被多少个consumer订阅了
Map<String, List<String>> consumersPerTopic = consumersPerTopic(subscriptions);
// 2.存储最终的分配方案
Map<String, List<TopicPartition>> assignment = new HashMap<>();
for (String memberId : subscriptions.keySet())
assignment.put(memberId, new ArrayList<>());

for (Map.Entry<String, List<String>> topicEntry : consumersPerTopic.entrySet()) {
String topic = topicEntry.getKey();
List<String> consumersForTopic = topicEntry.getValue();

// 3.每个topic的partition数量
Integer numPartitionsForTopic = partitionsPerTopic.get(topic);
if (numPartitionsForTopic == null)
continue;

Collections.sort(consumersForTopic);

// 4.取商,表示平均每个consumer会分配到多少个partition
int numPartitionsPerConsumer = numPartitionsForTopic / consumersForTopic.size();
// 5.取余,表示平均分配后还剩下多少个partition未被分配
int consumersWithExtraPartition = numPartitionsForTopic % consumersForTopic.size();

List<TopicPartition> partitions = AbstractPartitionAssignor.partitions(topic, numPartitionsForTopic);
// 6.这里是关键点,分配原则是将未能被平均分配的partition分配到前consumersWithExtraPartition个consumer
for (int i = 0, n = consumersForTopic.size(); i < n; i++) {
// 假设partition有7个,consumer有5个,则numPartitionsPerConsumer=1,consumersWithExtraPartition=2
// i=0, start: 0, length: 2, topic-partition: p0, p1
// i=1, start: 2, length: 2, topic-partition: p2, p3
// i=2, start: 4, length: 1, topic-partition: p4
// i=3, start: 5, length: 1, topic-partition: p5
// i=4, start: 6, length: 1, topic-partition: p6
int start = numPartitionsPerConsumer * i + Math.min(i, consumersWithExtraPartition);
int length = numPartitionsPerConsumer + (i + 1 > consumersWithExtraPartition ? 0 : 1);
assignment.get(consumersForTopic.get(i)).addAll(partitions.subList(start, start + length));
}
}
return assignment;
}

假设 topic 的 partition 数为 numPartitionsForTopic,group 中订阅这个 topic 的 member 数为 consumersForTopic.size(),首先需要算出两个值:

  • numPartitionsPerConsumer = numPartitionsForTopic / consumersForTopic.size():表示平均每个 consumer 会分配到几个 partition;
  • consumersWithExtraPartition = numPartitionsForTopic % consumersForTopic.size():表示平均分配后还剩下多少个 partition 未分配。

分配的规则是:对于剩下的那些 partition 分配到前 consumersWithExtraPartition 个 consumer 上,也就是前 consumersWithExtraPartition 个 consumer 获得 topic-partition 列表会比后面多一个。

在上述的程序中,举了一个例子,假设有一个 topic 有 7 个 partition,group 有5个 consumer,这个5个 consumer 都订阅这个 topic,那么 range 的分配方式如下:

消费者 分配方案
consumer 0 start: 0, length: 2, topic-partition: p0, p1
consumer 1 start: 2, length: 2, topic-partition: p2, p3
consumer 2 start: 4, length: 1, topic-partition: p4
consumer 3 start: 5, length: 1, topic-partition: p5
consumer 4 start: 6, length: 1, topic-partition: p6

而如果 group 中有 consumer 没有订阅这个 topic,那么这个 consumer 将不会参与分配。下面再举个例子,假设有 2 个 topic,一个有 5 个 partition,另一个有 7 个 partition,group 中有 5 个 consumer,但是只有前 3 个订阅第一个 topic,而另一个 topic 是所有 consumer 都订阅了,那么其分配结果如下:

consumer 订阅 topic1 的列表 订阅 topic2 的列表
consumer 0 t1 p0, t1 p1 t2 p0, t2 p1
consumer 1 t1 p2, t1 p3 t2 p2, t2 p3
consumer 2 t1 p4 t2 p4
consumer 3 t2 p5
consumer 4 t2 p6

RoundRobinAssignor

assign () 方法的实现如下:

1
2
3
4
5
6
7
8
9
10
11
12
13
14
15
16
17
18
19
20
21
22
23
24
25
26
27
28
29
30
31
32
33
34
35
36
@Override
public Map<String, List<TopicPartition>> assign(Map<String, Integer> partitionsPerTopic,
Map<String, Subscription> subscriptions) {
Map<String, List<TopicPartition>> assignment = new HashMap<>();
for (String memberId : subscriptions.keySet())
assignment.put(memberId, new ArrayList<>());

// 环状链表,存储所有的consumer,一次迭代完之后又会回到原点
CircularIterator<String> assigner = new CircularIterator<>(Utils.sorted(subscriptions.keySet()));
// 获取所有订阅的topic的partition总数
for (TopicPartition partition : allPartitionsSorted(partitionsPerTopic, subscriptions)) {
final String topic = partition.topic();
while (!subscriptions.get(assigner.peek()).topics().contains(topic))
assigner.next();
assignment.get(assigner.next()).add(partition);
}
return assignment;
}

public List<TopicPartition> allPartitionsSorted(Map<String, Integer> partitionsPerTopic,
Map<String, Subscription> subscriptions) {
// 所有的topics(有序)
SortedSet<String> topics = new TreeSet<>();
for (Subscription subscription : subscriptions.values())
topics.addAll(subscription.topics());

// 订阅的Topic的所有的TopicPartition集合
List<TopicPartition> allPartitions = new ArrayList<>();
for (String topic : topics) {
Integer numPartitionsForTopic = partitionsPerTopic.get(topic);
if (numPartitionsForTopic != null)
// topic的所有partition都添加进去
allPartitions.addAll(AbstractPartitionAssignor.partitions(topic, numPartitionsForTopic));
}
return allPartitions;
}

Round Robin 的实现原则,简单来说就是:列出所有 topic-partition 和列出所有的 consumer member,然后开始分配,一轮之后继续下一轮,假设有一个 topic,它有7个 partition,group 中有 3 个 consumer 都订阅了这个 topic,那么其分配方式为:

消费者 分配列表
consumer 0 p0, p3, p6
consumer 1 p1, p4
consumer 2 p2, p5

对于多个 topic 的订阅,假设有 2 个 topic,一个有 5 个 partition,一个有 7 个 partition,group 中有 5 个 consumer,但是只有前 3 个订阅第一个 topic,而另一个 topic 是所有 consumer 都订阅了,那么其分配结果如下:

消费者 订阅 topic1 的列表 订阅的 topic2 的列表
consumer 0 t1 p0, t1 p3 t2 p0, t2 p5
consumer 1 t1 p1, t1 p4 t2 p1, t2 p6
consumer 2 t1 p2 t2 p2
consumer 3 t2 p3
consumer 4 t2 p4

StickyAssignor

assign () 方法的实现如下:

1
2
3
4
5
6
7
8
9
10
11
12
13
14
15
16
17
18
19
20
21
22
23
24
25
26
27
28
29
30
31
32
33
34
35
36
37
38
39
40
41
42
43
44
45
46
47
48
49
50
51
52
53
54
55
56
57
58
59
60
61
62
63
64
65
66
67
68
69
70
71
72
73
74
75
76
77
78
79
80
81
82
83
84
85
86
public Map<String, List<TopicPartition>> assign(Map<String, Integer> partitionsPerTopic,
Map<String, Subscription> subscriptions) {
Map<String, List<TopicPartition>> currentAssignment = new HashMap<>();
Map<TopicPartition, ConsumerGenerationPair> prevAssignment = new HashMap<>();
partitionMovements = new PartitionMovements();

prepopulateCurrentAssignments(subscriptions, currentAssignment, prevAssignment);
boolean isFreshAssignment = currentAssignment.isEmpty();

// a mapping of all topic partitions to all consumers that can be assigned to them
final Map<TopicPartition, List<String>> partition2AllPotentialConsumers = new HashMap<>();
// a mapping of all consumers to all potential topic partitions that can be assigned to them
final Map<String, List<TopicPartition>> consumer2AllPotentialPartitions = new HashMap<>();

// initialize partition2AllPotentialConsumers and consumer2AllPotentialPartitions in the following two for loops
for (Entry<String, Integer> entry: partitionsPerTopic.entrySet()) {
for (int i = 0; i < entry.getValue(); ++i)
partition2AllPotentialConsumers.put(new TopicPartition(entry.getKey(), i), new ArrayList<>());
}

for (Entry<String, Subscription> entry: subscriptions.entrySet()) {
String consumer = entry.getKey();
consumer2AllPotentialPartitions.put(consumer, new ArrayList<>());
entry.getValue().topics().stream().filter(topic -> partitionsPerTopic.get(topic) != null).forEach(topic -> {
for (int i = 0; i < partitionsPerTopic.get(topic); ++i) {
TopicPartition topicPartition = new TopicPartition(topic, i);
consumer2AllPotentialPartitions.get(consumer).add(topicPartition);
partition2AllPotentialConsumers.get(topicPartition).add(consumer);
}
});

// add this consumer to currentAssignment (with an empty topic partition assignment) if it does not already exist
if (!currentAssignment.containsKey(consumer))
currentAssignment.put(consumer, new ArrayList<>());
}

// a mapping of partition to current consumer
Map<TopicPartition, String> currentPartitionConsumer = new HashMap<>();
for (Map.Entry<String, List<TopicPartition>> entry: currentAssignment.entrySet())
for (TopicPartition topicPartition: entry.getValue())
currentPartitionConsumer.put(topicPartition, entry.getKey());

List<TopicPartition> sortedPartitions = sortPartitions(
currentAssignment, prevAssignment.keySet(), isFreshAssignment, partition2AllPotentialConsumers, consumer2AllPotentialPartitions);

// all partitions that need to be assigned (initially set to all partitions but adjusted in the following loop)
List<TopicPartition> unassignedPartitions = new ArrayList<>(sortedPartitions);
for (Iterator<Map.Entry<String, List<TopicPartition>>> it = currentAssignment.entrySet().iterator(); it.hasNext();) {
Map.Entry<String, List<TopicPartition>> entry = it.next();
if (!subscriptions.containsKey(entry.getKey())) {
// if a consumer that existed before (and had some partition assignments) is now removed, remove it from currentAssignment
for (TopicPartition topicPartition: entry.getValue())
currentPartitionConsumer.remove(topicPartition);
it.remove();
} else {
// otherwise (the consumer still exists)
for (Iterator<TopicPartition> partitionIter = entry.getValue().iterator(); partitionIter.hasNext();) {
TopicPartition partition = partitionIter.next();
if (!partition2AllPotentialConsumers.containsKey(partition)) {
// if this topic partition of this consumer no longer exists remove it from currentAssignment of the consumer
partitionIter.remove();
currentPartitionConsumer.remove(partition);
} else if (!subscriptions.get(entry.getKey()).topics().contains(partition.topic())) {
// if this partition cannot remain assigned to its current consumer because the consumer
// is no longer subscribed to its topic remove it from currentAssignment of the consumer
partitionIter.remove();
} else
// otherwise, remove the topic partition from those that need to be assigned only if
// its current consumer is still subscribed to its topic (because it is already assigned
// and we would want to preserve that assignment as much as possible)
unassignedPartitions.remove(partition);
}
}
}
// at this point we have preserved all valid topic partition to consumer assignments and removed
// all invalid topic partitions and invalid consumers. Now we need to assign unassignedPartitions
// to consumers so that the topic partition assignments are as balanced as possible.

// an ascending sorted set of consumers based on how many topic partitions are already assigned to them
TreeSet<String> sortedCurrentSubscriptions = new TreeSet<>(new SubscriptionComparator(currentAssignment));
sortedCurrentSubscriptions.addAll(currentAssignment.keySet());

balance(currentAssignment, prevAssignment, sortedPartitions, unassignedPartitions, sortedCurrentSubscriptions,
consumer2AllPotentialPartitions, partition2AllPotentialConsumers, currentPartitionConsumer);
return currentAssignment;
}

sticky 分区策略是从 0.11 版本才开始引入的,它主要有两个目的:

  1. 分区的分配要尽可能均匀
  2. 分区的分配要尽可能与上次分配的保持相同

当两者冲突的时候,第一个目标优先于第二个目标。

sticky 的分区方式作用发生分区重分配的时候,尽可能地让前后两次分配相同,进而减少系统资源的损耗及其他异常情况的发生。因为 sticky 分区策略的代码,要比 range 和 roundrobin 复杂很多,此处不做具体的细节分析,只简单举例如下:

假设有 3 个 topic,一个有 2 个 partition,一个有 3 个 partition,另外一个有 4 个 partition,group 中有 3 个 consumer,第一个 consumer 订阅了第一个 topic,第二个 consumer 订阅了前两个 topic,第三个 consumer 订阅了三个 topic,那么它们的分配方案如下:

消费者 订阅 topic1 的列表 订阅 topic2 的列表 订阅 topic3 的列表
consumer1 t1 p0
consumer2 t1 p1, t2 p1 t2 p0, t2 p3
consumer3 t3 p0, t3 p1, t3 p2, t3 p3

上面三个分区策略有着不同的分配方式,在实际使用过程中,需要根据自己的需求选择合适的策略,但是如果你只有一个 consumer,那么选择哪个方式都是一样的,但是如果是多个 consumer 不在同一台设备上进行消费,那么 sticky 方式应该更加合适。

自定义分区策略

如之前所说,只需要继承 AbstractPartitionAssignor 并复写其中方法即可 (当然也可以直接实现 PartitionAssignor 接口) 自定义分区策略,其中有两个方法需要复写:

1
2
3
4
public String name();

public abstract Map<String, List<TopicPartition>> assign(Map<String, Integer> partitionsPerTopic,
Map<String, Subscription> subscriptions);

其中 assign () 方法表示的是分区分配方案的实现,而 name () 方法则表示了这个分配策略的唯一名称,比如之前提到的 range,roundrobin 和 sticky, 这个名字会在和 GroupCoordinator 的通信中返回,通过它 consumer leader 来确定整个 group 的分区方案 (分区策略是由 group 中的 consumer 共同投票决定的,谁使用的多,就使用哪个策略)。

本文参考

http://generalthink.github.io/2019/06/06/kafka-consumer-partition-assign/

https://matt33.com/2017/11/19/consumer-two-summary/

声明:写作本文初衷是个人学习记录,鉴于本人学识有限,如有侵权或不当之处,请联系 wdshfut@163.com

至此,关于 Kafka 的学习暂时告一段落,未来有需要时,会继续学习。更多关于 Kafka 原理等知识的介绍,参考:

http://generalthink.github.io/tags/Kafka/

https://matt33.com/tags/kafka/

前面的文章中,有简单的介绍了 KafkaConsumer 的两种订阅模式,本篇文章对此进行扩展说明一下。

KafkaConsumer 的两种订阅模式, subscribe () 模式和 assign () 模式,前者是 topic 粒度 (使用 group 管理),后者是 topic-partition 粒度 (用户自己去管理)。

订阅模式

KafkaConsumer 为订阅模式提供了 4 种 API,如下:

1
2
3
4
5
6
7
8
9
10
11
12
13
// 订阅指定的topic列表,并且会自动进行动态partition订阅
// 当发生以下情况时,会进行rebalance:1.订阅的topic列表改变;2.topic被创建或删除;3.consumer线程die;4.加一个新的consumer线程
// 当发生rebalance时,会唤醒ConsumerRebalanceListener线程
public void subscribe(Collection<String> topics, ConsumerRebalanceListener listener) {}

// 同上,但是这里没有设置listener
public void subscribe(Collection<String> topics) {}

// 订阅那些满足一定规则(pattern)的topic
public void subscribe(Pattern pattern, ConsumerRebalanceListener listener) {}

// 同上,但是这里没有设置listener
public void subscribe(Pattern pattern) {}

以上 4 种 API 都是按照 topic 级别去订阅,可以动态地获取其分配的 topic-partition,这是使用 Group 动态管理,它不能与手动 partition 管理一起使用。当监控到发生下面的事件时,Group 将会触发 rebalance 操作:

  1. 订阅的 topic 列表变化;
  2. topic 被创建或删除;
  3. consumer group 的某个 consumer 实例挂掉;
  4. 一个新的 consumer 实例通过 join 方法加入到一个 group 中。

在这种模式下,当 KafkaConsumer 调用 poll () 方法时,第一步会首先加入到一个 group 中,并获取其分配的 topic-partition 列表,具体细节在前面的文章中已经分析过了。

这里介绍一下当调用 subscribe () 方法之后,consumer 所做的事情,分两种情况介绍,一种按 topic 列表订阅,一种是按 pattern 模式订阅:

  • topic 列表订阅

topic 列表订阅,最终调用如下方法:

1
2
3
4
5
6
7
8
9
10
11
12
13
14
15
16
17
18
19
20
21
22
23
24
25
26
27
28
29
30
31
32
33
34
35
36
37
38
39
40
41
42
43
44
45
46
47
48
49
50
51
52
53
54
55
56
57
58
59
60
61
62
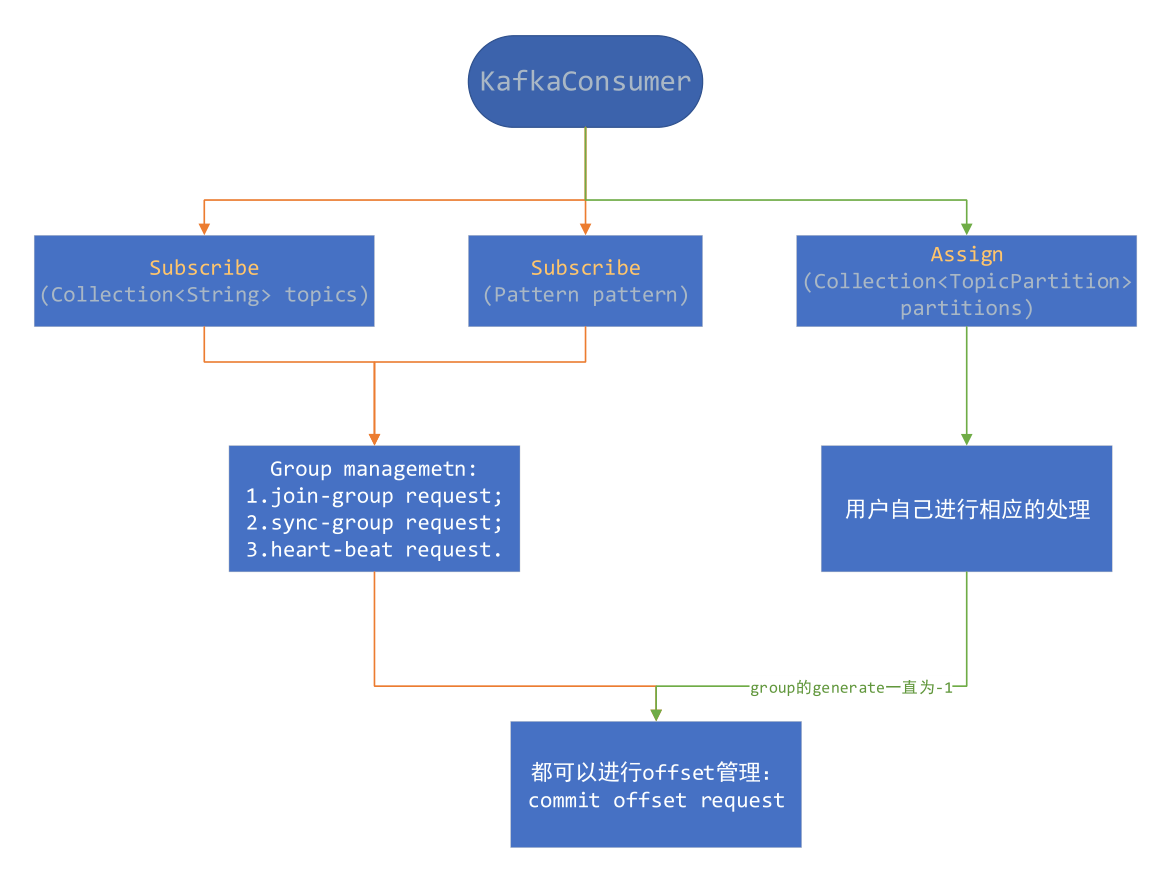
/**
* Subscribe to the given list of topics to get dynamically
* assigned partitions. <b>Topic subscriptions are not incremental. This list will replace the current
* assignment (if there is one).</b> Note that it is not possible to combine topic subscription with group management
* with manual partition assignment through {@link #assign(Collection)}.
*
* If the given list of topics is empty, it is treated the same as {@link #unsubscribe()}.
*
* <p>
* As part of group management, the consumer will keep track of the list of consumers that belong to a particular
* group and will trigger a rebalance operation if any one of the following events are triggered:
* <ul>
* <li>Number of partitions change for any of the subscribed topics
* <li>A subscribed topic is created or deleted
* <li>An existing member of the consumer group is shutdown or fails
* <li>A new member is added to the consumer group
* </ul>
* <p>
* When any of these events are triggered, the provided listener will be invoked first to indicate that
* the consumer's assignment has been revoked, and then again when the new assignment has been received.
* Note that rebalances will only occur during an active call to {@link #poll(Duration)}, so callbacks will
* also only be invoked during that time.
*
* The provided listener will immediately override any listener set in a previous call to subscribe.
* It is guaranteed, however, that the partitions revoked/assigned through this interface are from topics
* subscribed in this call. See {@link ConsumerRebalanceListener} for more details.
*
* @param topics The list of topics to subscribe to
* @param listener Non-null listener instance to get notifications on partition assignment/revocation for the
* subscribed topics
* @throws IllegalArgumentException If topics is null or contains null or empty elements, or if listener is null
* @throws IllegalStateException If {@code subscribe()} is called previously with pattern, or assign is called
* previously (without a subsequent call to {@link #unsubscribe()}), or if not
* configured at-least one partition assignment strategy
*/
@Override
public void subscribe(Collection<String> topics, ConsumerRebalanceListener listener) {
acquireAndEnsureOpen();
try {
maybeThrowInvalidGroupIdException();
if (topics == null)
throw new IllegalArgumentException("Topic collection to subscribe to cannot be null");
if (topics.isEmpty()) {
// treat subscribing to empty topic list as the same as unsubscribing
this.unsubscribe();
} else {
for (String topic : topics) {
if (topic == null || topic.trim().isEmpty())
throw new IllegalArgumentException("Topic collection to subscribe to cannot contain null or empty topic");
}

throwIfNoAssignorsConfigured();
fetcher.clearBufferedDataForUnassignedTopics(topics);
log.info("Subscribed to topic(s): {}", Utils.join(topics, ", "));
// 核心步骤在此处执行
if (this.subscriptions.subscribe(new HashSet<>(topics), listener))
metadata.requestUpdateForNewTopics();
}
} finally {
release();
}
}
  1. 将 SubscriptionType 类型设置为 AUTO_TOPICS,并更新 SubscriptionState 中记录的 subscription 属性 (记录的是订阅的 topic 列表);
1
2
3
4
5
6
7
8
9
10
11
12
13
14
15
16
17
18
19
public synchronized boolean subscribe(Set<String> topics, ConsumerRebalanceListener listener) {
registerRebalanceListener(listener);
setSubscriptionType(SubscriptionType.AUTO_TOPICS);
return changeSubscription(topics);
}

private boolean changeSubscription(Set<String> topicsToSubscribe) {
if (subscription.equals(topicsToSubscribe))
return false;

subscription = topicsToSubscribe;
if (subscriptionType != SubscriptionType.USER_ASSIGNED) {
groupSubscription = new HashSet<>(groupSubscription);
groupSubscription.addAll(topicsToSubscribe);
} else {
groupSubscription = new HashSet<>(topicsToSubscribe);
}
return true;
}
  1. 请求更新 metadata。
1
2
3
4
5
6
7
8
9
10
11
12
13
14
public synchronized void requestUpdateForNewTopics() {
// Override the timestamp of last refresh to let immediate update.
this.lastRefreshMs = 0;
this.requestVersion++;
requestUpdate();
}

/**
* Request an update of the current cluster metadata info, return the current updateVersion before the update
*/
public synchronized int requestUpdate() {
this.needUpdate = true;
return this.updateVersion;
}
  • pattern 模式订阅

pattern 模式订阅,最终调用如下方法:

1
2
3
4
5
6
7
8
9
10
11
12
13
14
15
16
17
18
19
20
21
22
23
24
25
26
27
28
29
30
31
32
33
34
35
36
/**
* Subscribe to all topics matching specified pattern to get dynamically assigned partitions.
* The pattern matching will be done periodically against all topics existing at the time of check.
* This can be controlled through the {@code metadata.max.age.ms} configuration: by lowering
* the max metadata age, the consumer will refresh metadata more often and check for matching topics.
* <p>
* See {@link #subscribe(Collection, ConsumerRebalanceListener)} for details on the
* use of the {@link ConsumerRebalanceListener}. Generally rebalances are triggered when there
* is a change to the topics matching the provided pattern and when consumer group membership changes.
* Group rebalances only take place during an active call to {@link #poll(Duration)}.
*
* @param pattern Pattern to subscribe to
* @param listener Non-null listener instance to get notifications on partition assignment/revocation for the
* subscribed topics
* @throws IllegalArgumentException If pattern or listener is null
* @throws IllegalStateException If {@code subscribe()} is called previously with topics, or assign is called
* previously (without a subsequent call to {@link #unsubscribe()}), or if not
* configured at-least one partition assignment strategy
*/
@Override
public void subscribe(Pattern pattern, ConsumerRebalanceListener listener) {
maybeThrowInvalidGroupIdException();
if (pattern == null)
throw new IllegalArgumentException("Topic pattern to subscribe to cannot be null");

acquireAndEnsureOpen();
try {
throwIfNoAssignorsConfigured();
log.info("Subscribed to pattern: '{}'", pattern);
this.subscriptions.subscribe(pattern, listener);
this.coordinator.updatePatternSubscription(metadata.fetch());
this.metadata.requestUpdateForNewTopics();
} finally {
release();
}
}
  1. 将 SubscriptionType 类型设置为 AUTO_PATTERN,并更新 SubscriptionState 中记录的 subscribedPattern 属性,设置为 pattern;
1
2
3
4
5
public synchronized void subscribe(Pattern pattern, ConsumerRebalanceListener listener) {
registerRebalanceListener(listener);
setSubscriptionType(SubscriptionType.AUTO_PATTERN);
this.subscribedPattern = pattern;
}
  1. 调用 coordinator 的 updatePatternSubscription () 方法,遍历所有 topic 的 metadata,找到所有满足 pattern 的 topic 列表,更新到 SubscriptionState 的 subscriptions 属性,并请求更新 Metadata;
1
2
3
4
5
6
7
8
9
10
11
12
13
14
15
16
17
18
19
20
21
22
23
24
25
26
27
28
29
public void updatePatternSubscription(Cluster cluster) {
final Set<String> topicsToSubscribe = cluster.topics().stream()
.filter(subscriptions::matchesSubscribedPattern)
.collect(Collectors.toSet());
if (subscriptions.subscribeFromPattern(topicsToSubscribe))
metadata.requestUpdateForNewTopics();
}

public synchronized boolean subscribeFromPattern(Set<String> topics) {
if (subscriptionType != SubscriptionType.AUTO_PATTERN)
throw new IllegalArgumentException("Attempt to subscribe from pattern while subscription type set to " +
subscriptionType);

return changeSubscription(topics);
}

private boolean changeSubscription(Set<String> topicsToSubscribe) {
if (subscription.equals(topicsToSubscribe))
return false;

subscription = topicsToSubscribe;
if (subscriptionType != SubscriptionType.USER_ASSIGNED) {
groupSubscription = new HashSet<>(groupSubscription);
groupSubscription.addAll(topicsToSubscribe);
} else {
groupSubscription = new HashSet<>(topicsToSubscribe);
}
return true;
}
1
2
3
4
5
6
7
8
9
10
11
12
13
14
public synchronized void requestUpdateForNewTopics() {
// Override the timestamp of last refresh to let immediate update.
this.lastRefreshMs = 0;
this.requestVersion++;
requestUpdate();
}

/**
* Request an update of the current cluster metadata info, return the current updateVersion before the update
*/
public synchronized int requestUpdate() {
this.needUpdate = true;
return this.updateVersion;
}

其他部分,两者基本一样,只是 pattern 模型在每次更新 topic-metadata 时,获取全局的 topic 列表,如果发现有新加入的符合条件的 topic,就立马去订阅,其他的地方,包括 group 管理、topic-partition 的分配都是一样的。

分配模式

当调用 assign () 方法手动分配 topic-partition 列表时,不会使用 consumer 的 Group 管理机制,也即是当 consumer group member 变化或 topic 的 metadata 信息变化时,不会触发 rebalance 操作。比如:当 topic 的 partition 增加时,这里无法感知,需要用户进行相应的处理,Apache Flink 就是使用的这种方式。

1
2
3
4
5
6
7
8
9
10
11
12
13
14
15
16
17
18
19
20
21
22
23
24
25
26
27
28
29
30
31
32
33
34
35
36
37
38
39
40
41
42
43
44
45
46
47
48
/**
* Manually assign a list of partitions to this consumer. This interface does not allow for incremental assignment
* and will replace the previous assignment (if there is one).
* <p>
* If the given list of topic partitions is empty, it is treated the same as {@link #unsubscribe()}.
* <p>
* Manual topic assignment through this method does not use the consumer's group management
* functionality. As such, there will be no rebalance operation triggered when group membership or cluster and topic
* metadata change. Note that it is not possible to use both manual partition assignment with {@link #assign(Collection)}
* and group assignment with {@link #subscribe(Collection, ConsumerRebalanceListener)}.
* <p>
* If auto-commit is enabled, an async commit (based on the old assignment) will be triggered before the new
* assignment replaces the old one.
*
* @param partitions The list of partitions to assign this consumer
* @throws IllegalArgumentException If partitions is null or contains null or empty topics
* @throws IllegalStateException If {@code subscribe()} is called previously with topics or pattern
* (without a subsequent call to {@link #unsubscribe()})
*/
@Override
public void assign(Collection<TopicPartition> partitions) {
acquireAndEnsureOpen();
try {
if (partitions == null) {
throw new IllegalArgumentException("Topic partition collection to assign to cannot be null");
} else if (partitions.isEmpty()) {
this.unsubscribe();
} else {
for (TopicPartition tp : partitions) {
String topic = (tp != null) ? tp.topic() : null;
if (topic == null || topic.trim().isEmpty())
throw new IllegalArgumentException("Topic partitions to assign to cannot have null or empty topic");
}
fetcher.clearBufferedDataForUnassignedPartitions(partitions);

// make sure the offsets of topic partitions the consumer is unsubscribing from
// are committed since there will be no following rebalance
if (coordinator != null)
this.coordinator.maybeAutoCommitOffsetsAsync(time.milliseconds());

log.info("Subscribed to partition(s): {}", Utils.join(partitions, ", "));
if (this.subscriptions.assignFromUser(new HashSet<>(partitions)))
metadata.requestUpdateForNewTopics();
}
} finally {
release();
}
}

assign () 方法是手动向 consumer 分配一些 topic-partition 列表,并且这个接口不允许增加分配的 topic-partition 列表,将会覆盖之前分配的 topic-partition 列表,如果给定的 topic-partition 列表为空,它的作用将会与 unsubscribe () 方法一样。

这种手动 topic 分配也不会使用 consumer 的 group 管理,当 group 的 member 变化或 topic 的 metadata 变化时,也不会触发 rebalance 操作。

这里所说的 consumer 的 group 管理,就是前面所说的 consumer 如何加入 group 的管理过程。如果使用的是 assign 模式,也即是非 AUTO_TOPICS 或 AUTO_PATTERN 模式时,consumer 实例在调用 poll () 方法时,不会向 GroupCoordinator 发送 join-group、sync-group、heartbeat 请求,也就是说 GroupCoordinator 拿不到这个 consumer 实例的相关信息,也不会去维护这个 member 是否存活,这种情况下就需要用户自己管理自己的处理程序。但是这种模式可以进行 offset commit,这将在下一篇文章进行分析。

小结

根据上面的讲述,这里做一下小结,两种模式对比如下图所示:

image-20201124145646131

简单说明如下:

模式 不同之处 相同之处
subscribe () 使用 Kafka group 管理,自动进行 rebalance 操作 可以在 Kafka 保存 offset
assign () 用户自己进行相关的处理 也可以进行 offset commit,但是尽量保证 group.id 唯一性,如果使用一个与上面模式一样的 group,offset commit 请求将会被拒绝

本文参考

https://matt33.com/2017/11/18/consumer-subscribe/

声明:写作本文初衷是个人学习记录,鉴于本人学识有限,如有侵权或不当之处,请联系 wdshfut@163.com

maven 的功能

maven 是一个项目管理工具,主要作用是在项目开发阶段对项目进行依赖管理项目构建

  • 依赖管理:仅仅通过 jar 包的几个属性,就能确定唯一的 jar 包,在指定的文件 pom.xml 中,只要写入这些依赖属性,就会自动下载并管理 jar 包。
  • 项目构建:内置很多的插件与生命周期,支持多种任务,比如校验、编译、测试、打包、部署、发布…
  • 项目的知识管理:管理项目相关的其他内容,比如开发者信息,版本等等。

maven 的安装与配置

image-20201118160234868

注意:安装 maven 之前,必须先确保你的机器中已经安装了 jdk,如果是 maven 3 则必须 jdk 1.7 以上。

  • 解压,添加环境变量 MAVEN_HOME,值为解压后的 maven 路径。

1605703683(1)

  • Path 环境变量的变量值末尾添加 %MAVEN_HOME%\bin;

1605703778(1)

  • 在 cmd 窗口输入 mvn –version,显示 maven 版本信息,说明安装配置成功。

1605704022(1)

在 IDEA 中使用 maven

image-20210120172317523

maven 的仓库

maven 仓库分为本地仓库和远程仓库,而远程仓库又分为 maven 中央仓库、其他远程仓库和私服 (私有服务器)。其中,中央仓库是由 maven 官方提供的,而私服就需要我们自己搭建。

image-20210409155011986

本地仓库

默认情况下,不管 linux 还是 windows,每个用户在自己的用户目录下都有一个路径名为 .m2\repository 的仓库目录,如:C:\Users\XiSun\.m2\repository。如果不自定义本地仓库的地址,则会将下载的构件放到该目录下。

修改 maven 根目录下的 conf 文件夹中的 setting.xml 文件,可以自定义本地仓库地址,例如:

1
<localRepository>D:\Program Files\Maven\apache-maven-3.6.3-maven-repository</localRepository>

运行 maven 的时候,maven 所需要的任何构件都是直接从本地仓库获取的。如果本地仓库没有,它会首先尝试从远程仓库下载构件至本地仓库,然后再使用本地仓库的构件。

远程仓库

maven 中央仓库

maven 中央仓库,是由 maven 社区提供的仓库,其中包含了大量常用的库。一般来说,简单的 java 项目依赖的构件都可以在这里下载到。

在 maven 安装目录的 lib 目录下,有一个 maven-model-builder-3.6.1.jar,里面的 org/apache/maven/model/pom-4.0.0.xml 文件定义了 maven 默认中央仓库的地址:https://repo.maven.apache.org/maven2

因为 maven 中央仓库默认在国外,国内使用难免很慢,推荐将其更换为阿里云的镜像。

全局配置:修改 maven 根目录下的 conf 文件夹中的 setting.xml 文件,在 mirrors 节点上,添加如下内容。

1
2
3
4
5
6
7
8
9
10
11
12
13
14
15
16
17
18
19
20
<mirrors>
<!-- mirror
| Specifies a repository mirror site to use instead of a given repository. The repository that
| this mirror serves has an ID that matches the mirrorOf element of this mirror. IDs are used
| for inheritance and direct lookup purposes, and must be unique across the set of mirrors.
|
<mirror>
<id>mirrorId</id>
<mirrorOf>repositoryId</mirrorOf>
<name>Human Readable Name for this Mirror.</name>
<url>http://my.repository.com/repo/path</url>
</mirror>
-->
<mirror>
<id>alimaven</id>
<name>aliyun maven</name>
<url>http://maven.aliyun.com/nexus/content/groups/public/</url>
<mirrorOf>central</mirrorOf>
</mirror>
</mirrors>

局部配置:修改项目的 pom.xml 文件,在 repositories 上,添加如下内容。

1
2
3
4
5
6
7
8
9
10
11
12
13
<repositories>
<repository>
<id>alimaven</id>
<name>aliyun maven</name>
<url>http://maven.aliyun.com/nexus/content/groups/public/</url>
<releases>
<enabled>true</enabled>
</releases>
<snapshots>
<enabled>false</enabled>
</snapshots>
</repository>
</repositories>

更多中央仓库地址参考:https://blog.csdn.net/Hello_World_QWP/article/details/82463799。

私服

maven 私服就是公司局域网内的 maven 远程仓库,每个员工的电脑上安装 maven 软件并且连接 maven 私服,程序员可以将自己开发的项目打成 jar 并发布到私服,其它项目组成员就可以从私服下载所依赖的 jar。

私服还充当一个代理服务器的角色,当私服上没有 jar 包时,会从 maven 中央仓库自动下载。

nexus 是一个 maven 仓库管理器 (其实就是一个软件),nexus 可以充当 maven 私服,同时 nexus 还提供强大的仓库管理、构件搜索等功能。

如果 maven 在中央仓库中也找不到依赖的文件,它会停止构建过程并输出错误信息到控制台。为避免这种情况,maven 提供了远程仓库的概念,它是开发人员自己定制的仓库,包含了所需要的代码库或者其他工程中用到的 jar 文件。

搭建 maven 私服
  1. 下载 nexus,地址:https://help.sonatype.com/repomanager2/download/download-archives---repository-manager-oss

  2. 安装 nexus

将下载的压缩包进行解压,进入 bin 目录:

1559551510928

打开 cmd 窗口并进入上面 bin 目录下,执行 nexus.bat install 命令安装服务 (注意需要以管理员身份运行 cmd 命令):

1559551531544

  1. 启动 nexus

经过前面命令已经完成 nexus 的安装,可以通过如下两种方式启动 nexus 服务。

  • 在 Windows 系统服务中启动 nexus

1559551564441

  • 在命令行执行 nexus.bat start 命令启动 nexus

1559551591730

  1. 访问 nexus

启动 nexus 服务后,访问 http://localhost:8081/nexus,点击右上角 LogIn 按钮,使用默认用户名 admin 和密码 admin123 登录系统。

登录成功后,点击左侧菜单 Repositories,可以看到 nexus 内置的仓库列表,如下图:

1559551620133

nexus 仓库类型

通过前面的仓库列表可以看到,nexus 默认内置了很多仓库,这些仓库可以划分为 4 种类型,每种类型的仓库用于存放特定的 jar 包,具体说明如下。

  • hosted:宿主仓库,部署自己的 jar 到这个类型的仓库,包括 Releases 和 Snapshots 两部分,Releases 为公司内部发布版本仓库,Snapshots 为公司内部测试版本仓库。
  • proxy:代理仓库,用于代理远程的公共仓库,如 maven 中央仓库,用户连接私服,私服自动去中央仓库下载 jar 包或者插件。

  • group:仓库组,用来合并多个 hosted 或 proxy 仓库,通常我们配置自己的 maven 连接仓库组。

  • virtual (虚拟):兼容 Maven1 版本的 jar 或者插件。

nexus 仓库类型与安装目录对应关系

1559551752012

将项目发布到 maven 私服

maven 私服是搭建在公司局域网内的 maven 仓库,公司内的所有开发团队都可以使用。例如技术研发团队开发了一个基础组件,就可以将这个基础组件打成 jar 包发布到私服,其他团队成员就可以从私服下载这个 jar 包到本地仓库并在项目中使用。

具体操作步骤如下:

  1. 配置 maven 的 settings.xml 文件
1
2
3
4
5
6
7
8
9
10
<server>
<id>releases</id>
<username>admin</username>
<password>admin123</password>
</server>
<server>
<id>snapshots</id>
<username>admin</username>
<password>admin123</password>
</server>

注意:一定要在 idea 工具中引入的 maven 的 settings.xml 文件中配置。

  1. 配置项目的 pom.xml 文件
1
2
3
4
5
6
7
8
9
10
<distributionManagement>
<repository>
<id>releases</id>
<url>http://localhost:8081/nexus/content/repositories/releases/</url>
</repository>
<snapshotRepository>
<id>snapshots</id>
<url>http://localhost:8081/nexus/content/repositories/snapshots/</url>
</snapshotRepository>
</distributionManagement>
  1. 执行 mvn clean deploy 命令

1559551977984

从私服下载 jar 到本地仓库

前面我们已经完成了将本地项目打成 jar 包发布到 maven 私服,下面我们就需要从 maven 私服下载 jar 包到本地仓库。

具体操作步骤如下:

  1. 在 maven 的 settings.xml 文件中配置下载模板
1
2
3
4
5
6
7
8
9
10
11
12
13
14
15
16
17
18
19
20
21
22
23
24
25
26
<profile>
<id>dev</id>
<repositories>
<repository>
<id>nexus</id>
<!--仓库地址,即nexus仓库组的地址-->
<url>http://localhost:8081/nexus/content/groups/public/</url>
<!--是否下载releases构件-->
<releases>
<enabled>true</enabled>
</releases>
<!--是否下载snapshots构件-->
<snapshots>
<enabled>true</enabled>
</snapshots>
</repository>
</repositories>
<pluginRepositories>
<!-- 插件仓库,maven的运行依赖插件,也需要从私服下载插件 -->
<pluginRepository>
<id>public</id>
<name>Public Repositories</name>
<url>http://localhost:8081/nexus/content/groups/public/</url>
</pluginRepository>
</pluginRepositories>
</profile>
  1. 在 maven 的 settings.xml 文件中配置激活下载模板
1
2
3
<activeProfiles>
<activeProfile>dev</activeProfile>
</activeProfiles>

将第三方 jar 安装到本地仓库和 maven 私服

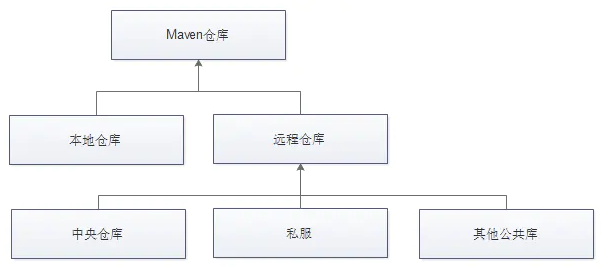
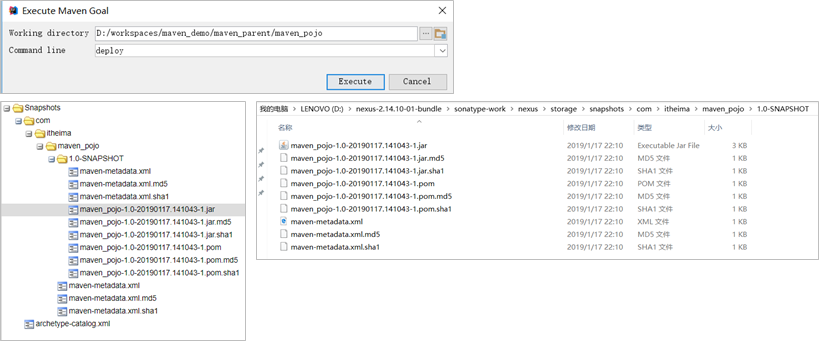
在 maven 工程的 pom.xml 文件中配置某个 jar 包的坐标后,如果本地的 maven 仓库不存在这个 jar 包,maven 工具会自动到配置的 maven 私服下载,如果私服中也不存在,maven 私服就会从 maven 中央仓库进行下载。

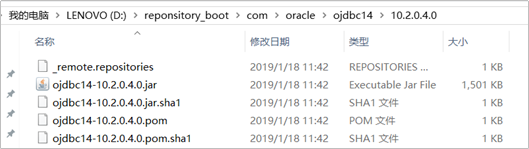
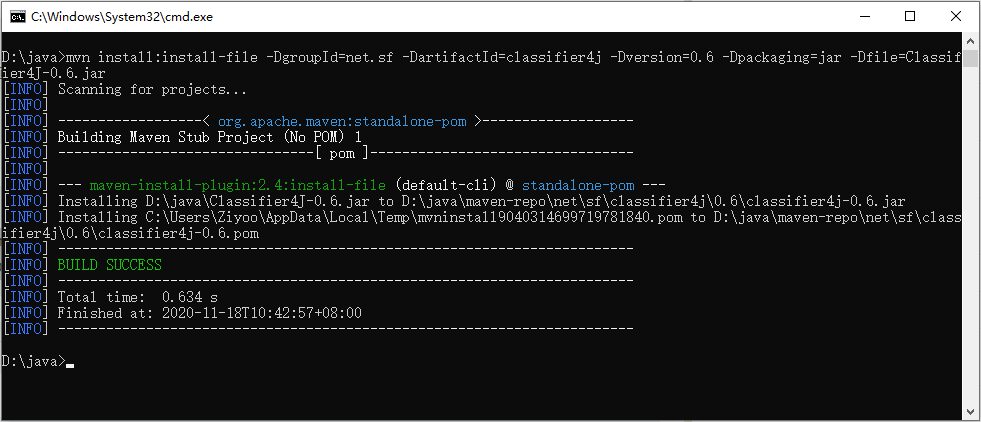
但是并不是所有的 jar 包都可以从中央仓库下载到,比如常用的 Oracle 数据库驱动的 jar 包在中央仓库就不存在。此时需要到 Oracle 的官网下载驱动 jar 包,然后将此 jar 包通过 maven 命令安装到我们本地的 maven 仓库或者 maven 私服中,这样在 maven 项目中就可以使用 maven 坐标引用到此 jar 包了。

将第三方 jar 安装到本地仓库

  1. 下载 Oracle 的 jar 包

  2. mvn install 命令进行安装

    1
    mvn install:install-file -Dfile=ojdbc14-10.2.0.4.0.jar -DgroupId=com.oracle -DartifactId=ojdbc14 –Dversion=10.2.0.4.0 -Dpackaging=jar
  3. 查看本地 maven 仓库,确认安装是否成功

1559552325997

再比如安装 Classifier4J-0.6.jar,打开 cmd 窗口,切换到 jar 包所在目录,输入 mvn 命令,命令格式如下:

1
mvn install:install-file -DgroupId=net.sf(自定义,需要与pom.xml文件中的groupId一致) -DartifactId=classifier4j(自定义,需要与pom.xml文件中的artifaceId一致) -Dversion=0.6(自定义,需要与pom.xml文件中的version一致) -Dpackaging=jar -Dfile=Classifier4J-0.6.jar(本地jar包)

-DgroupId、-DartifactId、-Dversion、-Dpackaging、-Dfile 前面均有一个空格。

使用示例如下:

之后,在 maven 的本地仓库,根据 groupId —— artifactId —— version,即可找到打包进来的本地 jar 包,也可以在项目中的 pom.xml 文件引入:

1
2
3
4
5
<dependency>
<groupId>net.sf</groupId>
<artifactId>classifier4j</artifactId>
<version>0.6</version>
</dependency>

将第三方 jar 安装到 maven 私服

  1. 下载 Oracle 的 jar 包

  2. 在 maven 的 settings.xml 配置文件中配置第三方仓库的 server 信息

1
2
3
4
5
<server>
<id>thirdparty</id>
<username>admin</username>
<password>admin123</password>
</server>
  1. 执行 mvn deploy 命令进行安装

    1
    mvn deploy:deploy-file -Dfile=ojdbc14-10.2.0.4.0.jar -DgroupId=com.oracle -DartifactId=ojdbc14 –Dversion=10.2.0.4.0 -Dpackaging=jar –Durl=http://localhost:8081/nexus/content/repositories/thirdparty/ -DrepositoryId=thirdparty

maven 的依赖搜索顺序

一般情况下,当执行 maven 构建命令时,maven 按照以下顺序查找依赖的库:

  • 步骤 1:在本地仓库中搜索,如果找不到,执行步骤 2,如果找到了则执行其他操作。
  • 步骤 2:在中央仓库中搜索,如果找不到,并且有一个或多个远程仓库已经设置,则执行步骤 4,如果找到了则下载到本地仓库中以备将来引用。
  • 步骤 3:如果远程仓库没有被设置,maven 将简单的停滞处理并抛出错误 (无法找到依赖的文件)。
  • 步骤 4:在一个或多个远程仓库中搜索依赖的文件,如果找到则下载到本地仓库以备将来引用,否则 maven 将停止处理并抛出错误 (无法找到依赖的文件)。

maven 的常用命令

  • clean: 清理
  • compile:编译
  • test: 测试
  • package:打包
  • install: 安装

maven 的坐标书写规范

1
2
3
4
5
<dependency>
<groupId>org.projectlombok</groupId>
<artifactId>lombok</artifactId>
<version>1.18.10</version>
</dependency>

maven 的依赖范围

依赖范围 对于编译 classpath 有效 对于测试 classpath 有效 对于运行 classpath 有效 例子
compile Y Y Y spring-core
test - Y - Junit
provided Y Y - servlet-api
runtime - Y Y JDBC 驱动
system Y Y - 本地的,maven 仓库之外的类库

默认使用 compile 依赖范围。

使用 system 依赖范围的依赖时,必须通过 systemPath 元素显示地指定依赖文件的路径。由于此类依赖不是通过 maven 仓库解析的,而且往往与本机系统绑定,可能构成构建的不可移植,因此应该谨慎使用。systemPath 元素可以引用环境变量,例如:

1
2
3
4
5
6
7
<dependency>
    <groupId>javax.sql</groupId>
    <artifactId>jdbc-stdext</artifactId>
    <Version>2.0</Version>
    <scope>system</scope>
    <systemPath>${java.home}/lib/rt.jar</systemPath>
</dependency>

maven 的依赖传递

什么是依赖传递

在 maven 中,依赖是可以传递的,假设存在三个项目,分别是项目 A,项目 B 以及项目 C。假设 C 依赖 B,B 依赖 A,那么根据 maven 项目依赖的特征,不难推出项目 C 也依赖 A。如图所示:

1559549336921

1559549377105

通过上面的图可以看到, 在一个 web 项目中,直接依赖了 spring-webmvc,而 spring-webmvc 依赖了 spring-aop、spring-beans 等。最终的结果就是在这个 web 项目中,间接依赖了 spring-aop、spring-beans 等。

什么是依赖冲突

由于依赖传递现象的存在,如图所示,spring-webmvc 依赖 spirng-beans-4.2.4,spring-aop 依赖 spring-beans-5.0.2,现在 spirng-beans-4.2.4 已经加入到了工程中,而我们希望 spring-beans-5.0.2 加入工程。这就造成了依赖冲突。

1559549435874

如何解决依赖冲突

  1. 使用 maven 提供的依赖调节原则
  1. 排除依赖

  2. 锁定版本

依赖调节原则

路径近者优先原则

当依赖声明不在同一个 pom.xml 文件中时,或者说存在依赖传递时,路径最短的 jar 包将被选为最终依赖。

image-20210118164236303

上图中,Jar2.0 将被选为最终依赖。

第一声明者优先原则

当依赖声明不在同一个 pom.xml 文件中时,或者说存在依赖传递时,并且依赖传递长度相同时,最先声明的依赖将被选为最终依赖。

1559549523188

上图中,spring-aop 和 spring-webmvc 都依赖了 spring-beans,但是因为 spring-aop 在前面,所以最终使用的 spring-beans 是由 spring-aop 传递过来的,而 spring-webmvc 传递过来的 spring-beans 则被忽略了。

覆盖优先

当依赖声明在同一个 pom.xml 文件中时,后面声明的依赖将覆盖前面声明的依赖。

排除依赖

使用 exclusions 标签将传递过来的依赖排除出去。

1559549561284

版本锁定

采用直接锁定版本的方法确定依赖 jar 包的版本,版本锁定后则不考虑依赖的声明顺序或依赖的路径,以锁定的版本为准添加到工程中,此方法在企业开发中经常使用。

版本锁定的使用方式:

第一步:在 dependencyManagement 标签中锁定依赖的版本

1559549614223

第二步:在 dependencies 标签中声明需要导入的 maven 坐标

1559549637900

备注

能查找依赖的网站:https://mvnrepository.com/

本文参考

https://juejin.cn/post/6844903543711907848

https://www.jianshu.com/p/a1d9fd97f568

声明:写作本文初衷是个人学习记录,鉴于本人学识有限,如有侵权或不当之处,请联系 wdshfut@163.com

上一篇文章讲了 consumer 如何加入 consumer group,现在加入 group 成功之后,就要准备开始消费。

kafkaConsumer.poll () 方法的核心代码如下:

1
2
3
4
5
6
7
8
9
10
11
12
13
14
15
16
17
18
19
20
21
22
23
24
25
26
27
28
29
30
31
32
33
34
35
36
37
38
39
40
41
42
43
44
45
46
private ConsumerRecords<K, V> poll(final Timer timer, final boolean includeMetadataInTimeout) {
// Step1:确认KafkaConsumer实例是单线程运行,以及没有被关闭
acquireAndEnsureOpen();
try {
if (this.subscriptions.hasNoSubscriptionOrUserAssignment()) {
throw new IllegalStateException("Consumer is not subscribed to any topics or assigned any partitions");
}

// poll for new data until the timeout expires
do {
client.maybeTriggerWakeup();

if (includeMetadataInTimeout) {
// Step2:更新metadata信息,获取GroupCoordinator的ip以及接口,并连接、 join-group、sync-group,期间group会进行rebalance。在此步骤,consumer会先加入group,然后获取需要消费的topic partition的offset信息
if (!updateAssignmentMetadataIfNeeded(timer)) {
return ConsumerRecords.empty();
}
} else {
while (!updateAssignmentMetadataIfNeeded(time.timer(Long.MAX_VALUE))) {
log.warn("Still waiting for metadata");
}
}

// Step3:拉取数据,核心步骤
final Map<TopicPartition, List<ConsumerRecord<K, V>>> records = pollForFetches(timer);
if (!records.isEmpty()) {
// before returning the fetched records, we can send off the next round of fetches
// and avoid block waiting for their responses to enable pipelining while the user
// is handling the fetched records.
//
// NOTE: since the consumed position has already been updated, we must not allow
// wakeups or any other errors to be triggered prior to returning the fetched records.
// 在返回数据之前,发送下次的fetch请求,避免用户在下次获取数据时线程block
if (fetcher.sendFetches() > 0 || client.hasPendingRequests()) {
client.pollNoWakeup();
}

return this.interceptors.onConsume(new ConsumerRecords<>(records));
}
} while (timer.notExpired());
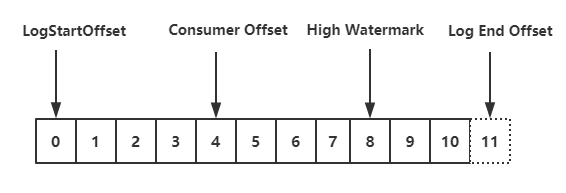
return ConsumerRecords.empty();
} finally {
release();
}
}

紧跟上一篇文章,我们继续分析 consumer 加入 group 后的行为:

1
2
3
4
5
6
7
8
9
10
11
12
/**
* Visible for testing
*/
boolean updateAssignmentMetadataIfNeeded(final Timer timer) {
// 1.上一篇主要集中在coordinator.poll(timer)方法源码分析(主要功能是:consumer加入group)
if (coordinator != null && !coordinator.poll(timer)) {
return false;
}

// 2.本篇文章从updateFetchPositions(timer)方法开始继续分析(主要功能是:consumer获得partition的offset)
return updateFetchPositions(timer);
}

KafkaConsumer 的消费策略

首先,我们应该知道,KafkaConsumer 关于如何消费的 2 种策略:

  • 手动指定:调用 consumer.seek(TopicPartition, offset),然后开始 poll ()

  • 自动指定poll () 之前给集群发送请求,让集群告知客户端,当前该 TopicPartition 的 offset 是多少,这也是我们此次分析的重点。

在讲如何拉取 offset 之前,先认识下下面这个类 (SubscriptionState 的内部类):

1
2
3
4
5
6
7
8
9
10
11
12
13
private static class TopicPartitionState {
private FetchState fetchState;
private FetchPosition position; // last consumed position
private Long highWatermark; // the high watermark from last fetch
private Long logStartOffset; // the log start offset
private Long lastStableOffset;
private boolean paused; // whether this partition has been paused by the user
private OffsetResetStrategy resetStrategy; // the strategy to use if the offset needs resetting
private Long nextRetryTimeMs;
private Integer preferredReadReplica;
private Long preferredReadReplicaExpireTimeMs;
...
}

consumer 实例订阅的每个 topic-partition 都会有一个对应的 TopicPartitionState 对象,在这个对象中会记录上面内容,最需要关注的就是 position 这个属性,它表示上一次消费的位置。通过 consumer.seek () 方式指定消费 offset 的时候,其实设置的就是这个 position 值。

updateFetchPositions - 拉取 offset

在 consumer 成功加入 group 并开始消费之前,我们还需要知道 consumer 是从 offset 为多少的位置开始消费。consumer 加入 group 之后,就得去获取 offset 了,下面的方法,就是开始更新 position (offset):

1
2
3
4
5
6
7
8
9
10
11
12
13
14
15
16
17
18
19
20
21
22
23
24
25
26
27
28
29
30
31
32
33
34
35
36
37
38
/**
* Set the fetch position to the committed position (if there is one)
* or reset it using the offset reset policy the user has configured.
*
* @throws org.apache.kafka.common.errors.AuthenticationException if authentication fails. See the exception for more details
* @throws NoOffsetForPartitionException If no offset is stored for a given partition and no offset reset policy is
* defined
* @return true iff the operation completed without timing out
*/
private boolean updateFetchPositions(final Timer timer) {
// If any partitions have been truncated due to a leader change, we need to validate the offsets
fetcher.validateOffsetsIfNeeded();

// Step1:查看TopicPartitionState的position是否为空,第一次消费肯定为空
cachedSubscriptionHashAllFetchPositions = subscriptions.hasAllFetchPositions();
if (cachedSubscriptionHashAllFetchPositions) return true;

// If there are any partitions which do not have a valid position and are not
// awaiting reset, then we need to fetch committed offsets. We will only do a
// coordinator lookup if there are partitions which have missing positions, so
// a consumer with manually assigned partitions can avoid a coordinator dependence
// by always ensuring that assigned partitions have an initial position.
// Step2:如果没有有效的offset,那么需要从GroupCoordinator中获取
if (coordinator != null && !coordinator.refreshCommittedOffsetsIfNeeded(timer)) return false;

// If there are partitions still needing a position and a reset policy is defined,
// request reset using the default policy. If no reset strategy is defined and there
// are partitions with a missing position, then we will raise an exception.
// Step3:如果还存在partition不知道position,并且设置了offsetreset策略,那么就等待重置,不然就抛出异常
subscriptions.resetMissingPositions();

// Finally send an asynchronous request to lookup and update the positions of any
// partitions which are awaiting reset.
// Step4:向PartitionLeader(GroupCoordinator所在机器)发送ListOffsetRequest重置position
fetcher.resetOffsetsIfNeeded();

return true;
}

上面的代码主要分为 4 个步骤,具体如下:

  1. 首先,查看当前 TopicPartition 的 position 是否为空,如果不为空,表示知道下次 fetch position (即拉取数据时从哪个位置开始拉取),但如果是第一次消费,这个 TopicPartitionState.position 肯定为空。
  2. 然后,通过 GroupCoordinator 为缺少 fetch position 的 partition 拉取 position (即 last committed offset)。
  3. 继而,仍不知道 partition 的 position (_consumer_offsets 中未保存位移信息),且设置了 offsetreset 策略,那么就等待重置,如果没有设置重置策略,就抛出 NoOffsetForPartitionException 异常。
  4. 最后,为那些需要重置 fetch position 的 partition 发送 ListOffsetRequest 重置 position (consumer.beginningOffsets ()consumer.endOffsets ()consumer.offsetsForTimes ()consumer.seek () 都会发送 ListOffRequest 请求)。

上面说的几个方法相当于都是用户自己自定义消费的 offset,所以可能出现越界 (消费位置无法在实际分区中查到) 的情况,所以也是会发送 ListOffsetRequest 请求的,即触发 auto.offset.reset 参数的执行。
比如现在某个 partition 的可拉取 offset 最大值为 100,如果你指定消费 offset=200 的位置,那肯定拉取不到,此时就会根据 auto.offset.reset 策略将拉取位置重置为 100 (默认的 auto.offset.reset 为 latest)。

refreshCommittedOffsetsIfNeeded

我们先看下 Setp 2 中 GroupCoordinator 是如何 fetch position 的:

1
2
3
4
5
6
7
8
9
10
11
12
13
14
15
16
17
18
19
20
21
22
23
24
25
26
27
28
29
/**
* Refresh the committed offsets for provided partitions.
*
* @param timer Timer bounding how long this method can block
* @return true iff the operation completed within the timeout
*/
public boolean refreshCommittedOffsetsIfNeeded(Timer timer) {
final Set<TopicPartition> missingFetchPositions = subscriptions.missingFetchPositions();

// 1.发送获取offset的请求,核心步骤
final Map<TopicPartition, OffsetAndMetadata> offsets = fetchCommittedOffsets(missingFetchPositions, timer);
if (offsets == null) return false;

for (final Map.Entry<TopicPartition, OffsetAndMetadata> entry : offsets.entrySet()) {
final TopicPartition tp = entry.getKey();
// 2.获取response中的offset
final OffsetAndMetadata offsetAndMetadata = entry.getValue();
final ConsumerMetadata.LeaderAndEpoch leaderAndEpoch = metadata.leaderAndEpoch(tp);
final SubscriptionState.FetchPosition position = new SubscriptionState.FetchPosition(
offsetAndMetadata.offset(), offsetAndMetadata.leaderEpoch(),
leaderAndEpoch);

log.info("Setting offset for partition {} to the committed offset {}", tp, position);
entry.getValue().leaderEpoch().ifPresent(epoch -> this.metadata.updateLastSeenEpochIfNewer(entry.getKey(), epoch));
// 3.实际就是设置SubscriptionState的position值
this.subscriptions.seekUnvalidated(tp, position);
}
return true;
}

fetchCommittedOffsets () 方法的核心代码如下:

1
2
3
4
5
6
7
8
9
10
11
12
13
14
15
16
17
18
19
20
21
22
23
24
25
26
27
28
29
30
31
32
33
34
35
36
37
38
39
40
41
42
43
44
45
46
47
48
49
/**
* Fetch the current committed offsets from the coordinator for a set of partitions.
*
* @param partitions The partitions to fetch offsets for
* @return A map from partition to the committed offset or null if the operation timed out
*/
public Map<TopicPartition, OffsetAndMetadata> fetchCommittedOffsets(final Set<TopicPartition> partitions,
final Timer timer) {
if (partitions.isEmpty()) return Collections.emptyMap();

final Generation generation = generation();
if (pendingCommittedOffsetRequest != null && !pendingCommittedOffsetRequest.sameRequest(partitions, generation)) {
// if we were waiting for a different request, then just clear it.
pendingCommittedOffsetRequest = null;
}

do {
if (!ensureCoordinatorReady(timer)) return null;

// contact coordinator to fetch committed offsets
final RequestFuture<Map<TopicPartition, OffsetAndMetadata>> future;
if (pendingCommittedOffsetRequest != null) {
future = pendingCommittedOffsetRequest.response;
} else {
// 1.封装FetchRequest请求
future = sendOffsetFetchRequest(partitions);
pendingCommittedOffsetRequest = new PendingCommittedOffsetRequest(partitions, generation, future);

}
// 2.通过KafkaClient发送请求
client.poll(future, timer);

if (future.isDone()) {
pendingCommittedOffsetRequest = null;

if (future.succeeded()) {
// 3.请求成功,获取请求的响应数据
return future.value();
} else if (!future.isRetriable()) {
throw future.exception();
} else {
timer.sleep(retryBackoffMs);
}
} else {
return null;
}
} while (timer.notExpired());
return null;
}

上面的步骤和我们之前提到的发送其他请求毫无区别,基本就是这三个套路。

在获取到响应之后,会通过 subscriptions.seekUnvalidated () 方法为每个 TopicPartition 设置 position 值后,就知道从哪里开始消费订阅 topic 下的 partition 了。

resetMissingPositions

在 Step 3 中,什么时候发起 FetchRequest 拿不到 position 呢?

我们知道消费位移 (consume offset) 是保存在 _consumer_offsets 这个 topic 里面的,当我们进行消费的时候需要知道上次消费到了什么位置。那么就会发起请求去看上次消费到了 topic 的 partition 的哪个位置,但是这个消费位移是有保存时长的,默认为 7 天 (broker 端通过 offsets.retention.minutes 设置)。

当隔了一段时间再进行消费,如果这个间隔时间超过了参数的配置值,那么原先的位移信息就会丢失,最后只能通过客户端参数 auto.offset.reset 来确定开始消费的位置。

如果我们第一次消费 topic,那么在 _consumer_offsets 中也是找不到消费位移的,所以就会执行第四个步骤,发起 ListOffsetRequest 请求根据配置的 reset 策略 (即 auto.offset.reset) 来决定开始消费的位置。

resetOffsetsIfNeeded

在 Step 4 中,发起 ListOffsetRequest 请求和处理 response 的核心代码如下:

1
2
3
4
5
6
7
8
9
10
11
12
13
14
15
16
17
18
19
20
21
22
23
24
25
26
27
/**
* Reset offsets for all assigned partitions that require it.
*
* @throws org.apache.kafka.clients.consumer.NoOffsetForPartitionException If no offset reset strategy is defined
* and one or more partitions aren't awaiting a seekToBeginning() or seekToEnd().
*/
public void resetOffsetsIfNeeded() {
// Raise exception from previous offset fetch if there is one
RuntimeException exception = cachedListOffsetsException.getAndSet(null);
if (exception != null)
throw exception;

// 1.需要执行reset策略的partition
Set<TopicPartition> partitions = subscriptions.partitionsNeedingReset(time.milliseconds());
if (partitions.isEmpty())
return;

final Map<TopicPartition, Long> offsetResetTimestamps = new HashMap<>();
for (final TopicPartition partition : partitions) {
Long timestamp = offsetResetStrategyTimestamp(partition);
if (timestamp != null)
offsetResetTimestamps.put(partition, timestamp);
}

// 2.执行reset策略
resetOffsetsAsync(offsetResetTimestamps);
}
1
2
3
4
5
6
7
8
9
10
11
12
13
14
15
16
17
18
19
20
21
22
23
24
25
26
27
28
29
30
31
32
33
34
35
36
37
38
39
40
private void resetOffsetsAsync(Map<TopicPartition, Long> partitionResetTimestamps) {
Map<Node, Map<TopicPartition, ListOffsetRequest.PartitionData>> timestampsToSearchByNode =
groupListOffsetRequests(partitionResetTimestamps, new HashSet<>());
for (Map.Entry<Node, Map<TopicPartition, ListOffsetRequest.PartitionData>> entry : timestampsToSearchByNode.entrySet()) {
Node node = entry.getKey();
final Map<TopicPartition, ListOffsetRequest.PartitionData> resetTimestamps = entry.getValue();
subscriptions.setNextAllowedRetry(resetTimestamps.keySet(), time.milliseconds() + requestTimeoutMs);

// 1.发送ListOffsetRequest请求
RequestFuture<ListOffsetResult> future = sendListOffsetRequest(node, resetTimestamps, false);

// 2.为ListOffsetRequest请求添加监听器
future.addListener(new RequestFutureListener<ListOffsetResult>() {
@Override
public void onSuccess(ListOffsetResult result) {
if (!result.partitionsToRetry.isEmpty()) {
subscriptions.requestFailed(result.partitionsToRetry, time.milliseconds() + retryBackoffMs);
metadata.requestUpdate();
}

for (Map.Entry<TopicPartition, ListOffsetData> fetchedOffset : result.fetchedOffsets.entrySet()) {
TopicPartition partition = fetchedOffset.getKey();
ListOffsetData offsetData = fetchedOffset.getValue();
ListOffsetRequest.PartitionData requestedReset = resetTimestamps.get(partition);
// 3.发送ListOffsetRequest请求成功,对结果reset,如果reset策略设置的是latest,那么requestedReset.timestamp = -1,如果是earliest,requestedReset.timestamp = -2
resetOffsetIfNeeded(partition, timestampToOffsetResetStrategy(requestedReset.timestamp), offsetData);
}
}

@Override
public void onFailure(RuntimeException e) {
subscriptions.requestFailed(resetTimestamps.keySet(), time.milliseconds() + retryBackoffMs);
metadata.requestUpdate();

if (!(e instanceof RetriableException) && !cachedListOffsetsException.compareAndSet(null, e))
log.error("Discarding error in ListOffsetResponse because another error is pending", e);
}
});
}
}

sendListOffsetRequest () 方法的核心代码如下:

1
2
3
4
5
6
7
8
9
10
11
12
13
14
15
16
17
18
19
20
21
22
23
24
25
26
/**
* Send the ListOffsetRequest to a specific broker for the partitions and target timestamps.
*
* @param node The node to send the ListOffsetRequest to.
* @param timestampsToSearch The mapping from partitions to the target timestamps.
* @param requireTimestamp True if we require a timestamp in the response.
* @return A response which can be polled to obtain the corresponding timestamps and offsets.
*/
private RequestFuture<ListOffsetResult> sendListOffsetRequest(final Node node,
final Map<TopicPartition, ListOffsetRequest.PartitionData> timestampsToSearch,
boolean requireTimestamp) {
ListOffsetRequest.Builder builder = ListOffsetRequest.Builder
.forConsumer(requireTimestamp, isolationLevel)
.setTargetTimes(timestampsToSearch);

log.debug("Sending ListOffsetRequest {} to broker {}", builder, node);
return client.send(node, builder)
.compose(new RequestFutureAdapter<ClientResponse, ListOffsetResult>() {
@Override
public void onSuccess(ClientResponse response, RequestFuture<ListOffsetResult> future) {
ListOffsetResponse lor = (ListOffsetResponse) response.responseBody();
log.trace("Received ListOffsetResponse {} from broker {}", lor, node);
handleListOffsetResponse(timestampsToSearch, lor, future);
}
});
}

resetOffsetIfNeeded () 方法的核心代码如下:

1
2
3
4
5
6
7
private void resetOffsetIfNeeded(TopicPartition partition, OffsetResetStrategy requestedResetStrategy, ListOffsetData offsetData) {
SubscriptionState.FetchPosition position = new SubscriptionState.FetchPosition(
offsetData.offset, offsetData.leaderEpoch, metadata.leaderAndEpoch(partition));
offsetData.leaderEpoch.ifPresent(epoch -> metadata.updateLastSeenEpochIfNewer(partition, epoch));
// reset对应的TopicPartition fetch的position
subscriptions.maybeSeekUnvalidated(partition, position.offset, requestedResetStrategy);
}

这里解释下 auto.offset.reset 的两个值 (latest 和 earliest) 的区别:

假设我们现在要消费 MyConsumerTopic 的数据,它有 3 个分区,生产者往这个 topic 发送了 10 条数据,然后分区数据按照 MyConsumerTopic-0 (3 条数据),MyConsumerTopic-1 (3 条数据),MyConsumerTopic-2 (4 条数据) 这样分配。

当设置为 latest 的时候,返回的 offset 具体到每个 partition 就是 HW 值 (partition 0 是 3,partition 1 是 3,partition 2 是 4)。

当设置为 earliest 的时候,就会从起始处 (即 LogStartOffset,注意不是 LSO) 开始消费,这里就是从 0 开始。

  • Log Start Offset:表示 partition 的起始位置,初始值为 0,由于消息的增加以及日志清除策略影响,这个值会阶段性增大。尤其注意这个不能缩写为 LSO,LSO 代表的是 LastStableOffset,和事务有关。

  • Consumer Offset:消费位移,表示 partition 的某个消费者消费到的位移位置。

  • High Watermark:简称 HW,代表消费端能看到的 partition 的最高日志位移,HW 大于等于 ConsumerOffset 的值。

  • Log End Offset:简称 LEO,代表 partition 的最高日志位移,对消费者不可见,HW 到 LEO 这之间的数据未被 follwer 完全同步。

至此,我们成功的知道 consumer 消费的 partition 的 offset 位置在哪里,下面就开始拉取 partition 里的数据。

pollForFetches - 拉取数据

现在万事俱备只欠东风了,consumer 成功加入 group,也确定了需要拉取的 topic partition 的 offset,那么现在就应该去拉取数据了,其核心源码如下:

1
2
3
4
5
6
7
8
9
10
11
12
13
14
15
16
17
18
19
20
21
22
23
24
25
26
27
28
29
30
31
32
33
34
35
36
37
38
39
40
41
42
43
44
45
46
private Map<TopicPartition, List<ConsumerRecord<K, V>>> pollForFetches(Timer timer) {
long pollTimeout = coordinator == null ? timer.remainingMs() :
Math.min(coordinator.timeToNextPoll(timer.currentTimeMs()), timer.remainingMs());

// if data is available already, return it immediately
// 1.获取fetcher已经拉取到的数据
final Map<TopicPartition, List<ConsumerRecord<K, V>>> records = fetcher.fetchedRecords();
if (!records.isEmpty()) {
return records;
}

// 到此,说明上次fetch到的数据已经全部拉取了,需要再次发送fetch请求,从broker拉取新的数据

// send any new fetches (won't resend pending fetches)
// 2.发送fetch请求,会从多个topic-partition拉取数据(只要对应的topic-partition没有未完成的请求)
fetcher.sendFetches();

// We do not want to be stuck blocking in poll if we are missing some positions
// since the offset lookup may be backing off after a failure

// NOTE: the use of cachedSubscriptionHashAllFetchPositions means we MUST call
// updateAssignmentMetadataIfNeeded before this method.
if (!cachedSubscriptionHashAllFetchPositions && pollTimeout > retryBackoffMs) {
pollTimeout = retryBackoffMs;
}

Timer pollTimer = time.timer(pollTimeout);

// 3.真正开始发送,底层同样使用NIO
client.poll(pollTimer, () -> {
// since a fetch might be completed by the background thread, we need this poll condition
// to ensure that we do not block unnecessarily in poll()
return !fetcher.hasCompletedFetches();
});
timer.update(pollTimer.currentTimeMs());

// after the long poll, we should check whether the group needs to rebalance
// prior to returning data so that the group can stabilize faster
// 4.如果group需要rebalance,直接返回空数据,这样更快地让group进入稳定状态
if (coordinator != null && coordinator.rejoinNeededOrPending()) {
return Collections.emptyMap();
}

// 5.返回拉取到的新数据
return fetcher.fetchedRecords();
}

fetcher.sendFetches

这里需要注意的是 fetcher.sendFetches () 方法,在发送请求的同时会注册回调函数,当有 response 的时候,会解析 response,将返回的数据放到 Fetcher 的成员变量中:

1
2
3
4
5
6
7
8
9
10
11
12
13
14
15
16
17
18
19
20
21
22
23
24
25
26
27
28
29
30
31
32
33
34
35
36
37
38
39
40
41
42
43
44
45
46
47
48
49
50
51
52
53
54
55
56
57
58
59
60
61
62
63
64
65
66
67
68
69
70
71
72
73
74
75
76
77
78
79
80
81
82
83
84
85
86
87
88
89
90
91
92
93
94
95
96
97
98
99
100
101
102
103
104
105
106
/**
* Set-up a fetch request for any node that we have assigned partitions for which doesn't already have
* an in-flight fetch or pending fetch data.
* @return number of fetches sent
*/
public synchronized int sendFetches() {
// Update metrics in case there was an assignment change
sensors.maybeUpdateAssignment(subscriptions);

// 1.创建FetchRequest
Map<Node, FetchSessionHandler.FetchRequestData> fetchRequestMap = prepareFetchRequests();
for (Map.Entry<Node, FetchSessionHandler.FetchRequestData> entry : fetchRequestMap.entrySet()) {
final Node fetchTarget = entry.getKey();
final FetchSessionHandler.FetchRequestData data = entry.getValue();
final FetchRequest.Builder request = FetchRequest.Builder
.forConsumer(this.maxWaitMs, this.minBytes, data.toSend())
.isolationLevel(isolationLevel)
.setMaxBytes(this.maxBytes)
.metadata(data.metadata())
.toForget(data.toForget())
.rackId(clientRackId);

if (log.isDebugEnabled()) {
log.debug("Sending {} {} to broker {}", isolationLevel, data.toString(), fetchTarget);
}
// 2.发送FetchRequest
RequestFuture<ClientResponse> future = client.send(fetchTarget, request);
// We add the node to the set of nodes with pending fetch requests before adding the
// listener because the future may have been fulfilled on another thread (e.g. during a
// disconnection being handled by the heartbeat thread) which will mean the listener
// will be invoked synchronously.
this.nodesWithPendingFetchRequests.add(entry.getKey().id());
future.addListener(new RequestFutureListener<ClientResponse>() {
@Override
public void onSuccess(ClientResponse resp) {
synchronized (Fetcher.this) {
try {
@SuppressWarnings("unchecked")
FetchResponse<Records> response = (FetchResponse<Records>) resp.responseBody();
FetchSessionHandler handler = sessionHandler(fetchTarget.id());
if (handler == null) {
log.error("Unable to find FetchSessionHandler for node {}. Ignoring fetch response.",
fetchTarget.id());
return;
}
if (!handler.handleResponse(response)) {
return;
}

Set<TopicPartition> partitions = new HashSet<>(response.responseData().keySet());
FetchResponseMetricAggregator metricAggregator = new FetchResponseMetricAggregator(sensors, partitions);

for (Map.Entry<TopicPartition, FetchResponse.PartitionData<Records>> entry : response.responseData().entrySet()) {
TopicPartition partition = entry.getKey();
FetchRequest.PartitionData requestData = data.sessionPartitions().get(partition);
if (requestData == null) {
String message;
if (data.metadata().isFull()) {
message = MessageFormatter.arrayFormat(
"Response for missing full request partition: partition={}; metadata={}",
new Object[]{partition, data.metadata()}).getMessage();
} else {
message = MessageFormatter.arrayFormat(
"Response for missing session request partition: partition={}; metadata={}; toSend={}; toForget={}",
new Object[]{partition, data.metadata(), data.toSend(), data.toForget()}).getMessage();
}

// Received fetch response for missing session partition
throw new IllegalStateException(message);
} else {
long fetchOffset = requestData.fetchOffset;
FetchResponse.PartitionData<Records> fetchData = entry.getValue();

log.debug("Fetch {} at offset {} for partition {} returned fetch data {}",
isolationLevel, fetchOffset, partition, fetchData);
// 3.发送FetchRequest请求成功,将返回的数据放到ConcurrentLinkedQueue<CompletedFetch>中
completedFetches.add(new CompletedFetch(partition, fetchOffset, fetchData, metricAggregator,
resp.requestHeader().apiVersion()));
}
}

sensors.fetchLatency.record(resp.requestLatencyMs());
} finally {
nodesWithPendingFetchRequests.remove(fetchTarget.id());
}
}
}

@Override
public void onFailure(RuntimeException e) {
synchronized (Fetcher.this) {
try {
FetchSessionHandler handler = sessionHandler(fetchTarget.id());
if (handler != null) {
handler.handleError(e);
}
} finally {
nodesWithPendingFetchRequests.remove(fetchTarget.id());
}
}
}
});

}
return fetchRequestMap.size();
}

该方法主要分为以下两步:

  1. prepareFetchRequests ():为订阅的所有 topic-partition list 创建 fetch 请求 (只要该 topic-partition 没有还在处理的请求),创建的 fetch 请求依然是按照 node 级别创建的;
  2. client.send ():发送 fetch 请求,并设置相应的 Listener,请求处理成功的话,就加入到 completedFetches 中,在加入这个 completedFetches 队列时,是按照 topic-partition 级别去加入,这样也就方便了后续的处理。

从这里可以看出,在每次发送 fetch 请求时,都会向所有可发送的 topic-partition 发送 fetch 请求,调用一次 fetcher.sendFetches,拉取到的数据,可能需要多次 pollForFetches 循环才能处理完,因为 Fetcher 线程是在后台运行,这也保证了尽可能少地阻塞用户的处理线程,因为如果 Fetcher 中没有可处理的数据,用户的线程是会阻塞在 poll 方法中的。

fetcher.fetchedRecords

这个方法的作用就是获取已经从 server 拉取到的 Records,其核心源码如下:

1
2
3
4
5
6
7
8
9
10
11
12
13
14
15
16
17
18
19
20
21
22
23
24
25
26
27
28
29
30
31
32
33
34
35
36
37
38
39
40
41
42
43
44
45
46
47
48
49
50
51
52
53
54
55
56
57
58
59
60
61
62
63
64
65
66
67
68
69
70
71
72
73
74
75
76
77
78
79
80
81
82
83
84
85
86
87
88
89
90
91
92
93
94
95
96
97
98
99
100
101
102
103
104
105
106
107
108
109
110
111
112
113
114
115
116
117
/**
* Return the fetched records, empty the record buffer and update the consumed position.
*
* NOTE: returning empty records guarantees the consumed position are NOT updated.
*
* @return The fetched records per partition
* @throws OffsetOutOfRangeException If there is OffsetOutOfRange error in fetchResponse and
* the defaultResetPolicy is NONE
* @throws TopicAuthorizationException If there is TopicAuthorization error in fetchResponse.
*/
public Map<TopicPartition, List<ConsumerRecord<K, V>>> fetchedRecords() {
Map<TopicPartition, List<ConsumerRecord<K, V>>> fetched = new HashMap<>();
// 在max.poll.records中设置单词最大的拉取条数,默认500条
int recordsRemaining = maxPollRecords;

try {
while (recordsRemaining > 0) {
if (nextInLineRecords == null || nextInLineRecords.isFetched) {// nextInLineRecords为空时
// Step1:当一个nextInLineRecords处理完,就从completedFetches处理下一个完成的Fetch请求
CompletedFetch completedFetch = completedFetches.peek();
if (completedFetch == null) break;

try {
// Step2:获取下一个要处理的nextInLineRecords
nextInLineRecords = parseCompletedFetch(completedFetch);
} catch (Exception e) {
// Remove a completedFetch upon a parse with exception if (1) it contains no records, and
// (2) there are no fetched records with actual content preceding this exception.
// The first condition ensures that the completedFetches is not stuck with the same completedFetch
// in cases such as the TopicAuthorizationException, and the second condition ensures that no
// potential data loss due to an exception in a following record.
FetchResponse.PartitionData partition = completedFetch.partitionData;
if (fetched.isEmpty() && (partition.records == null || partition.records.sizeInBytes() == 0)) {
completedFetches.poll();
}
throw e;
}
completedFetches.poll();
} else {
// Step3:拉取records,更新position
List<ConsumerRecord<K, V>> records = fetchRecords(nextInLineRecords, recordsRemaining);
TopicPartition partition = nextInLineRecords.partition;
if (!records.isEmpty()) {
List<ConsumerRecord<K, V>> currentRecords = fetched.get(partition);
if (currentRecords == null) {// 正常情况下,一个node只会发送一个request,一般只会有一个
fetched.put(partition, records);
} else {
// this case shouldn't usually happen because we only send one fetch at a time per partition,
// but it might conceivably happen in some rare cases (such as partition leader changes).
// we have to copy to a new list because the old one may be immutable
List<ConsumerRecord<K, V>> newRecords = new ArrayList<>(records.size() + currentRecords.size());
newRecords.addAll(currentRecords);
newRecords.addAll(records);
fetched.put(partition, newRecords);
}
recordsRemaining -= records.size();
}
}
}
} catch (KafkaException e) {
if (fetched.isEmpty())
throw e;
}
// Step4:返回相应的Records数据
return fetched;
}

private List<ConsumerRecord<K, V>> fetchRecords(PartitionRecords partitionRecords, int maxRecords) {
if (!subscriptions.isAssigned(partitionRecords.partition)) {
// this can happen when a rebalance happened before fetched records are returned to the consumer's poll call
log.debug("Not returning fetched records for partition {} since it is no longer assigned",
partitionRecords.partition);
} else if (!subscriptions.isFetchable(partitionRecords.partition)) {
// this can happen when a partition is paused before fetched records are returned to the consumer's
// poll call or if the offset is being reset
// 这个topic-partition不能被消费了,比如调用了pause
log.debug("Not returning fetched records for assigned partition {} since it is no longer fetchable",
partitionRecords.partition);
} else {
SubscriptionState.FetchPosition position = subscriptions.position(partitionRecords.partition);
if (partitionRecords.nextFetchOffset == position.offset) {// offset对的上,也就是拉取是按顺序拉的
// 获取该topic-partition对应的records,并更新partitionRecords的fetchOffset(用于判断是否顺序)
List<ConsumerRecord<K, V>> partRecords = partitionRecords.fetchRecords(maxRecords);

if (partitionRecords.nextFetchOffset > position.offset) {
SubscriptionState.FetchPosition nextPosition = new SubscriptionState.FetchPosition(
partitionRecords.nextFetchOffset,
partitionRecords.lastEpoch,
position.currentLeader);
log.trace("Returning fetched records at offset {} for assigned partition {} and update " +
"position to {}", position, partitionRecords.partition, nextPosition);
// 更新消费到的offset(the fetch position)
subscriptions.position(partitionRecords.partition, nextPosition);
}

// 获取Lag(即position与hw之间差值),hw为null时,才返回null
Long partitionLag = subscriptions.partitionLag(partitionRecords.partition, isolationLevel);
if (partitionLag != null)
this.sensors.recordPartitionLag(partitionRecords.partition, partitionLag);

Long lead = subscriptions.partitionLead(partitionRecords.partition);
if (lead != null) {
this.sensors.recordPartitionLead(partitionRecords.partition, lead);
}

return partRecords;
} else {
// these records aren't next in line based on the last consumed position, ignore them
// they must be from an obsolete request
log.debug("Ignoring fetched records for {} at offset {} since the current position is {}",
partitionRecords.partition, partitionRecords.nextFetchOffset, position);
}
}

partitionRecords.drain();
return emptyList();
}

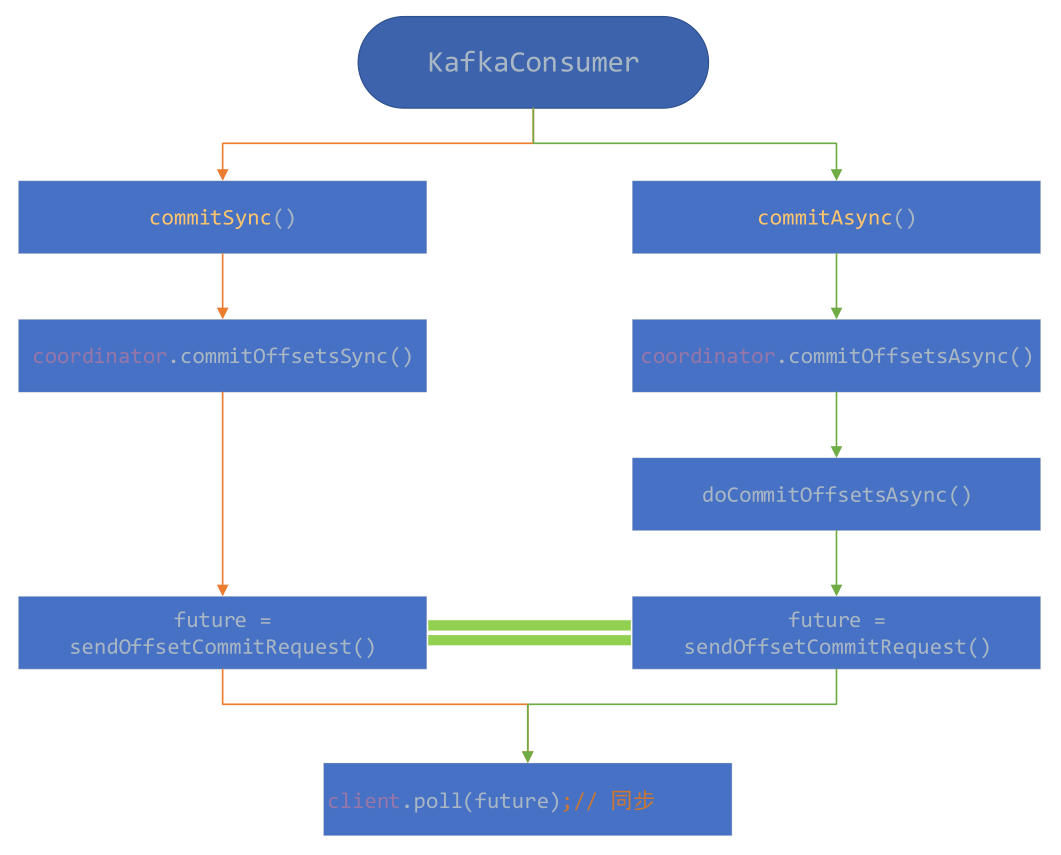
consumer 的 Fetcher 处理从 server 获取的 fetch response 大致分为以下几个过程:

  1. 通过 completedFetches.peek() 获取已经成功的 fetch response (在 fetcher.sendFetches () 方法中会把发送FetchRequest请求成功后的结果放在这个集合中,是拆分为 topic-partition 的粒度放进去的);
  2. parseCompletedFetch() 处理上面获取的 completedFetch,构造成 PartitionRecords 类型;
  3. 通过 fetchRecords() 方法处理 PartitionRecords 对象,在这个里面会去验证 fetchOffset 是否能对得上,只有 fetchOffset 是一致的情况下才会去处理相应的数据,并更新 the fetch offset 的信息,如果 fetchOffset 不一致,这里就不会处理,the fetch offset 就不会更新,下次 fetch 请求时是会接着 the fetch offset 的位置去请求相应的数据;
  4. 返回相应的 Records 数据。

至此,KafkaConsumer 如何拉取消息的整体流程也分析完毕。

本文参考

http://generalthink.github.io/2019/05/31/kafka-consumer-offset/

https://matt33.com/2017/11/11/consumer-pollonce/

声明:写作本文初衷是个人学习记录,鉴于本人学识有限,如有侵权或不当之处,请联系 wdshfut@163.com

伐树记

署之东园,久茀不治。修至始辟之,粪瘠溉枯,为蔬圃十数畦,又植花果桐竹凡百本。

春阳既浮,萌者将动。园之守启曰:“园有樗焉,其根壮而叶大。根壮则梗地脉,耗阳气,而新植者不得滋;叶大则阴翳蒙碍,而新植者不得畅以茂。又其材拳曲臃肿,疏轻而不坚,不足养,是宜伐。”因尽薪之。明日,圃之守又曰:“圃之南有杏焉,凡其根庇之广可六七尺,其下之地最壤腴,以杏故,特不得蔬,是亦宜薪。”修曰:“噫!今杏方春且华,将待其实,若独不能损数畦之广为杏地邪?“因勿伐。

既而悟且叹曰:“吁!庄周之说曰:樗、栎以不材终其天年,桂、漆以有用而见伤夭。今樗诚不材矣,然一旦悉翦弃;杏之体最坚密,美泽可用,反见存。岂才不才各遭其时之可否邪?”

他日,客有过修者。仆夫曳薪过堂下,因指而语客以所疑。客曰: “是何怪邪?夫以无用处无用,庄周之贵也。以无用而贼有用,乌能免哉!彼杏之有华实也,以有生之具而庇其根,幸矣。若桂、漆之不能逃乎斤斧者,盖有利之者在死,势不得以生也,与乎杏实异矣。今樗之臃肿不材,而以壮大害物,其见伐,诚宜尔。与夫‘才者死、不才者生’之说,又异矣。凡物幸之与不幸,视其处之而已。”客既去,修善其言而记之。

非非堂记

权衡之平物,动则轻重差,其于静也,锱铢不失。水之鉴物,动则不能有睹,其于静也,毫发可辨。在乎人,耳司听,目司视,动则乱于聪明,其于静也,闻见必审。处身者不为外物眩晃而动,则其心静,心静则智识明,是是非非,无所施而不中。夫是是近乎谄,非非近乎讪,不幸而过,宁讪无谄。是者,君子之常,是之何加?一以视之,未若非非之为正也。

予居洛之明年,既新厅事,有文纪于壁末。营其西偏作堂,户北向,植丛竹,辟户于其南,纳日月之光。设一几一榻,架书数百卷,朝夕居其中。以其静也,闭目澄心,览今照古,思虑无所不至焉。故其堂以非非为名云。

浪淘沙 · 把酒祝东风

把酒祝东风,且共从容。垂杨紫陌洛城东。总是当时携手处,游遍芳丛。

聚散苦匆匆,此恨无穷。今年花胜去年红。可惜明年花更好,知与谁同?

玉楼春 · 尊前拟把归期说

尊前拟把归期说,欲语春容先惨咽。人生自是有情痴,此恨不关风与月。

离歌且莫翻新阕,一曲能教肠寸结。直须看尽洛城花,始共春风容易别。

生查子 · 元夕

去年元夜时,花市灯如昼。

月上柳梢头,人约黄昏后。

今年元夜时,月与灯依旧。

不见去年人,泪满春衫袖。

读李翱文

予始读翱《复性书》三篇,曰:此《中庸》之义疏尔。智者诚其性,当读《中庸》;愚者虽读此不晓也,不作可焉。又读《与韩侍郎荐贤书》,以谓翱特穷时愤世无荐己者,故丁宁如此;使其得志,亦未必。然以韩为秦汉间好侠行义之一豪俊,亦善论人者也。最后读《幽怀赋》,然后置书而叹,叹已复读,不自休。恨翱不生于今,不得与之交;又恨予不得生翱时,与翱上下其论也。

凡昔翱一时人,有道而能文者,莫若韩愈。愈尝有赋矣,不过羡二鸟之光荣,叹一饱之无时尔。此其心使光荣而饱,则不复云矣。若翱独不然,其赋曰:“众嚣嚣而杂处兮,咸叹老而嗟卑;视予心之不然兮,虑行道之犹非。”又怪神尧以一旅取天下,后世子孙不能以天下取河北,以为忧。呜呼!使当时君子皆易其叹老嗟卑之心为翱所忧之心,则唐之天下岂有乱与亡哉!

然翱幸不生今时,见今之事,则其忧又甚矣。奈何今之人不忧也?余行天下,见人多矣,脱有一人能如翱忧者,又皆贱远,与翱无异;其余光荣而饱者,一闻忧世之言,不以为狂人,则以为病痴子,不怒则笑之矣。呜呼,在位而不肯自忧,又禁他人使皆不得忧,可叹也夫!

景祐三年十月十七日,欧阳修书。

答吴充秀才书

修顿首白,先辈吴君足下。前辱示书及文三篇,发而读之,浩乎若千万言之多,及少定而视焉,才数百言尔。非夫辞丰意雄,沛然有不可御之势,何以至此!然犹自患伥伥莫有开之使前者,此好学之谦言也。

修材不足用于时,仕不足荣于世,其毁誉不足轻重,气力不足动人。世之欲假誉以为重,借力而后进者,奚取于修焉?先辈学精文雄,其施于时,又非待修誉而为重,力而后进者也。然而惠然见临,若有所责,得非急于谋道,不择其人而问焉者欤?

夫学者未始不为道,而至者鲜焉;非道之于人远也,学者有所溺焉尔。盖文之为言,难工而可喜,易悦而自足。世之学者往往溺之,一有工焉,则曰:“吾学足矣。“甚者至弃百事不关于心,曰:“吾文士也,职于文而已。”此其所以至之鲜也。

昔孔子老而归鲁,六经之作,数年之顷尔。然读《易》者如无《春秋》,读《书》者如无《诗》,何其用功少而至于至也!圣人之文虽不可及,然大抵道胜者,文不难而自至也。故孟子皇皇不暇著书,荀卿盖亦晚而有作。若子云、仲淹,方勉焉以模言语,此道未足而强言者也。后之惑者,徒见前世之文传,以为学者文而已,故愈力愈勤而愈不至。此足下所谓”终日不出于轩序,不能纵横高下皆如意“者,道未足也。若道之充焉,虽行乎天地,入于渊泉,无不之也。

先辈之文浩乎沛然,可谓善矣。而又志于为道,犹自以为未广。若不止焉,孟、荀可至而不难也。修,学道而不至者,然幸不甘于所悦而溺于所止。因吾子之能不自止,又以励修之少进焉。幸甚!幸甚!修白。

答祖择之书

修启。秀才人至,蒙示书一通,并诗赋杂文两策,谕之曰:“一览以为如何?”某既陋,不足以辱好学者之问;又其少贱而长穷,其素所为未有足称以取信于人。亦尝有人问者,以不足问之愚,而未尝答人之问。足下卒然及之,是以愧惧不知所言。虽然,不远数百里走使者以及门,意厚礼勤,何敢不报。

某闻古之学者必严其师,师严然后道尊,道尊然后笃敬,笃敬然后能自守,能自守然后果于用,果于用然后不畏而不迁。三代之衰,学校废。至两汉,师道尚存,故其学者各守其经以自用。是以汉之政理文章与其当时之事,后世莫及者,其所从来深矣。后世师,法渐坏,而今世无师,则学者不尊严,故自轻其道。轻之则不能至,不至则不能笃信,信不笃则不知所守,守不固则有所畏而物可移。是故学者惟俯仰徇时,以希禄利为急,至于忘本趋末,流而不返。夫以不信不固之心,守不至之学,虽欲果于自用,而莫知其所以用之之道,又况有禄利之诱、刑祸之惧以迁之哉!此足下所谓志古知道之士世所鲜,而未有合者,由此也。

足下所为文,用意甚高,卓然有不顾世俗之心,直欲自到于古人。今世之人用心如足下者有几?是则乡曲之中能为足下之师者谓谁,交游之间能发足下之议论者谓谁?学不师则守不一,议论不博则无所发明而究其深。足下之言高趣远,甚善,然所守未一而议论未精,此其病也。窃惟足下之交游能为足下称才誉美者不少,今皆舍之,远而见及,乃知足下是欲求其不至。此古君子之用心也,是以言之不敢隐。

夫世无师矣,学者当师经,师经必先求其意,意得则心定,心定则道纯,道纯则充于中者实,中充实则发为文者辉光,施于世者果致。三代、两汉之学,不过此也。足下患世未有合者,而不弃其愚,将某以为合,故敢道此。未知足下之意合否?

与荆南乐秀才书

修顿首白秀才足下。前者舟行往来,屡辱见过。又辱以所业一编,先之启事,及门而贽。田秀才西来,辱书;其后予家奴自府还县,比又辱书。仆有罪之人,人所共弃,而足下见礼如此,何以当之?当之未暇答,宜遂绝,而再辱书;再而未答,益宜绝,而又辱之。何其勤之甚也!如修者,天下穷贱之人尔,安能使足下之切切如是邪?盖足下力学好问,急于自为谋而然也。然蒙索仆所为文字者,此似有所过听也。

仆少从进士举于有司,学为诗赋,以备程试,凡三举而得第。与士君子相识者多,故往往能道仆名字,而又以游从相爱之私,或过称其文字。故使足下闻仆虚名,而欲见其所为者,由此也。

仆少孤贫,贪禄仕以养亲,不暇就师穷经,以学圣人之遗业。而涉猎书史,姑随世俗作所谓时文者,皆穿蠹经传,移此俪彼,以为浮薄,惟恐不悦于时人,非有卓然自立之言如古人者。然有司过采,屡以先多士。及得第已来,自以前所为不足以称有司之举而当长者之知,始大改其为,庶几有立。然言出而罪至,学成而身辱,为彼则获誉,为此则受祸,此明效也。

夫时文虽曰浮巧,然其为功,亦不易也。仆天姿不好而强为之,故比时人之为者尤不工,然已足以取禄仕而窃名誉者,顺时故也。先辈少年志盛,方欲取荣誉于世,则莫若顺时。天圣中,天子下诏书,敕学者去浮华,其后风俗大变。今时之士大夫所为,彬彬有两汉之风矣。先辈往学之,非徒足以顺时取誉而已,如其至之,是直齐肩于两汉之士也。若仆者,其前所为既不足学,其后所为慎不可学,是以徘徊不敢出其所为者,为此也。

在《易》之《困》曰:“有言不信。”谓夫人方困时,其言不为人所信也。今可谓困矣,安足为足下所取信哉?辱书既多且切,不敢不答。幸察。

答李诩第一书

修白。人至,辱书及《性诠》三篇,曰以质其果是。夫自信笃者,无所待于人;有质于人者,自疑者也。今吾子自谓“夫子与孟、荀、扬、韩复生,不能夺吾言”,其可谓自信不疑者矣。而返以质于修。使修有过于夫子者,乃可为吾子辩,况修未及孟、荀、扬、韩之一二也。修非知道者,好学而未至者也。世无师久矣,尚赖朋友切磋之益,苟不自满而中止,庶几终身而有成。固常乐与学者论议往来,非敢以益于人,盖求益于人者也。况如吾子之文章论议,岂易得哉?固乐为吾子辩也。苟尚有所疑,敢不尽其所学以告,既吾子自信如是,虽夫子不能夺,使修何所说焉?人还索书,未知所答,惭惕惭惕。修再拜。

答李诩第二书

修白。前辱示书及《性诠》三篇,见吾子好学善辩,而文能尽其意之详。令世之言性者多矣,有所不及也,故思与吾子卒其说。

修患世之学者多言性,故常为说曰“夫性,非学者之所急,而圣人之所罕言也。《易》六十四卦不言性,其言者动静得失吉凶之常理也;《春秋》二百四十二年不言性,其言者善恶是非之实录也;《诗》三百五篇不言性,其言者政教兴衰之美刺也;《书》五十九篇不言性,其言者尧、舜、三代之治乱也;《礼》、《乐》之书虽不完,而杂出于诸儒之记,然其大要,治国修身之法也。六经之所载,皆人事之切于世者,是以言之甚详。至于性也,百不一二言之,或因言而及焉,非为性而言也,故虽言而不究。

予之所谓不言者,非谓绝而无言,盖其言者鲜,而又不主于性而言也。《论语》所载七十二子之问于孔子者,问孝、问忠、问仁义、问礼乐、问修身、问为政、问朋友、问鬼神者有矣,未尝有问性者。孔子之告其弟子者,凡数千言,其及于性者一言而已。予故曰:非学者之所急,而圣人之罕言也。

《书》曰“习与性成”,《语》曰“性相近,习相远”者,戒人慎所习而言也。《中庸》曰“天命之谓性,率性之谓道”者,明性无常,必有以率之也。《乐记》亦曰“感物而动,性之欲”者,明物之感人无不至也。然终不言性果善果恶,但戒人慎所习与所感,而勤其所以率之者尔。予故曰“因言以及之,而不究也。

修少好学,知学之难。凡所谓六经之所载,七十二子之所问者,学之终身,有不能达者矣;于其所达,行之终身,有不能至者矣。以予之汲汲于此而不暇乎其他,因以知七十二子亦以是汲汲而不暇也,又以知圣人所以教人垂世,亦皇皇而不暇也。今之学者于古圣贤所皇皇汲汲者,学之行之,或未至其一二,而好为性说,以穷圣贤之所罕言而不究者,执后儒之偏说,事无用之空言,此予之所不暇也。

或有问曰:性果不足学乎?予曰:性者,与身俱生而人之所皆有也。为君子者,修身治人而已,性之善恶不必究也。使性果善邪,身不可以不修,人不可以不治;使性果恶邪,身不可以不修,人不可以不治。不修其身,虽君子而为小人,《书》曰“惟圣罔念作狂”是也;能修其身,虽小人而为君子,《书》曰“惟狂克念作圣”是也。治道备,人斯为善矣,《书》曰“黎民于变时雍”是也;治道失,人斯为恶矣,《书》曰“殷顽民”,又曰“旧染污俗”是也。故为君子者,以修身治人为急,而不穷性以为言。夫七十二子之不问,六经之不主言,或虽言而不究,岂略之哉,盖有意也。

或又问曰:然则三子言性,过欤?曰:不过也。其不同何也?曰:始异而终同也。使孟子曰人性善矣,遂怠而不教,则是过也;使荀子曰人性恶矣,遂弃而不教,则是过也;使扬子曰人性混矣,遂肆而不教,则是过也。然三子者,或身奔走诸侯以行其道,或著书累千万言以告于后世,未尝不区区以仁义礼乐为急。盖其意以谓善者一日不教,则失而入于恶;恶者勤而教之,则可使至于善;混者驱而率之,则可使去恶而就善也。其说与《书》之“习与性成”,《语》之“性近习远”,《中庸》之“有以率之”,《乐记》之“慎物所感”皆合。夫三子者,推其言则殊,察其用心则一,故予以为推其言不过始异而终同也。凡论三子者,以予言而一之,则譊譊者可以息矣。

予之所说如此,吾子其择焉。

醉翁亭记

环滁皆山也。其西南诸峰,林壑尤美,望之蔚然而深秀者,琅琊也。山行六七里,渐闻水声潺潺,而泻出于两峰之间者,酿泉也。峰回路转,有亭翼然临于泉上者,醉翁亭也。作亭者谁?山之僧智仙也。名之者谁?太守自谓也。太守与客来饮于此,饮少辄醉,而年又最高,故自号曰醉翁也。醉翁之意不在酒,在乎山水之间也。山水之乐,得之心而寓之酒也。

若夫日出而林霏开,云归而岩穴暝,晦明变化者,山间之朝暮也。野芳发而幽香,佳木秀而繁阴,风霜高洁,水落而石出者,山间之四时也。朝而往,暮而归,四时之景不同,而乐亦无穷也。

至于负者歌于途,行者休于树,前者呼,后者应,伛偻提携,往来而不绝者,滁人游也。临溪而渔,溪深而鱼肥。酿泉为酒,泉香而酒洌;山肴野蔌,杂然而前陈者,太守宴也。宴酣之乐,非丝非竹,射者中,弈者胜,觥筹交错,起坐而喧哗者,众宾欢也。苍颜白发,颓然乎其间者,太守醉也。

已而夕阳在山,人影散乱,太守归而宾客从也。树林阴翳,鸣声上下,游人去而禽鸟乐也。然而禽鸟知山林之乐,而不知人之乐;人知从太守游而乐,而不知太守之乐其乐也。醉能同其乐,醒能述以文者,太守也。太守谓谁?庐陵欧阳修也。

朝中措 · 送刘仲原甫出守维扬

平山阑槛倚晴空,山色有无中。手种堂前垂柳,别来几度春风?

文章太守,挥毫万字,一饮千钟。行乐直须年少,尊前看取衰翁。

夜行船 · 忆昔西都欢纵

忆昔西都欢纵。自别后、有谁能共。伊川山水洛川花,细寻思、旧游如梦。

今日相逢情愈重。愁闻唱、画楼钟动。白发天涯逢此景,倒金尊、殢谁相送。

伶官传序

呜呼!盛衰之理,虽曰天命,岂非人事哉!原庄宗之所以得天下,与其所以失之者,可以知之矣。

世言晋王之将终也,以三矢赐庄宗而告之曰:“梁,吾仇也;燕王,吾所立,契丹,与吾约为兄弟,而皆背晋以归梁。此三者,吾遗恨也。与尔三矢,尔其无忘乃父之志!”庄宗受而藏之于庙。其后用兵,则遣从事以一少牢告庙,请其矢,盛以锦囊,负而前驱,及凯旋而纳之。

方其系燕父子以组,函梁君臣之首,入于太庙,还矢先王,而告以成功,其意气之盛,可谓壮哉!及仇雠已灭,天下已定,一夫夜呼,乱者四应,仓皇东出,未及见贼而士卒离散,君臣相顾,不知所归。至于誓天断发,泣下沾襟,何其衰也!岂得之难而失之易欤?抑本其成败之迹,而皆自于人欤?

《书》曰:“满招损,谦得益。”忧劳可以兴国,逸豫可以亡身,自然之理也。故方其盛也,举天下之豪杰莫能与之争;及其衰也,数十伶人困之,而身死国灭,为天下笑。夫祸患常积于忽微,而智勇多困于所溺,岂独伶人也哉!作《伶官传》。